• Hi all and welcome to TheWoodHaven2 brought into the 21st Century, kicking and screaming! We all have Alasdair to thank for the vast bulk of the heavy lifting to get us here, no more so than me because he's taken away a huge burden of responsibility from my shoulders and brought us to this new shiny home, with all your previous content (hopefully) still intact! Please peruse and feed back. There is still plenty to do, like changing the colour scheme, adding the banner graphic, tweaking the odd setting here and there so I have added a new thread in the 'Technical Issues, Bugs and Feature Requests' forum for you to add any issues you find, any missing settings or just anything you'd like to see added/removed from the feature set that Xenforo offers. We will get to everything over the coming weeks so please be patient, but add anything at all to the thread I mention above and we promise to get to them over the next few days/weeks/months. In the meantime, please enjoy!

Framed doors WIP

Tiresias

Nordic Pine
Joined
Sep 3, 2020
Messages
618
Reaction score
99
Now that really is strange, as I’ve been doing exactly the same (making a pair of framed doors) over the last few days. I’ve done haunched through tenons.

I didn’t have the choice of doing the grooves first or not – I was using reclaimed timber that already had grooves in it, and I foolishly decided to try and use them. Not my finest bit of thinking.

Needless to say, the existing grooves did not match any of my (admittedly limited) selection of chisels.

There are marking out difficulties if the groove is already there. Not insurmountable, but…. And unless you have a chisel and grooving iron of the same size there is a lot of paring. Well, for me anyway. So having done it the other way it seems likely that cutting the grooves afterwards would be easier.

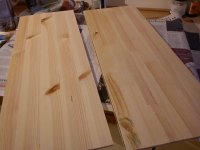
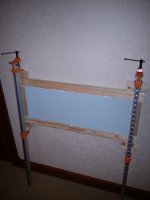
I don’t want to hijack the thread (I may write up a WIP of my own in the unlikely event that anybody is interested), but this is my kit of parts, and this is the first one being glued up (panel and grooves pre finished to avoid a paint line gap if it moves).

DSC05022.jpg

DSC05024.jpg

DSC05032.jpg
 
Tiresias":2n73vf68 said:
.......I may write up a WIP of my own in the unlikely event that anybody is interested......

Yes please. And I'll have some paneled doors to show after the weekend.
 
TrimTheKing":1p3e1zz5 said:
I've split this out into its own thread so as to not hijack AndyT's.

Cheers
Mark

That's one way to force someone to post a WIP! :) :lol: :eusa-clap:
 
Ah, interesting and looking good too.
Bit of a shame having ready made grooves - I do enjoy a bit of grooving when I can!

Can I ask why you chose through mortices? Are they easier to get straight, given that you work from both sides and even out any errors? I chose to hide what I expect will be some fitting which is not quite the best that can be done...
 
AndyT":p34r5hln said:
Ah, interesting and looking good too.
Bit of a shame having ready made grooves - I do enjoy a bit of grooving when I can!

Can I ask why you chose through mortices? Are they easier to get straight, given that you work from both sides and even out any errors? I chose to hide what I expect will be some fitting which is not quite the best that can be done...

You are spot on. That is indeed my rationale – easier to keep them straight. I knew I’d be painting these, so the end grain will be covered up anyway. I suppose it also adds to the strength and resistance to distortion of the joint. And if the fit on the outside is less than perfect, I'll pretend I always meant to wedge the joints...

Actually, I think I find it easier overall to make through tenons, rather than blind ones.

As for the grooving, well, it was already there. It is not, of course, exactly in the middle of the timber, something that is, I suppose, inevitable, but which I only picked up at the last minute – cue some erasing and remarking of face sides. It would have been far simpler to start from scratch.
 
I'm often asked.. I'm sometimes asked... Someone asked me once...

Do you know you wait ages for projects involving framed doors to come along and now you get three at once. Obviously I am not competing with MikeG’s televison cabinet, and I was politely nudged off AndyT’s cabinet thread. I possess neither the energy of the former, nor the knowledge of tools of the latter. Or the ability of either. Very much that last sentence.

So. I am making a larder. It will fit in a press cupboard that is in an internal angle of a Z plan house, surrounded by lots of masonry, and maintaining a pretty constant (low) temperature.
With apologies for the photograph in ‘fuzz-o-rama’ vision this I what I have to work with:
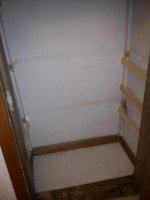
DSC04702.jpg

The eagle eyed amongst you will note (back right hand corner) the use by a previous occupier of blutak as a building material. No doubt that too now forms part of the Listing, and I will have to preserve it.
Whilst it was used by my predecessors as a food cupboard, it was still fitted out as a linen cupboard: 1” by 2” gapped slats. Totally useless for storing jars, bottles and tins. However, it yielded some poor quality but at least dry wood, of which more later.

So here (now being exhibited on the laser display screen) is my CAD layout. And for those at home, here is the mystery voice:
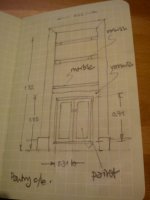
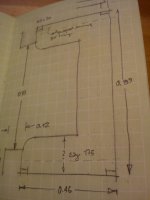
DSC05033.jpg

DSC05034.jpg

The top of the lower portion will be a slab of marble I picked up somewhere. I am hoping to get the rest out of the slats removed or stuff I have otherwise, ahem, recovered.

So I need a face frame (I think that is what it is called) and doors to fit within it.

Some skirting recovered from a skip in the New Town was the base material for the frame. It had a moulding along the top, but a simple half round too large for what I wanted. So, in the words of Edwyn Collins, rip it up and start again.

I wanted a bead on the inside of the frame – better than a square edge if it gets bashed when things are being put into the cupboard. I tried running it in a single piece with the sides. Even did a trial joint.

DSC05040.jpg

Didn't help myself by estimating the mitre by hand.

But, in my hands at least, the Stanley 50 is a capricious beast. And I didn’t have that much wood to work with. So I did the beading separately.

Haunched through tenons, thusly.

DSC05012.jpg

Glued up.

DSC05014.jpg

And trimmed.

DSC05047.jpg

The separate beading.

DSC05013.jpg

Dry fitted.

DSC05038.jpg

And now onto the doors. I had got hold of some doors from a defunct IKEA wardrobe or something. Coated in a black lacquer that was vile in the extreme to remove. This sort of thing.

DSC05043.jpg

Already grooved, and the panels were actually solid (albeit staved if that is the right word) wood. In the spirit of optimists every, how had could it be to cut those down to suit. Well, dearly beloved, it would have been much easier not to start from there.

First of all, get rid of the black laquer stuff. Ugh. You can’t even burn the shavings. Then, of course, the groove isn’t any size of chisel or plane iron I have. Then, and I think I have alluded to this earlier, the grooves ain’t symmetrical. So, re-mark everything you have done up to that point.

Through tenons as for the frame, haunched. Hacked out with a 4mm Narex mortice chisel – too small of course, but a 6mm was too wide. Given you are working a bit unsighted within the groove (Get into the groove, boy you've got to prove… Sorry, 80s flash back. Happens.) I actually drilled out much of the waste with this natty little thing someone bought me.

DSC05045.jpg

Oh, yeah, and the tenons. Another gift. Goodness gracious. It really does make it much simpler. Weight of the brass back? Rip cut teeth? Just better? Dunno, but even I looked like I knew what I was doing. OK, that’s maybe a stretch too far.

DSC05044.jpg

Trimming – sort of AndyT’s idea of using other parts to support the router plane, but I used the relevant stiles (oh, I hope I’ve got that the right way round and it’s not a rail) so you’re always referencing off the correct component and correct edge. You can do it this way either on the long side or the short side. Mmm, not sure that is clear, maybe I'll take a photo' later.


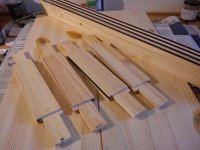
So here we are. Kit of parts.
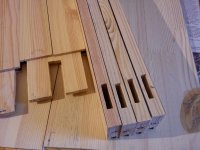
DSC05024.jpg

DSC05021.jpg

DSC05020.jpg

And that is where we came in. A final photograph to show AndyT we are at the same stage.

DSC05037.jpg

And breathe.
 
Very tidy joints, that man. Makes me embarrassed to post my feeble efforts.

Great WIP, thanks
 
I like that a lot.

You're going about it methodically and it all looks straight and neat. You'll end up with something that looks appropriate for an old house. And you'll please Mike by doing it with a minimal tool kit.
 
Tiresias":2u9l4xpf said:
.......So here (now being exhibited on the laser display screen) is my CAD layout. And for those at home, here is the mystery voice:

View attachment 13......

Samantha.............No, no. Not now :D

I've spotted the perfect place for a nice little spot of carving. Above the frame (where it says "varnish") and below the marble top. Go on......you know it makes sense!

-

The easy way to remember the difference is that a fence rail or a hand rail is normally horizontal.

Tell me about your beads, which look great. Are they the same depth as the stiles? And planting on beads is a perfectly legitimate way of working, even in really high end stuff. My coming weekend is going to involve a fair amount of bead making, mitre-ing, and gluing in place.
 
Tiresias":2jvlcfxn said:
.......Oh, yeah, and the tenons. Another gift. Goodness gracious. It really does make it much simpler. Weight of the brass back? Rip cut teeth? Just better? Dunno, but even I looked like I knew what I was doing. OK, that’s maybe a stretch too far.

View attachment 4.......

Is that one of mine?
 
RogerS":1t2lhrpy said:
Very tidy joints, that man. Makes me embarrassed to post my feeble efforts.

Great WIP, thanks

Very kind of you to say so RogerS. These are the first tenons I have cut that go into a groove, although I did do some haunched ones for my workbench legs, and have done through tenons for some shelves.

Pine is a very forgiving wood, I find. A good job too.
 
AndyT":2q0k3g85 said:
I like that a lot.

You're going about it methodically and it all looks straight and neat. You'll end up with something that looks appropriate for an old house. And you'll please Mike by doing it with a minimal tool kit.

Thank you AndyT. I'm bound to mess it up sooner or later though. Adding character I call it.
 
Mike G":2cjfzidw said:
I've spotted the perfect place for a nice little spot of carving. Above the frame (where it says "varnish") and below the marble top. Go on......you know it makes sense!

Umm. Carving. The only thing I have ever done is marking the legs on my bench with roman numerals. Straight lines. Nah, I'll claim it is not my aesthetic, and get out of it that way.

Mike G":2cjfzidw said:
Tell me about your beads, which look great. Are they the same depth as the stiles? And planting on beads is a perfectly legitimate way of working, even in really high end stuff. My coming weekend is going to involve a fair amount of bead making, mitre-ing, and gluing in place.

Beads cut out of a plank of the same skirting board as the frame. First one marked with pencil so I could see when I had got the peak of the bead to the same level as the surface of the wood, then depth stop set on the 50 for the rest. Sawn off, and planed down to the right width.

So yes they are the same depth as the stiles. Is that wrong?

The 50 is a temperamental thing though. I abandoned using the little lever, and just tapped the iron (5/16 if I remember) to adjust. And ran off about twice what I needed so I could cut around the worst tearout.

To be honest I'm not sure I wasn't happier doing beads with a sharpened screw in a bit of wood followed up with a rebate plane. However, god loves a trier, I'm told.
 
Mike G":2tyvwxm7 said:
Tiresias":2tyvwxm7 said:
.......Oh, yeah, and the tenons. Another gift. Goodness gracious. It really does make it much simpler. Weight of the brass back? Rip cut teeth? Just better? Dunno, but even I looked like I knew what I was doing. OK, that’s maybe a stretch too far.

View attachment 4.......

Is that one of mine?

Not unless you were moonlighting at Flinn Garlick.
 
Ahhhh....that's it! I recognised the saw nuts........and I buy mine from Flinn Garlick.
 
Tiresias":2n6sc0yo said:
......So yes they are the same depth as the stiles. Is that wrong?.....

Not at all. It's just that the photo you showed of them made me think they were thinner. I think with drawers the cock bead was often the full width of the top of (the depth of) the drawer front, if you follow, but the sides and bottom sat in a rebate. I'm going to do my TV cabinet doors using a rebate all round, but I've never done that before.
 
Well, just in case you think I have been slacking.

(Actually I was taken unawares by AndyT's extraordinary burst of pace. I'd thought I could laze about and still beat him). Credit to you, Andy.

Call me indolent, call me lazy, call me slothful. And you'd be right.

So I've glued and trimmed the doors.

DSC05066.jpg

Made some shelves (out of the previous rubbish wood slats in the cupboard).

And we are getting there.

DSC05069.jpg

Next: hinges, stops, catches and a tricky detail between the face frame and the base of the lower stage - the house moves a lot, so the door opening has to be isolated from the structure. I should never have done that engineering degree.

More later. (If anyone is remotely interested).
 
That's looking really nice, but I have to ask - if those two black dots on the inner stiles are holes for handles, they don't quite line up perfectly. Indeed, it could even be a big enough discrepancy for a non-woodworker to spot... ;)
 
AndyT":3dgp01ry said:
That's looking really nice, but I have to ask - if those two black dots on the inner stiles are holes for handles, they don't quite line up perfectly. Indeed, it could even be a big enough discrepancy for a non-woodworker to spot... ;)

Oh, golly. Well, did you evah?

Taken in the spirit it was meant.

Reusing old wood with preexisting holes. Plugs are being made.

Although I am tempted to spout some rubbish about asymmetry being the new symmetry.
 
Yes indeed, but don't forget to put something in about the exercise benefit of bending down to reach handles fitted just above the floor level... :D
 
Andyp":3c2c4ajh said:
I’m confused as to why it is necessary to have a cupboard inside a cupboard.


I think it's for the secret blend of herbs and spices! :D
 
Andyp":1bj56boo said:
I’m confused as to why it is necessary to have a cupboard inside a cupboard.

Well, ‘necessary’. Hmmm. It isn’t necessary to cook one’s food. More pleasant though, isn’t it.

In the spirit of jollity (never understood why that is derived from Jove, who was a bit of a whatsit if I recall) here are my reasons. Most cogent first and last.

• The larder is across the short hall from my kitchen. I leave the outer door open to save time. Not all the things in my larder (brine bucket) would please guests wandering past. So a cupboard door is good.
• Have you never put something in a box, and then in a drawer. Same thing.
• Look at any period secretaire or bureau: cupboard doors behind doors.
• Матрёна. Same thing. Really.
• Where else would my house elves live.
• In the words of Neo: ‘Because I choose to’.

Just my view.
 
This build is looking good, as a cook and woodworker that spice rack is very appealing 8-)

I love our larder. House built in 1965 and pretty much every house on the estate has had them ripped out which is such a shame. Built under the stairs in the higher part, the lower part under the stairs is accessed from outside and makes a perfect wine cellar for homebrew!
 
chataigner":17hj9n3m said:
Like the doors.
Also like the large selection of herbs and spices in rack in your last picture.
Who's the cook - you ?

Chief cook and bottle washer. Guilty as charged.

Mostly spices actually. The only dried herbs I use with any regularity are oregano/rigani/marjoram and thyme. There was a rigourous cull (possibly a cull-pepper. Culpeper. NIcholas Culpeper. Herbalist. Oh, suit yourself, then) of spices to make them fit in the rack. For example I don't think I have used amchoor powder for quite some time. Kokum is a bit of a slow seller too. So they are amongst the things I leave hidden in less accessible areas of the larder.
 
Andyp":1tjmoozu said:
Fair enough, although I googled Матрёна and I am none the wiser :)

It's a name for the Russian nesting dolls. Possibly more familiar in the diminutive матрёшка, erm, Matryoshka I believe. Been decades since I spoke,read or wrote Russian. I was just being silly.
 
Tiresias":2bj9lqu2 said:
.... a rigourous cull (possibly a cull-pepper. Culpeper. NIcholas Culpeper. Herbalist. Oh, suit yourself, then) of spices...

You'll fit in well here! :lol: - Rob
 
Mike G":w9ekn10r said:
Why does your house move a lot?

It is a sort of seasonal shimmy. Age and non-standard construction.

Rather like AJB I've had problems resulting from putting photographs of my gaff on open fora. I'll send you a pm if you are interested.
 
MattS":hai7te9u said:
This build is looking good, as a cook and woodworker that spice rack is very appealing 8-)

I love our larder. House built in 1965 and pretty much every house on the estate has had them ripped out which is such a shame. Built under the stairs in the higher part, the lower part under the stairs is accessed from outside and makes a perfect wine cellar for homebrew!

Thank you MattS. I do like a good larder.

I'm having difficulty in envisaging your arrangement, but a constant low temperature is a good thing.

I have some flats in the New Town that were converted in the 70s. At that time the Dean of Guild insisted on an externally ventilated food cupboard for all kitchens. I am told It was regarded as daring then to suggest it could be replaced by a refrigerator.
 
Tiresias":6scp86lu said:
......Rather like AJB I've had problems resulting from putting photographs of my gaff on open fora. I'll send you a pm if you are interested.

The only problems Adrian has had is from his wife ;) :lol:

Yes please. Always interested in a non-standard construction.
 
Back
Top