• Hi all and welcome to TheWoodHaven2 brought into the 21st Century, kicking and screaming! We all have Alasdair to thank for the vast bulk of the heavy lifting to get us here, no more so than me because he's taken away a huge burden of responsibility from my shoulders and brought us to this new shiny home, with all your previous content (hopefully) still intact! Please peruse and feed back. There is still plenty to do, like changing the colour scheme, adding the banner graphic, tweaking the odd setting here and there so I have added a new thread in the 'Technical Issues, Bugs and Feature Requests' forum for you to add any issues you find, any missing settings or just anything you'd like to see added/removed from the feature set that Xenforo offers. We will get to everything over the coming weeks so please be patient, but add anything at all to the thread I mention above and we promise to get to them over the next few days/weeks/months. In the meantime, please enjoy!

Games & Card Table (complete)

Oh my goodness me........you've got nerves of steel. I took a Forstner bit to a finished piece today, on the pillar drill, and it took me half an hour to pluck up the courage. To stick one into a veneered top like that, hand held.......! Nightmare.

Absolutely stunning stuff (although I don't like the red). There are some bonuses to being an autodidact, but I've certainly missed out on veneering. Watching a pro doing it gives me huge pleasure..........and kittens, at the same time.
 
Oooo.... 'Autodidact'.... I've just leant a new word!

Thanks Mike, I was poised with the 40mm forstner... Just incase I (goofed) had to go up a size [emoji51]

Sent from my moto g(7) plus using Tapatalk
 
Wow! That is stunning Jim. It would never have crossed my mind to attempt to wrap veneer around a solid edging strip that way, and I love the mix of traditional and modern design. Fabulous work!

And wot Mike said about drilling the centre hole with a hand held forstner bit! :o Balls of steel! :lol: Glad it worked out for you. I think I would have been tempted to drill the hole in a piece of scrap MRMDF first and clamp it (or double sided tape it) in place in the final position as a guide to stop the forstner bit wandering. Belt and braces and all that! It's a technique I've used to cut holes and plugs when I haven't been able to get to a pillar drill.
 
Wicked work as always Jim!

It's great to see somebody doing this kind of work and earning a crust from it

Please keep posting!

Jonathan.

Sent from my SM-J530F using Tapatalk
 
RogerM":g69z3lhe said:
Wow! That is stunning Jim. It would never have crossed my mind to attempt to wrap veneer around a solid edging strip that way, and I love the mix of traditional and modern design. Fabulous work!

And wot Mike said about drilling the centre hole with a hand held forstner bit! :o Balls of steel! [emoji38] Glad it worked out for you. I think I would have been tempted to drill the hole in a piece of scrap MRMDF first and clamp it (or double sided tape it) in place in the final position as a guide to stop the forstner bit wandering. Belt and braces and all that! It's a technique I've used to cut holes and plugs when I haven't been able to get to a pillar drill.
Thanks Roger, in hind sight it probably was a little wild [emoji16], a jig or router would definitely be a more sensible idea or one of those mobile drill, drilling rig attachments I've seen some use

Sent from my moto g(7) plus using Tapatalk
 
Jimmy Mack":1jqt9wlr said:
....Thanks Mike, I was poised with the 40mm forstner... Just incase I (goofed) had to go up a size ...

The problem with that is that the first goof-up might have stuffed up the centre-point, and to try to start a Forstner on its rim, without the centrepoint biting first, would have been a catastrophe. So you'd have had to drill out with say a spade bit, smaller than the first Forstner, insert a plug, re-find the centre, then attempt your bigger size Forstner...........knowing that if that one didn't work you'd be going through that all over again with an even bigger Forstner. Too much angst!!
 
Jonathan":2rj9uxed said:
Wicked work as always Jim!

It's great to see somebody doing this kind of work and earning a crust from it

Please keep posting!

Jonathan.

Sent from my SM-J530F using Tapatalk
Thanks Jonathan, earning a crust? [emoji848]...well, I'm...err ...not sure about that [emoji51], these pieces do tend to become a labour of love.... Back to building 'bread winner' boxes soon ...a wardrobe and some book-casing then I can buy the middle bit of the pizza to go with that crust [emoji6]

Sent from my moto g(7) plus using Tapatalk
 
Ha! Indeed!... I've still to get the router out and try not to mess up the perimeter string and burr Oak lipping today ...eek! Then there's sanding through.... Or messing up the finish potential.... No turning back now, I'm mid tight rope.

I'd probably of switched across to a router and template (the sensible route in the first place!) if the hole needs to go up tho, Roger's method above is a good way to go up sizes when you've lost your centre point or indeed have no centre at all... handy for lots applications


Sent from my moto g(7) plus using Tapatalk
 
Mike G":eyz0pnd1 said:
Jimmy Mack":eyz0pnd1 said:
....Thanks Mike, I was poised with the 40mm forstner... Just incase I (goofed) had to go up a size ...

The problem with that is that the first goof-up might have stuffed up the centre-point, and to try to start a Forstner on its rim, without the centrepoint biting first, would have been a catastrophe. So you'd have had to drill out with say a spade bit, smaller than the first Forstner, insert a plug, re-find the centre, then attempt your bigger size Forstner...........knowing that if that one didn't work you'd be going through that all over again with an even bigger Forstner. Too much angst!!

You just need to drill through a bit of scrap first and clamp in it the correct spot and it will guide the forstner perfectly!

In fact, I would have been tempted to do it this way on a piece like this anyway, I'm not a brave as Jimmy
 
Ok, now you lot have me wondering about my plan to use this *hole saw to sink the four (playing) chip cups [emoji848]

EDIT *"Workzone" by Aldi

5f0065f2e06229442478ca4eb8abb8ea.jpg


Sent from my moto g(7) plus using Tapatalk
 
:text-bravo:

Bloody lovely work mate and very glad you're sharing it with us on here, despite telephony submergence... :eusa-doh: :lol:
 
I would take a piece of scrap and drill a hole the same size as the pilot drill on the hole cutter.
Drill the same size hole in the table 15-20 mm deep. Use the shank of the drill to align the scrap and the table. Take a second piece of scrap and put it under the table if you plan you hole to go all the way through.
Clamp up the sandwich of scrap-table-scrap securely. Say prayers and drill all the way into the lower scrap and maybe all the way through the lot. Rinse and repeat with fresh scrap for each hole.

Do test hole first because one those hole saws don’t drill accurately to the marked size. You have a little wriggle room due to the lip on the cup which is an advantage.
If there much of a gap, wind a narrow strip of tape round circumference of the cup just under the rim until it is a nice self retaining fit. Then invert the table and backfill with epoxy to secure it. The tape will remove the risk of epoxy leaking through and marring the top surface.

I did a very similar job with tea light holders a couple of years back

HTH
Bob
 
Will those cups be removable by pushing through from the underneath? If not how are you going to clear out the base of the hole?
Whether drilling right through or not is investing in a forstner bit for those holes out of the question? tear out from those hole saws can be awful.
 
I bought Axminster drill guide to hog out the mortises of my framing.

While the principle appears OK, the axminster one has too much play in it. It's very sloppy. I don't know if the Wolf or Rutlands versions are any better.
 
Some top tips chaps, thank you. The hole saw cuts a perfect snug hole; friction fit. There's only 20mm of material to go through so the plan will be along the lines of...

• Remove top from legs.
• Cut template with the hole cutter
• Clamp template in place
• Cut 25mm access hole for a shear cut, bottom bearing router cutter to drop in and do the deed.

The cups have a turned over lip so will sit proud by 2.5mm and cover any line in the hole. These will be removable for cleaning maintenance; a simple push from the underside.


Screen Shot 2019-11-07 at 18.53.18.png

I cut out the octagon and test fitted today with some scrap to form the perimeter cap, this has some (really sticky!) self adhesive T. O. Olstation & Sons draft brush on the inside to take up the 3mm tolerance and make for a squeaky fit. :eusa-dance:

IMG_20191107_112917498.jpg

IMG_20191107_113546881.jpg

IMG_20191107_114532455.jpg

I've cut some holes to receive the tops of the cups, they'll be some felt pads too. I might line the cup holes with baize :eusa-think: -too much ? [emoji38]

IMG_20191107_145239286.jpg
 
I like the baize touch. I've started putting it on the base of my wooden tea light holders.

(Been using up offcuts of the larch of my post and beam frame)
 
Lippings with Ebony detail added (mini, rebate, insert
4x4mm string, plane, router trim).

6813fd41f883793f46e56ceb0dfd464d.jpg


The top is lipped.... this was a slow and labourious process [emoji3061]... And quickly dulled and caked my TS blade cutting the ply mitres... Think Smokey fresh ply aromas ....I was reluctant to drop the tooth count for fear of wrecking the burr.... Any tips? Thoughts?

ca2590e1c29d379ee3df26ca012f7a91.jpg
90b8a1e249e800d26b47ac1213b1ddfb.jpg
cc1290d25cfec697b6739df7e94c6dd8.jpg
383f5f1e7b94609b2a3ad3fc4dbb4cc0.jpg


Now to softly, softly clean up and not wreck the show [emoji51]
c7a5cdb49c81a718b9d32f54e2c06e54.jpg


Sent from my moto g(7) plus using Tapatalk
 
Malc2098":23kt9ddk said:
I like the baize touch. I've started putting it on the base of my wooden tea light holders.

(Been using up offcuts of the larch of my post and beam frame)
Here's the baize, I'll be using, picked by the customer..... First dealings with this company, and the service and advice has been excellent. Lovely fabrics too

https://www.baizewoolfabrics.co.uk/prod ... -pale-sea/

(Ps...No affiliation)

Sent from my moto g(7) plus using Tapatalk
 
Just caught up this WIP. I can say no more than what has already been said.
OUTSTANDING
It is, without doubt, a pleasure to watch a true craftsman. :text-bravo: I shall continue to make all sizes of kindling, and loads of sawdust. Truly inspiring.

bill
 
fiveeyes":39gen483 said:
Just caught up this WIP. I can say no more than what has already been said.
OUTSTANDING
It is, without doubt, a pleasure to watch a true craftsman. :text-bravo: I shall continue to make all sizes of kindling, and loads of sawdust. Truly inspiring.

bill
Too kind Bill, you're making me blush.

I have a large pile of kindling too... And I've not mentioned my first games octogan was too small as I measured the width of the flat sides but marked these as the points! (that probably makes no sense).... ... Any ideas for a lovely Oak octogan on ply let me know [emoji23]

0081338ac274d7264bcf4b1c6546383b.jpg


Oh ...and here are a some coopered toes I made...too big.... What was I thinking ?! [emoji2359]

3738da7904b2a68ba02490a2d28389b7.jpg


Jnr will be getting some bridges for his train set from Santa [emoji16]


But we won't tell anyone it can be our secret


Sent from my moto g(7) plus using Tapatalk
 
9fingers":3nrzdkg0 said:
Ouch! I just saw the price

"£114.95 - £149.95 / m inc. VAT"

Is that per mile rather than metre? [emoji38]

Bob
[emoji23] true... It's good gear though, ever if I can't afford it myself

Sent from my moto g(7) plus using Tapatalk
 
The top is lipped.... this was a slow and labourious process [emoji3061 said:
... And quickly dulled and caked my TS blade cutting the ply mitres... Think Smokey fresh ply aromas ....I was reluctant to drop the tooth count for fear of wrecking the burr.... Any tips? Thoughts?
/quote]

Jim....I use a sharp rip blade on the slider for all my cross cutting of solid timber....I find too many teeth and the charf can't clear......I generally use the rip blade for everything except MFC and MDF.

Ps....my blades are 300mm diameter, don't know what the results would be with a smaller diameter.


Sent from my SM-J530F using Tapatalk
 
A few shots of the baize going on, I was pretty nervous doing this and the fabric (real wool) wasn't cheap. It's not something I've much experience with either. If anyone does have any experience laying baize do chip in.

First job was to mask up with a cheap 'rag'

6a2542d46614ad15a15f535fb8789a63.jpg
a6b2afc69343541bd395a6570a28a3e6.jpg
eabfc873bd63fdd89bedc6bcb93f9792.jpg
5be80aee80bcd7fbb01206a71141a420.jpg


I rolled baize onto the tube it arrived on and rolled it out onto the contact adhesive like you would when applying a pastry top to a pie

Once down I used a decorators foam mini roller to flatten out into the adhesive

Then a trim with 10mm excess, a tuck, trim and final trim

fc002734622b227cfd6a1bfd700f6061.jpg
de8adf2ea1fb65fffa0409c8fa99c107.jpg


4136e853f355614c4f476aae402ac04d.jpg


And here with the chip cups popped in place. These weren't too bad to install, though I did have to notch out a bit of the top of the legs, which was a pain.


4c8d100b76bd0f647217d6766aa0b57e.jpg


Now to wrap it up away from harm.

Jim

Sent from my moto g(7) plus using Tapatalk
 
Hang on a sec......how does that work? Where have the half-hidden card inlays gone?
 
Mike G":2jwyym5g said:
Hang on a sec......how does that work? Where have the half-hidden card inlays gone?
It's drying...

581d016d225d064005aa9b01b9432924.jpg


This is it with the first coat, I was going to go with Roger's method using the RAW + 3032... But learnt that RAW works by using a white pigment, which would of messed up my Black's and Ebony details (milky)

So I've continued with wax oil for maximum chatoyance.... Though it will golden over time, which I feel will look quite ok/ mellow with the Oak ( Mike, I think you mentioned the finish tones being more similar/ relaxed / mellow in your earlier comment, when I popped up the drawings).

For clarity the card top pops on-top of the baize top, here's the test fit from an earlier post with the gash ply edging

ce05807004e8aa850e1e4053a30adce6.jpg


I've made a stand kit which lives underneath... Photos soon

Sent from my moto g(7) plus using Tapatalk
 
Amazing project and can only echo all the other superlatives already posted :)

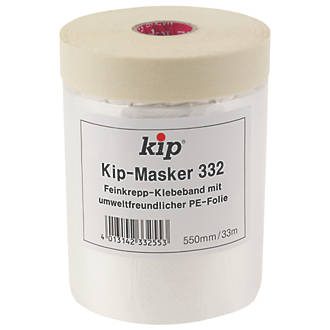
One small suggestion get some of this stuff from screwfix for masking wide areas
ae235


https://www.screwfix.com/p/kip-drop-clo ... -33m/9004g

Comes in different widths and the polythene has a nice static cling to whatever you stick the tape to. I used 3 different widths during some recent redecorating and was impressed with it. Tape is probably not as good as the best painters tape but it all came off clean without tearing and sealed fine at the edge.
 
Robert":3qlh2qr7 said:
Amazing project and can only echo all the other superlatives already posted :)

One small suggestion get some of this stuff from screwfix for masking wide areas
ae235


https://www.screwfix.com/p/kip-drop-clo ... -33m/9004g

Comes in different widths and the polythene has a nice static cling to whatever you stick the tape to. I used 3 different widths during some recent redecorating and was impressed with it. Tape is probably not as good as the best painters tape but it all came off clean without tearing and sealed fine at the edge.
Interesting, Robert, that would of been very useful, and I like that it appears to have no adhesive; working off static.

Thanks

Sent from my moto g(7) plus using Tapatalk
 
Yes. It's 1/2" masking tape with a static skirt. I liked the way it stayed put and didn't blow about despite being very thin polythene.
 
Robert":13bja3cy said:
Yes. It's 1/2" masking tape with a static skirt. I liked the way it stayed put and didn't blow about despite being very thin polythene.
Ah, I get it now [emoji106]

Sent from my moto g(7) plus using Tapatalk
 
Jimmy Mack":176u506o said:
This is it with the first coat, I was going to go with Roger's method using the RAW + 3032... But learnt that RAW works by using a white pigment, which would of messed up my Black's and Ebony details (milky)

Yep. The Osmo raw is great on pale timbers but it would have made that lovely ebony go grey, and it is too complex a shape to mask off in this case. When you say you've used a wax oil, do you mean standard Polyx or Top Oil? Whatever - it's looking great!
 
Thanks Roger, It was a shame, the QTR Sycamore sample was looking good, it wasn't overly muting the ripples of the Sycamore too much and I might of got away with it on the Ebony strings, but the Club, Spade and drop shadows would of lost their punch as it 'greyed', left a milky appearance on a sample of black veneer (dye'd Tulip wood/Poplar) and you're right, the masking would of been way too complex

3032 Satin Matt Polyx classic, all the way.

I'm getting a very 'groovy' effect, as the random orientation of the veneer panels appear to turn on and off as you walk around the table with light absorbance and reflection changes.

Sent from my moto g(7) plus using Tapatalk
 
Back
Top