• Hi all and welcome to TheWoodHaven2 brought into the 21st Century, kicking and screaming! We all have Alasdair to thank for the vast bulk of the heavy lifting to get us here, no more so than me because he's taken away a huge burden of responsibility from my shoulders and brought us to this new shiny home, with all your previous content (hopefully) still intact! Please peruse and feed back. There is still plenty to do, like changing the colour scheme, adding the banner graphic, tweaking the odd setting here and there so I have added a new thread in the 'Technical Issues, Bugs and Feature Requests' forum for you to add any issues you find, any missing settings or just anything you'd like to see added/removed from the feature set that Xenforo offers. We will get to everything over the coming weeks so please be patient, but add anything at all to the thread I mention above and we promise to get to them over the next few days/weeks/months. In the meantime, please enjoy!

Games & Card Table (complete)

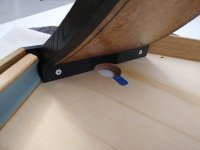
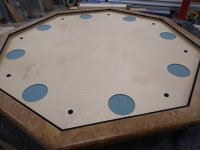
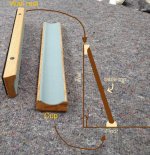
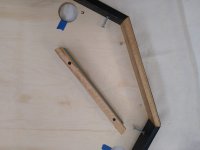
A couple of last pics showing assembly details and the stand, which is more of a prop support /rest to park the table top when the games surface is in use. Using a furniture pad (wall) and rubber feet (floor), they kind of remind me of old school board rubbers, might be the 'Pale Sea' colour :D They attach with magnets and park underneath in one of four openings. The cove was cut on the tablesaw and the rest was done on the router table. ebony plugs to conceal the magnets.
IMG_20191116_140420477.jpg

IMG_20191118_134556942.jpg

IMG_20191118_134603998.jpg


IMG_20191118_134818160.jpg

IMG_20191117_150612561.jpg

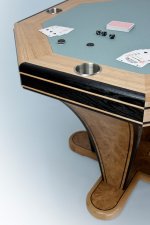
I've some posh pictures of the finished piece, but I'll post these next week after delivery Tuesday. Here's a finish detail in the meantime. I estimate I've spent around 300 hours banging my head on this project...there'll be a brief moment of euphoria when its delivered before moving onto a loft wardrobe... kind of a relief to get back to some "boxes wiv hinges on"!
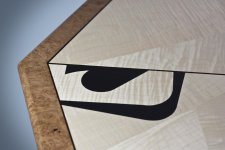
image 19.jpg
 
That looks absolutely magnificent. I'm hugely impressed, but not in the least surprised at how this has turned out. I'd love to know how much your client was prepared to pay for that (I'm not asking, it's none of my business)....but 300 hours is a bloody lot of hours.
 
That is fabulous Jim. Hopefully we'll get some piccies of the piece in its final position? Your client should be absolutely delighted! Thanks for a great write up.
 
Truly magnificent ! I trust your client will be suitably impressed - I certainly am.
Delighted to see that youve also got some quote "posh pictures" - a piece like this deserves some professional photography for the record (and your portfolio).
 
Thank you for all the kind comments. It's been challenging but a lot of fun along the way. I feel very grateful to have been commissioned for such a piece; it's a rare thing.

A few things I'd do differently and parts that I'm not too keen on of course ...always easy to be self critical. For example, theres a slight telegraphing of the spray contact adhesive through the baize, so I'd probable go for a more traditional application of the contact adhesive next time and maybe the toes should of been octagonal :eusa-think: ...little details. All in, the client is happy and there were no bumps on delivery; which is a relief :)

Now delivered I'm happy to share final pictures from last week - Thanks again - Jim

JSMcKay3.jpgJSMcKay14.jpgJSMcKay16.jpgJSMcKay20.jpgJSMcKay12.jpgJSMcKay.jpg
 
Oozes class and talent from its every pore........
 
It's nice to know that there are still craftsmen around who can produce stuff of such high quality AND take the time to share the whole build process here. Thankyou.
 
I would like to echo the thanks expressed above for documenting this - I will never achieve this level of craftsmanship, but it is fascinating to see it done! :eusa-clap:
 
Gosh!.... What lifting and generous comments; not quite sure what to say. Thank you.


My main goal is to share some knowledge back, keep the skills alive and most importantly encourage others to have a go, especially with the veneering, laminating and marquetry which with a bit of practice can open up a whole avenue of creativity. Plus it's pretty affordable and doesn't require an armoury of tools or a lot of space.

Many thanks again,

Jim

Sent from my moto g(7) plus using Tapatalk
 
Fabulous piece, Jimmy, and a great write-up.

Am I right in saying that you used heat to bend that ebony ?
 
RogerS":1q8gbspn said:
Fabulous piece, Jimmy, and a great write-up.

Am I right in saying that you used heat to bend that ebony ?
Thanks Roger.

Yes, I used heat to bend the 3x3mm around the toes. I used a heat gun clamped in a vice, gently exposing to the heat and bending by hand, I had a few snap failures and it was easy to twist. A better set up might be a section of metal pipe (3" dia), as a former. with a blow torch inside, I think this is how Luthiers bend and shape their guitar body binding

Sent from my moto g(7) plus using Tapatalk
 
What everyone else says! :text-+1:

I've been re-reading this Jim, and I was wondering whether you have any worry that the joints in the lipping around the edge of the Octagon might be prone to damage? As I understand it, they have veneer wrapped around them which looks brilliant, but was just wondering whether the points of the corners might be more damage-prone as veneer rather than if solid?
 
RogerM":25bisavl said:
What everyone else says! :text-+1:

I've been re-reading this Jim, and I was wondering whether you have any worry that the joints in the lipping around the edge of the Octagon might be prone to damage? As I understand it, they have veneer wrapped around them which looks brilliant, but was just wondering whether the points of the corners might be more damage-prone as veneer rather than if solid?
Thanks Roger, very kind

Fingers crossed. Ha! ...Tbh I think they'll be fine with the piece being more decorative than utility. Once layed, the Oak Burr is surprisingly very hard, perhaps the complexity of the fibre orientation? It was tricky cutting them, as slightly out of length and I got a step at the joint and potentially revealing the substrate on dressing the corner. So I arissed/ dressed the corners by tapping (compacting) with a pin hammer and light finish sand. Seemed to be enough to soften things up at the joint

If that makes sense.

Sent from my moto g(7) plus using Tapatalk
 
Back
Top