• Hi all and welcome to TheWoodHaven2 brought into the 21st Century, kicking and screaming! We all have Alasdair to thank for the vast bulk of the heavy lifting to get us here, no more so than me because he's taken away a huge burden of responsibility from my shoulders and brought us to this new shiny home, with all your previous content (hopefully) still intact! Please peruse and feed back. There is still plenty to do, like changing the colour scheme, adding the banner graphic, tweaking the odd setting here and there so I have added a new thread in the 'Technical Issues, Bugs and Feature Requests' forum for you to add any issues you find, any missing settings or just anything you'd like to see added/removed from the feature set that Xenforo offers. We will get to everything over the coming weeks so please be patient, but add anything at all to the thread I mention above and we promise to get to them over the next few days/weeks/months. In the meantime, please enjoy!

Gap filling between floorboards

Windows

Old Oak
Joined
Jan 25, 2022
Messages
1,433
Reaction score
433
Location
Cumbria & West Kent
If you were to be prepping an old wooden floor for painting with sizeable & variable width gaps between the floorboards (2mm to 9mm), and you were tasked with filling the gaps between the floorboards, what would you use to fill the gaps?

A few options I’m aware of:

1. natural rope/twine
2. wood strips/wedges/slivers
3. cork strips
4. foam rubber strips
5. plastic strips
6. newspaper
7. flexible sealant
8. rubber spline

The first two seem worth considering to me, but maybe there’s some option I’ve missed.
 
traditionally they'd have been caulked. much like a ships hull were a tar coated twine is hammered between the boards or a clean twine was hammered in the act as a backer and then the caulk was added. it's messy and takes for ever but the latter of these would be my suggestion with foam backer rod and a caulking gun it shouldn't be to messy.

https://www.sealantsandtoolsdirect.co.u ... 0mm-back10

you can get caulk to sort of match your boards or use black.
 
I’ve done the strips of wood approach on a couple of floors. It is time consuming and hard work (lots of planing and sanding unless you can manage to get each strip level with the finished floor).

It did look good and lasted for years so it’s probably my go to method although I wouldn’t want to do another one now!
 
Like Stuart, I've cut tapered strips to fill in gaps on a very small area (one landing, much abused by plumbers and electricians).
It was laborious work that I wouldn't hurry to repeat. If you can arrange for strips to be cut and trimmed right next to you, that will help. Otherwise cut a variety of sizes and work in batches.

One other option was adopted by a friend. He had big gaps in a floor he wanted to sand and varnish. Rather than fill the gaps, we lifted all the boards and relaid them tight. This felt like less work and it gave us the opportunity to put right other problems of worm damage, old patches etc.
 
20220824_120003.jpgDepends also on the look you are after. Yes the most favoured way is to pull them up and re lay the boards clamping them up tightly and fill in the last gap. Skirting off etc etc PITA!
If you want a smooth surface then I don't think anything other than tapered strips glued in will give you that. Any caulking filler will shrink or sink over time. I have successfully used cheapo water based frame seal on these which was easy as the boards were already varnished and so it could be wiped off. This has maintained the look of original boards very well but there's no way I could have got a level surface for painting.
 
Raymedullary":ev5gwc3m said:
Yes the most favoured way is to pull them up and re lay the boards clamping them up tightly and fill in the last gap.

And cross your fingers tightly that you don't have much seasonal movement.
 
I used tapered strips. I cut a pile of them covering the main gap sizes and lengths and then planed them on site if they were not quite right. Took me ages, daughters house so no pay!
 
Raymedullary":12st6xhx said:
...... I have successfully used cheapo water based frame seal on these .....

What's this, Ray?
 
It's a brown coloured own brand acrylic (water soluble) based frame sealant from a VERY well known (often located on industrial estates) supplier of tools, electrical fittings, plumbing fittings, paint and safety equipment.
It's a low cost option sealant but other products within this brand, in my experience, outperform or are equal to more costly branded products. Therefore for the purpose for which I put it to I would highly recommend it!
 
Thank you. I think we’ll go for the wood slivers. The boards are in good condition and very stable as you walk on them, so I don’t want to risk that by pulling them all up and relaying in this case. Making the wood slivers sounds like a bit of work, but doable.

It’s raining today, but we’ve had such a run of hot dry weather, I’m thinking the boards must be quite dry and the gaps therefore at close to their largest. Is this a good time to do the slivers? The carpet has been up for 3 days so far.
 
Wise choice in my opinion. I have gone down the pulling them up and re clamping route but its a pain and as you say the chance of damaging the boards especially pulling out rusted 2inch cut nails is high. In theory the best time would be after a spell of dry weather but I would say that any movement issues are now going to be so minimal as to make no real difference.
If you have a tablesaw then cutting the tapered strips is not too difficult. Make the taper quite slow to maximise contact.
 
Raymedullary":1caxprjs said:
It's a brown coloured own brand acrylic (water soluble) based frame sealant from a VERY well known (often located on industrial estates) supplier of tools, electrical fittings, plumbing fittings, paint and safety equipment....

Thanks. I've done the same. There are a couple of points to watch: firstly, the sealant should be reasonably "low modulus" such that it remains flexible rather than drying out and then splitting as the boards shrink. Secondly, that you work neatly. Smearing it all over the boards isn't a good look!
 
I’ve put some wood slivers into the gaps and have planed them level.

Except in some cases they’re only level with one board and there’s a step on the side of the other board if it’s lower.

Should I:

1. Use a narrower plane (been using a block plane - don’t have a smaller one)
2. Use a chisel (have plenty of chisels including narrow ones)
3. Something else

What do you think?
 
Personally in that situation I'd probably use sandpaper wrapped around a scrap of 3x2. If the step is too big to be dealt with by that, then it's probably too big to fair in nicely without re-seating the floorboards.
 
Well the floorboards will have started out the same thickness and I think that the high one could be pulled down which should alleviate the problem but you will need to watch out for pipes and wires. Special very small head screws will do it, better than nails which can squeak after time.
 
Thinking about it, there are two main causes of the height differences:

1. Access holes cut in floorboards for heating or electric are more likely to have a height difference
2. One board cupped U and the other crowned ∩

In the first case, I might be able to lift just the small cut piece (which is usually lower) and re-lay with a shim to raise it.

In the second case, probably sanding the wood strip will be enough. I'm not sure about every case though so I'm curious about the small-head screws. These are solidly laid, rock hard, 1910 floorboards that have cupped. Is that the kind of situation the screws would be a good choice?
 
Small head screws such as Tongue-Tite are designed to pull through. Certainly won't do anything to move an old floorboard into a better position.
 
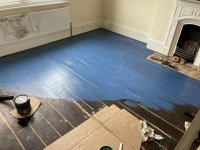
Here’s a picture of the WIP.

E21899B4-FE68-482F-8E53-D2F030F30E4F.jpeg

Many staples and pin nails removed.
A number of nails knocked below surface
Wood strips added to fill gaps between most boards. Glued on one side only.
Wood filler in a few places
Dowels cut and glued to fill large holes
Did end up chisel-adjusting some of the strips so there wouldn’t be a hard edge - quicker than hand sanding.
Hand-sanded boards to provide a key for the paint
Cleaned with sugar soap
Painted with Little Greene wode floor paint
 
Thanks! We’re going for “Kerblammers! Here’s a floor!”, but by the time it’s got furniture & rugs, it’s probably not going to feel too in yer face.
 
I salute your hard work and hope your knees and back are holding up!

Did you not consider getting these guys in?

raboteurs.JPG
 
Back
Top