

Phil
Old Oak
Gnomes - Kabouter
The pattern is downloaded from Steve Good, ScrollSaw Workshop. Steve e-mails a daily pattern which can be downloaded.
https://scrollsawworkshop.blogspot.com
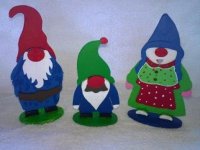
There are a trio of Gnomes.
Father
Mother
Youngster
The patterns are cut out and then mounted onto whatever scrap board is available.
The main figure is cut from 3mm hardboard, the rest of the figures are from 3mm MDF
The board is covered with clear packaging tape. The pattern is then first nested to optimise the board then glued on with some Pritt in a stick.
Also the very small parts are placed where there will be enough board around it for handling and cutting.
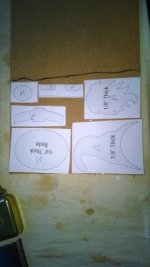
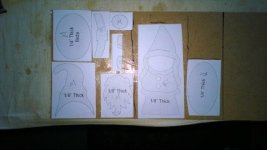


Before cutting, drill all the internal holes for the internal cuts
After cutting only some mild sanding is required. All parts were cut with a #7 blade.
The back of the bodies (rough hardboard side were painted white) The small guy I assembled and glued first, then painted. What a pain in the butt!!!!!!
The 2 larger ones I painted all the individual pieces first before gluing. Much better result.
Painting the small pieces is tricky, so I used a large tweezer to hold them.
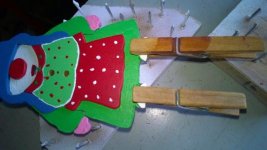
I also have a painting station of scrap wood with a bed of nails on which the piece and lie down and not destroy the paint job!

I have a very small paintbrush and then use the ends of toothpicks for some final touches.
Then comes the gluing together.
For the small one I used superglue, but then reverted back to white PVA glue for the others, doing one piece at a time.
I used some extremely expensive imported clamps for this very small delicate procedure.


And here is the completed family. The colours are what I have in stock and I did a bit of mixing for the lighter green.
Thank you for reading.
Phil
The pattern is downloaded from Steve Good, ScrollSaw Workshop. Steve e-mails a daily pattern which can be downloaded.
https://scrollsawworkshop.blogspot.com
There are a trio of Gnomes.
Father
Mother
Youngster
The patterns are cut out and then mounted onto whatever scrap board is available.
The main figure is cut from 3mm hardboard, the rest of the figures are from 3mm MDF
The board is covered with clear packaging tape. The pattern is then first nested to optimise the board then glued on with some Pritt in a stick.
Also the very small parts are placed where there will be enough board around it for handling and cutting.
Before cutting, drill all the internal holes for the internal cuts
After cutting only some mild sanding is required. All parts were cut with a #7 blade.
The back of the bodies (rough hardboard side were painted white) The small guy I assembled and glued first, then painted. What a pain in the butt!!!!!!
The 2 larger ones I painted all the individual pieces first before gluing. Much better result.
Painting the small pieces is tricky, so I used a large tweezer to hold them.
I also have a painting station of scrap wood with a bed of nails on which the piece and lie down and not destroy the paint job!
I have a very small paintbrush and then use the ends of toothpicks for some final touches.
Then comes the gluing together.
For the small one I used superglue, but then reverted back to white PVA glue for the others, doing one piece at a time.
I used some extremely expensive imported clamps for this very small delicate procedure.
And here is the completed family. The colours are what I have in stock and I did a bit of mixing for the lighter green.
Thank you for reading.
Phil


