Phil
Old Oak
H-R Dust Extraction
The scroll saw is very messy with its fine dust; the blower pipe at the top also blows all the dust directly at you. Bad design in the olden days.
The first problem, blower pipe was easy.
Disconnect from arm, wrap some wire around the pipe and then hook it onto the lamp. Dust as you cut then gets blown to the right of the table (when I cut the reindeer, with the pipe fitted on the arm, my paunch and shorts were covered in dust, sticks to the perspiration, requires a wash in a bucket next to the garden tap! :lol: )
The next problem is below the table where the bulk of the dust settles, drifts onto the shelf below and floor and anywhere else the dust-fairy decides to take it.

There is not much space under the table (old model) to retro fit the new dust extraction.
This required a bit of thought as I did not particularly want to hook up a vacuum cleaner because of the noise.
Scratched around in the electrical storage box and found 3 fans, different sizes and strengths.
Decided the large 150mm one would do.

As I did not want to waste timber building a trial model, I resorted to cardboard using a 3l wine box.
Hauled out the hotglue gun and started cutting and gluing.
Heath Robinson would have loved drawing this machine!
Apologies, no M-CAD drawings, all done as I went along.
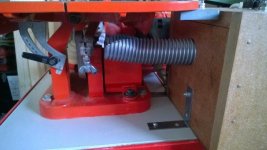
The top of the box got a piece of vacuum cleaner pipe with the top of the front cut at an angle.

The dust bag hangs at the bottom.

The cable connections are all open wire, so I needed to be extra careful.
Vacuumed everything nice and clean.
Switched on the extractor, very silent, and started cutting. Most of the Alphabet Puzzles.

Results:-
The only dust below the table were some larger pieces that were cut off, the rest went into the extractor and bag.
There is still dust on top of the table, but I can live with that.
Very pleased with the concept and will now sit and do proper M-CAD drawings.
I found my small drawing board when moving boxes in the garage for the new shelves.
The trial model just hung from the shelf, somewhere in the deepest dark hours the one bracket came loose and it fell off . I did get up to check the noise, but being 75% asleep only found the source of the noise in the morning.
Cheers
Phil
The scroll saw is very messy with its fine dust; the blower pipe at the top also blows all the dust directly at you. Bad design in the olden days.
The first problem, blower pipe was easy.
Disconnect from arm, wrap some wire around the pipe and then hook it onto the lamp. Dust as you cut then gets blown to the right of the table (when I cut the reindeer, with the pipe fitted on the arm, my paunch and shorts were covered in dust, sticks to the perspiration, requires a wash in a bucket next to the garden tap! :lol: )
The next problem is below the table where the bulk of the dust settles, drifts onto the shelf below and floor and anywhere else the dust-fairy decides to take it.
There is not much space under the table (old model) to retro fit the new dust extraction.
This required a bit of thought as I did not particularly want to hook up a vacuum cleaner because of the noise.
Scratched around in the electrical storage box and found 3 fans, different sizes and strengths.
Decided the large 150mm one would do.
As I did not want to waste timber building a trial model, I resorted to cardboard using a 3l wine box.
Hauled out the hotglue gun and started cutting and gluing.
Heath Robinson would have loved drawing this machine!
Apologies, no M-CAD drawings, all done as I went along.
The top of the box got a piece of vacuum cleaner pipe with the top of the front cut at an angle.
The dust bag hangs at the bottom.
The cable connections are all open wire, so I needed to be extra careful.
Vacuumed everything nice and clean.
Switched on the extractor, very silent, and started cutting. Most of the Alphabet Puzzles.
Results:-
The only dust below the table were some larger pieces that were cut off, the rest went into the extractor and bag.
There is still dust on top of the table, but I can live with that.
Very pleased with the concept and will now sit and do proper M-CAD drawings.
I found my small drawing board when moving boxes in the garage for the new shelves.
The trial model just hung from the shelf, somewhere in the deepest dark hours the one bracket came loose and it fell off
. I did get up to check the noise, but being 75% asleep only found the source of the noise in the morning.Cheers
Phil