• Hi all and welcome to TheWoodHaven2 brought into the 21st Century, kicking and screaming! We all have Alasdair to thank for the vast bulk of the heavy lifting to get us here, no more so than me because he's taken away a huge burden of responsibility from my shoulders and brought us to this new shiny home, with all your previous content (hopefully) still intact! Please peruse and feed back. There is still plenty to do, like changing the colour scheme, adding the banner graphic, tweaking the odd setting here and there so I have added a new thread in the 'Technical Issues, Bugs and Feature Requests' forum for you to add any issues you find, any missing settings or just anything you'd like to see added/removed from the feature set that Xenforo offers. We will get to everything over the coming weeks so please be patient, but add anything at all to the thread I mention above and we promise to get to them over the next few days/weeks/months. In the meantime, please enjoy!

Hollow chisel morticer - sharpening chisels

Gremmy

Seedling
Joined
Mar 27, 2021
Messages
25
Reaction score
14
Location
Egham
Evening gents -

I’ve just acquired a Sedgwick hollow chisel morticer for a price I couldn’t refuse. Need it for a bit of batch work coming up, I’ve never used one before. I’ve given it’s a good cleaning and lubrication of moving parts. I won’t be redoing a paint job on this one quite yet ;)
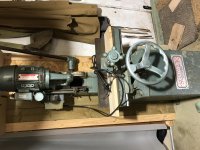
4A3559C1-F3A2-4058-BFB2-30A1C09E7A8F.jpeg

It came with quite a few chisels of varying shank sizes - between 3/4 and 13/16. The original bush was really worn and sloppy so I had a couple of replacements turned.
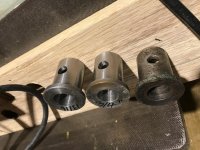
816DB5BB-B894-4FF0-974A-D279B2FA04DE.jpeg
1B3078CE-25CB-4DCB-ADDF-0B52121001A8.jpeg

I’ve read Trevanion’s handy guide for hollow chisel morticers so I get the basic theory on sharpening.

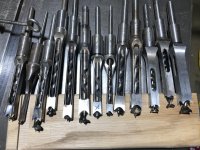
I’m struggling to find anything online for sharpening the chisels themselves. I can find a lot of diamond cones and stone cones but reviews aren’t great. I understand perhaps I need a specialist reamer? And it would seem I have two types of pattern of chisels here?

You can see on this photo that the corners on quite a few chisels have been dropped and generally mistreated. I’d like to get these back up to shape and do them justice.

Can anyone suggest where I might find suitable sharpening equipment for the chisels?

Cheers

Sam.
 

Attachments

  • 49A2B06C-046B-4AE1-9AB8-BAE1626DB5B1.jpeg
    49A2B06C-046B-4AE1-9AB8-BAE1626DB5B1.jpeg
    223.5 KB · Views: 1,095
Very nice score!

The majority are what you have there are the "Japanese Pattern" chisels and are quite easy to find sharpening gear for, those diamond cones that you find in places like Axminster are the angle required. The three "English" pattern chisels on the far right are a bit more tricky as they're not made anymore and hence the sharpening gear isn't either, though reamers occasionally appear on eBay for sale. You can use a stone intended for use in a drill and shape it to the correct angle with a devil stone if push comes to shove.
 
Yes well done, that’s the machine I always lusted after. My old massive morticer (well over 100 years old) came with sharpeners that look like v large countersink bits but with a spigot at the point that matched the drill hole in the chisel. Ian
 
D7DB2FD5-E0CB-431E-9155-23C730DA9547.jpeg

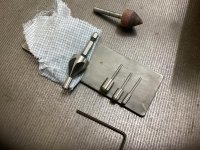
At the top is the shaped stone I used before splashing out on the proper kit shown below.
I think it’s self explanatory, it was from Axi and probably sourced from b———y China!
The bits are sharpened with a saw file.
 
If buying a new chisel it’s a good idea to have a spare auger with it. The smaller sizes are prone to failure.
Some years back some suppliers tried to claim that the chisel and auger could only be bought as a set!
 
Whatever chisel sets you end up with - as with many others,over time mine are a mixture - Sharpening can be an involved pain.

However you do it with regard to the auger cutting points and the internal faces of the chisel, two small details that I have found improve the performance are:

1 - Hone the four outside faces of the chisel on a fine and flat stone of your choice. This will remove any residual machine marks and polish off the whisper of metal that you'll turn over when you ream the insides. It can be a big improvement to the plunge action and the internal finish of the mortise.

2 - As well as the 2mm (or so) gap at the auger head, add a small amount of chain-saw oil or similar type of thick oil on the internal shanks and the auger head. There is an inevitable rubbing action inside, and it keeps it cool.
Anticipating the question.... no, you don't use a lot of oil and I've never seen it come off on the mortise sides.

Good luck.
 
I had a little morticer for a while (Axminster one, now branded 'hobby'), and used a sharpening kit as Mike's above, with excellent results. My chisels were low grade, fairly soft, gummy steel (Chinese). Anything that's decently tempered will probably put up more of a fight.

My morticer was arguably under-powered: anything bigger than 1/2" in softwood was a bit iffy. OK, you can make multiple passes, but even so, sharpness was really important. As with all edge tools, I found myself touching the chisels up frequently. Also getting the extraction nozzle right down close to the chip ejection slot of the chisel helped a lot.

After a few jamming-and-burning episodes I also went through the chisels and checked the machining of the slot (or lack of it!). In most cases the finish on the chisel bodies was terrible (where the chip ejection slot was). The internal casting was rough with jagged edges and rough sides, inviting the chips to get stuck. So I worked a few rats-tail files through, finally using one to mount some coarse wet & dry, paying particular attention to the arrises on the ejection slots. This was tedious but a one-time task, and it made a big difference, If I did it again, I'd probably spray-mount some wet&dry onto steel bar stock and spin it with a drill. The law of diminishing returns applies - the higher up the chisel the less it matters - so you only need concentrate on the first 1/2" to 3/4" or so.

For actual sharpening, the trick was to use a bit of cutting compound (in my case Trefolex paste) when re-doing the internal cone in the bottom of the chisel. It made the reamer cut better and in turn left a more polished internal cone. This is valuable because chip clearance became better, too. That in turn means less frictional heating, so less dulling of the edges, and less downward pressure necessary.

The chisels I had were ground to a slight taper so the cutting edge was widest, tapering in as you go up the chisel. This gives a bit of clearance behind the edge, much like the bedding angle of a plane.

If you just hone/polish the outside surfaces on a flat stone or scary sharp glass plate, you can end up with a short section at the cutting edge that's actually parallel with the chisel sides. I worried about this for a while, but now think this is useful, as long as the chisel is properly sharp, as it seems to reduce the propensity to wander when you start the cutting downstroke. Obviously you dont need (nor want!) super smooth mortice sides, but it's nice that the chisel does what you want it to rather than it becoming an infernal tug-of-war. DAMHIKT.

The chisels you have look quite damaged. I'd be tempted to see if you can find someone with a suitable lathe to re-cut the cones, otherwise you have quite a job on to grind back sufficiently to restore the corner points.

Obviously it's worth checking the augers are sharp, too. I used to touch mine up with a diamond needle file set -cheap'n'nasty but small enough to get onto the bevels of the augers easily and at the right angle.

I also drilled a hole in a 2p piece, tied it on to the machine with a bit of string and used it as a spacer to set the auger height in the chuck (other spacers are available). And glueing coarse sandpaper to the workholding clamp is really helpful (I left the fence smooth and shiny though).

I miss my morticer now I no longer have it, so enjoy!
 
Many thanks Eric for your very descriptive methods for maintaining your mortice chisels in good nick.
I have the Axminster model you refer to but it suffered from the blocking and sharpening problems. I was unable to solve them so gave up on the machine several years ago and have done all my mortices by hand ever since. I find the by-hand method more satisfying but the noise from the hammering is terrible and I feel for my neighbors.
Anyway your post has revived my interest in the machine method and I will make a start by blowing the dust off it this morning.

John
 
On the subject of spacing the auger and hollow chisel. I believe it’s most important to cut the auger to an exact length to ensure the it makes solid contact with the bottom of the collet or chuck and prevent it being pushed up into contact with the chisel during heavy use. The result of the two parts coming into contact is to have the friction burn both and turn them blue and draw the temper.
It’s also worth mentioning that the discharge slots should be at the sides of the chisel to ensure chipping clearance when cutting deep.
 
Back
Top