• Hi all and welcome to TheWoodHaven2 brought into the 21st Century, kicking and screaming! We all have Alasdair to thank for the vast bulk of the heavy lifting to get us here, no more so than me because he's taken away a huge burden of responsibility from my shoulders and brought us to this new shiny home, with all your previous content (hopefully) still intact! Please peruse and feed back. There is still plenty to do, like changing the colour scheme, adding the banner graphic, tweaking the odd setting here and there so I have added a new thread in the 'Technical Issues, Bugs and Feature Requests' forum for you to add any issues you find, any missing settings or just anything you'd like to see added/removed from the feature set that Xenforo offers. We will get to everything over the coming weeks so please be patient, but add anything at all to the thread I mention above and we promise to get to them over the next few days/weeks/months. In the meantime, please enjoy!

I don't need any more planes...

Dr.Al

Old Oak
Joined
Dec 31, 2020
Messages
3,747
Reaction score
2,579
Location
Dursley, Gloucestershire
Name
Al
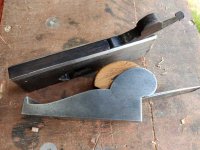
... but that didn't seem to matter when I was in an antique shop in the black country yesterday.
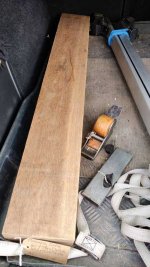
planes_and_lintel.jpg

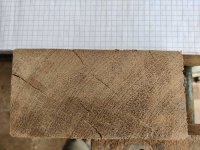
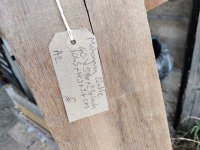
That big lump of wood is alleged to be mahogany and an ex-lintel. My boss looked at it and thought it looked like teak. I haven't a clue, but it seemed a bargain for £40:
lintel_closeup.jpg

Better view of the planes:

two_planes_2.jpg

two_planes.jpg

two_planes_3.jpg

I've already got a (modern) bevel-up block plane, but I thought this one was quite cute. I've also got a Record 311 shoulder plane, but I liked the wooden infill on the new one. Shoulder planes finally started to make sense to me a bit at the weekend as I was practising (badly trying to cut) through tenons & mortices. I think it'll be a while before I've mastered the shoulder plane, but I'm sure having two to play with will help (ahem :eusa-whistle: ). I don't think it'll sort out my apparent inability to cut a good through mortice & tenon though :(

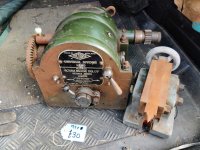
In another black country junk shop I also got this monster (which is still in the boot of my car as it's a bit too heavy to lift - and far too big for my mini milling machine, so it won't get much use until I upgrade that!). The tailstock appears to be from a different dividing head, but it was included in the price and it's about the right centre height, so it'll do just fine.
dividing_head.jpg

Entirely impractical, but for £30 I couldn't say no :? :D Should be a fun restoration project if I can manage to lift it onto a bench!
 
Seems entirely rational to me! If you don't have them, how are you ever going to discover what they do, or be able to use them when they are exactly what you need?

And as for the dividing head, I'm sure it will be great too, once you have found a multiplying head to go with it... :D
 
Nice haul. I’ll be interested to know what other people think of your lovely wood. Maybe the photos are showing lighter than reality, but I’ve always thought of both teak and mahogany as quite dark woods even in their natural state.
 
Looks like a bit of Greenheart rather than Teak, but a bit of planing to take off the UV-exposed face will show its true colour and grain.

Dividing head was a good score!
 
Difficult in it's current state to say what that lump of wood is; it could be any one of a thousand different pseudo-mahogany type timbers, but as T said above, you'll get a better idea when it's cleaned up - Rob
 
I don't really mind what the wood is as long as it's nice and it seems to meet that criterion.

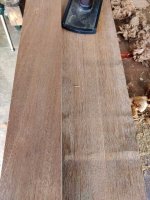
Nevertheless, I took a few shavings off one side to see what it looked like a little way in:

IMG_2022-09-24-12-54-36-060 - Copy.jpg

Next to some oak (left, obviously) and some sapele (sitting on top of it at the bottom of the picture):

IMG_2022-09-24-12-54-18-931 - Copy.jpg

That photo makes it look a lot closer in colour to the sapele than it actually is. This one's a bit better:

IMG_2022-09-24-12-55-20-686 - Copy.jpg

Mystery wood shavings on the left, sapele shavings on the right, white paper as the background:

IMG_2022-09-24-12-56-02-769 - Copy.jpg

I also gave the dividing head & tailstock a lot of TLC (in the form of wire brushes and wire wool dipped in paraffin). It's looking a lot better now:

IMG_2022-09-24-12-19-45-379 - Copy.jpg

IMG_2022-09-24-12-22-23-764 - Copy.jpg

Some before-and-after shots:

IMG_2022-09-24-12-43-04-785 - Copy.jpg

IMG_2022-09-24-12-19-32-312 - Copy.jpg

IMG_2022-09-24-12-19-00-737 - Copy.jpg
 
Al, could you add a few words about how the dividing head will get used? I understand that it lets you rotate something by any fraction of a circle you choose, but I'm not sure what it will attach to or how. Does it need a chuck or a faceplate or something screwed onto that threaded boss? Does the big notched ring give you a second set of divisions in addition to the rings of holes? It looks complicated and I bet it was expensive when it was made.
 
AndyT":2hrtzzdp said:
Al, could you add a few words about how the dividing head will get used? I understand that it lets you rotate something by any fraction of a circle you choose, but I'm not sure what it will attach to or how. Does it need a chuck or a faceplate or something screwed onto that threaded boss? Does the big notched ring give you a second set of divisions in addition to the rings of holes? It looks complicated and I bet it was expensive when it was made.

In answer to the question about the chuck, yes: it needs a chuck or faceplate attached to the big threaded shaft (or a morse taper something-or-other shoved into the spindle).

As far as the rest of it, it's complicated, but I'll have a go. It sits on the table of a milling machine. Here's a rather rubbish photo of my existing dividing head (which is much, much smaller and also less capable) sitting in the vice on my milling machine with a fledgling gear that I'd just made:

IMG_20210528_160435 - Copy.jpg

Here's another photo that shows it bolted down to the table with a tailstock supporting the other end of the workpiece:

IMG_20220722_154610 - Copy.jpg

My existing dividing head has one function†: dividing using an indexing plate.

† Not strictly true, but close enough for this purpose.

I haven't got a photo of my little dividing head's indexing plate, but here's an indexing plate photo I nicked off the internet:

download.jpg

The handle is geared to the chuck through a worm-and-wheel, typically with a 40:1 or sometimes 72:1 ratio. That means turning that handle 40 times turns the chuck once. At each diameter on the index plate, there is a different number of holes. For a given number of divisions, you look up in a table (or use the calculator I designed) which circle to use (i.e. how many holes on the diameter) and how many holes to move on each division (e.g. to cut 45 gear teeth into a part, you might use the 27 hole circle and after each operation you turn the handle along 24 holes).

The sector arms (brass in the internet photo above) are (in my opinion) a genius invention. They spin freely as a pair and can be adjusted so they're at a different position relative to one another. In the case above, you'd set them so there were 24 holes in between them. You spin the pair round until one sector
arm touches the locking pin on the handle, then move the handle up to the second sector arm. That saves you having to count. You then spin the pair round again and rinse and repeat. My new dividing head is missing the sector arms unfortunately, but I'll have a go at making some replacements at some point.

That's pretty much everything that a minimal dividing head does.

My new head has a few extra functions. Firstly, you can rotate the entire head so it points horizontally, up or at an angle. There are some "sine bar pins" that allow you to use a dial indicator to set the angle very, very accurately.

Secondly, you can disengage the worm wheel entirely and then the head moves relatively freely. The thing that looks like a gear can then be used with a detent pin to quickly index round through moderately common numbers of divisions. If you look closely at this photo, you can see the numbers stamped in the rim to help you index to the right place. You can also see the sine bar pins I mentioned above:

file.php


The two sides of the gear have 60 notches and 56 notches, so you can quickly index any of these numbers of divisions: 1, 2, 3, 4, 5, 6, 7, 8, 10, 12, 14, 15, 20, 28, 30, 56 & 60, which covers an awful lot of uses. Using the detent pin and disengaged worm wheel should be much quicker than the indexing plate.

The last and most complicated thing you can do is to set up additional gears attached to the shaft on the left-hand side of the dividing head in these photos:

file.php


That allows you to do one of two things:

  1. Introduce additional gear ratios for what's called differential dividing. This is really complicated and would only really be of use for some very odd numbers of divisions.
  2. Link the movement of the dividing head to (e.g.) the movement of the X-axis of the milling machine, via whatever gear ratio is desired. With this set up you could, for example, mill the flutes in a drill bit: as the milling table moves along the drill bit, the dividing head would automatically turn.

Another internet photo showing the latter case:

img17.gif

Does that all make sense? Have I missed anything?
 
Thanks for the explanation. I can see that you get the ability to make all sorts of interesting shapes, gear wheels and stuff. It's nice to see it's found a good home.
 
Cabinetman":2om5prm0 said:
I was never taught metalwork, compared to woodwork it looks jolly complicated, and probably very expensive tool wise too.

It can be expensive, but then so can woodwork :lol: . For the first few years the only tools I had were a £500 mini-lathe and a £1 bench grinder (plus some lumps of high-speed steel to grind into tools and some drill bits). Of course, as with any hobby it doesn't take long before you're tempted to upgrade stuff and it can quickly get a lot more pricey.
 
Back
Top