• Hi all and welcome to TheWoodHaven2 brought into the 21st Century, kicking and screaming! We all have Alasdair to thank for the vast bulk of the heavy lifting to get us here, no more so than me because he's taken away a huge burden of responsibility from my shoulders and brought us to this new shiny home, with all your previous content (hopefully) still intact! Please peruse and feed back. There is still plenty to do, like changing the colour scheme, adding the banner graphic, tweaking the odd setting here and there so I have added a new thread in the 'Technical Issues, Bugs and Feature Requests' forum for you to add any issues you find, any missing settings or just anything you'd like to see added/removed from the feature set that Xenforo offers. We will get to everything over the coming weeks so please be patient, but add anything at all to the thread I mention above and we promise to get to them over the next few days/weeks/months. In the meantime, please enjoy!

Inoperative Thicknesser - fixed at last!

AJB Temple

Sequoia
Joined
Apr 15, 2019
Messages
7,722
Reaction score
1,201
Right. Follow on from previous thread. I decided to get all my oak cladding planed before taking the PT apart, and with all 140 lengths PAR I took the cover off.

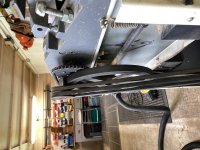
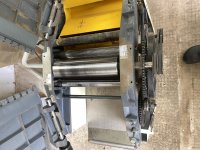
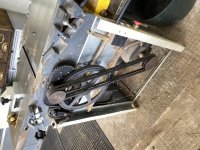
The mechanism, as Trevanion surmised, is dead simple. The cutter block runs on a twin belt pulley and is directly coupled to the induction motor. Works fine. The feed and exit rollers are connected by tensioned chains. They are engaged when the spring tensioned lever frees the big spoked wheel, which seems to have a hard rubber tyre on it. That presses against the cutter block spindle and when engaged the chains are tensioned by a greased bearing thing, and the rubber wheel transfers rotation to the infeed and outfield rollers via the chains.

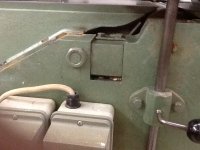
As Trevanion suggested, it is geared so that the feed rollers are slow and the cutter is obviously fast. The yellow guard must have a safety switch, as the thicknesser won't run without the guard in place, but I ran it with the guard over (but pulley cover off) and the infeed and outfeed rollers engage and run fine. The chains are in good shape, as are the belts. Everything is vacuumed out (it was not at all bad inside) ....and the thicknesser is still not working. :?

I can only assume that when I try to put wood through, this adds enough friction such that the spoked wheel with a tyre on slips against the cutter spindle. The rubber (if it is that) feels quite hard and shiny. I don't want to destroy it, but I was thinking I need to put some cleaner on the tyre and maybe rough the somewhat shiny surface up a bit with some emery cloth. Daft idea or OK?
IMG_1726.JPG
IMG_1728.JPG
IMG_1732.JPG
 
When you were running it with the cover off, did the feeding mechanism actually stop and the big wheel kept spinning when you tried to push something through the thicknesser, or did the big wheel stop?

How hard are your feed rollers set compared to the knife projection? Generally, on most machines, you want about 2mm of spring pre-load on the first roller and 1mm on the second roller before the knives contact the workpiece. This can be set too hard which puts a lot of undue stress on the machine's mechanicals and can dent softer timbers beyond what the knives take off with the fluted roller.
 
Something I find helps is to wax the bed that the wood slides on, it probably won't fix your problem but it might help.
 
:text-goodpost:

That might also be the problem, so much friction on the bed that the feed rollers can't feed the timber through. I can't believe I forgot to mention that... :eusa-doh:
 
Ah. Feeling a bit dim now. When I try to push a piece of oak through (just a 40mm square section) to take off say 1mm (well within spec) it simply won't feed into the machine. The infeed roller won't grab it so the wood is not making contact with the blades.

It's impossible to see what is going on, as it will only run with the yellow extraction cover in place and covering everything.

There does not appear to be any means of adjusting the infeed and outfeed rollers - but I don't really know what I'm looking for. The tensioning of the drive mechanism is just a stiff spring and as far as I can see that is not adjustable at all.
 
I will lube the beds, but that is not the problem. It's only a 40mm bit of oak.
 
AJB Temple":23b1js6y said:
Ah. Feeling a bit dim now. When I try to push a piece of oak through (just a 40mm square section) to take off say 1mm (well within spec) it simply won't feed into the machine. The infeed roller won't grab it so the wood is not making contact with the blades.

It's impossible to see what is going on, as it will only run with the yellow extraction cover in place and covering everything.

There does not appear to be any means of adjusting the infeed and outfeed rollers - but I don't really know what I'm looking for. The tensioning of the drive mechanism is just a stiff spring and as far as I can see that is not adjustable at all.

It largely depends on how far out your knives are protruding out of the cutter block, I tend to have mine set to that the back of the knife bevel is flush with the cutter block so it has plenty of support behind it, although some prefer to have them poking out further. If you can set the knives so that you've got 2mm of pre-load before the knives engage on the infeed roller you should be golden, just a case of adjusting your thickness gauge, and the outfeed table on the surface planing side.

Alternatively, if the knives are already pretty far set into the block you may need to adjust the roller height. I'm not sure how it adjusts but on my Multico thicknesser it's quite plain to see:

91vknj3.png

The two lock nuts at the very bottom control the height of the roller, and the two above it control the spring tension.

AJB Temple":23b1js6y said:
I will lube the beds, but that is not the problem. It's only a 40mm bit of oak.

You would be surprised, I've constantly got to spray my beds down with silicone spray otherwise it simply won't feed, even on tiny sections.
 
I had a similar problem with the metabo I've got.

On that, there are springs on the in/out feed rollers forcing them down onto the material There wasn't enough pressure from the springs onto the rollers so the material wasn't being grabbed and moved forward.

A couple of nuts just needed tightening up on the springs to increase the pressure.
 
Thickness of wood does not correlate with the need to wax the bed. if the wood is 'sticky' enough then any thickness can make it stall. I use Woodslide spray which is excellent.
 
I agree on lubing the beds. I had a problem with my Axminster machine which turned out to be too much feed roller pressure. However, prior to the engineer coming to have a look at it and adjusting the pressure, they did ask me if I had tried waxing the beds. I actually use some machine wax fairly regularly for rust prevention, but I tried a smear of microcrystalline wax and the boards went through smoothly (even with the excess roller pressure). I was really surprised how much difference it made.

Very basic point, but my machine has a lever to engage the rollers. You're supposed to leave them disengaged when not in use because otherwise you can flat spot the rubber on the wheel. Apparently it won't affect the way the machine works, but creates an annoying clonk every time the flat spot goes around. I have on occasion forgotten to re-engage the rollers and then wondered why the thicknesser doesn't work...
 
OK, thanks. All helpful guys. It will have to wait until tomorrow now, but I will clean the tyre, and lube the beds much more. Never heard of Woodslide spray gut will buy some pronto. I didn't realise that lube can have that much effect (I normally use a candle rub), as I've not had a problem before.

The cutters are set with a special tool and I don't think I did anything unusual when I put the new blades in - they just bed right in. I've done this before with no problem.

I do disengage the thicknesser properly. The lever is very clear. There is no evidence of a tyre flat spot.

It might, I suppose, be the material I was trying to thickness. These are lots of 3m to 4m lengths of 40mm oak strips that I cut from 40mm bandsawn planks ages ago on the farm rough table saw (not the workshop one) the original intention being to use them as roofing laths on show. However, the tilers turned their noses up as too thick so now they are being planed and will become decorative cladding strips. However, the sawing was dead rough and some are not that flat either. Maybe that made the infeed roller struggle or fail to grip.

Everything has gone through the surface planer now, but I've got some really nice wenge and some top quality maple planks that need to be run through (for much finer quality work) which is actually the main reason I want it working properly again.
 
There was a mischievous note in another land earlier today, obliquely mentioning this issue, by a Bloke with a Biblical Name (since removed.... taken down.... eliminated.... vanished) that the culprit may be compacted dust-krud within the roller tension spring chamber/assembly..... as had happened to him.

just sayin'..............

It left me scratching my head, but this thread suddenly reminded me.
 
image.jpegI had a similar problem with a sedgewick machine, it was caused by chippings packed beneath the blocks supporting the feed rollers and preventing them from coming low enough to grip the timber. You can see a few chipping in the space in this pic.
 
Candle is what I use too, but ordered some special stuff now. I don't think anything is compacted. My feeling is the rollers are in a fixed position but I could be totally wrong.

I'm not a machine fiddler. I just want the bloody things to work!
 
I had my new P/T stall the timber while thicknessing a couple of times. Fed as far as the cutter then it was like a brake was applied to the timber. had to lower the table to free it.

I was machining the flooring used to make my garden table at the time. Took a while to work out what was happening. turned out the first feed roller was getting gummed up with crushed varnish and no longer biting into what was a very hard wood. Lots of awkward cleaning to get the grooves on the roller clear and back to normal. Having worked that out oiling the varnish with baby oil stopped it happening again.

So maybe check the grooves are clear on the infeed roller.
 
RogerS":1eepf592 said:
Doesn't candle wax mess up whatever you use to finish it with ?

Generally speaking, you sand planed surfaces before finishing anyway. People always ask this question in relation to the silicone spray I use which is about £2 a tin when you buy a boxful, I've never had any problems with finish adhesion.

The Wurth guy is constantly trying to push the Woodslide stuff, he doesn't tell you (or rather, doesn't know) is that its only purpose is to de-grease machinery that gets a lot of softwood resin build-up, hence why most planer moulders have tanks bolted to the side with pump feed right onto the tables inside. It's not much use on stuff that isn't sappy as it's essentially a mild white spirit in a spray can, better than nothing but it's not really technically a lubricant unless it's used for its intended purpose, which is de-greasing resin build-up off the tables during planing.
 
The stuff I ordered is a wax and will be useful on other tool beds. Cheap. Feed roller grooves are clear. Not concerned about finish as I always sand and also tend to rub off with a lint free rag with white spirit anyway.
 
RogerS":1jhs7kl0 said:
Mike G":1jhs7kl0 said:
An old candle works for me.

Doesn't candle wax mess up whatever you use to finish it with ?

I use it on my planes, too, and it is impossbile to find any trace of it on the finished item. I never finish direct from the PT, obviously. Whats'isname, the world's woodwork teacher, uses machine oil (in a rag in a can) on his planes.
 
RogerS":20fgwwur said:
Mike G":20fgwwur said:
An old candle works for me.

Doesn't candle wax mess up whatever you use to finish it with ?

Use a smear of candle on the sole in front of the mouth; the subsequent shaving will then remove said candle leaving the wood clean - Rob
 
Given my accident record of late, I am loathe to bypass the interlock.

I had a private message from Jacob elsewhere suggesting that it could be a build up of impacted sawdust preventing the rollers from loading properly. Very hard to see apparently and he suggests cranking them up with some wood blocks. I thought they were fixed, but could easily be wrong so will check tomorrow. No workshop today - have to get some fee earning work done.
 
Woodbloke":age36w8p said:
RogerS":age36w8p said:
Mike G":age36w8p said:
An old candle works for me.

Doesn't candle wax mess up whatever you use to finish it with ?

Use a smear of candle on the sole in front of the mouth; the subsequent shaving will then remove said candle leaving the wood clean - Rob

Mouth ? I looked in my thicknesser manual and can't see it mentioned :eusa-think:
 
Vann":1l537jt8 said:
RogerS":1l537jt8 said:
...Mouth ? I looked in my thicknesser manual and can't see it mentioned :eusa-think:
He means on his handplanes.

Cheers, Vann.

I know Vann. It was meant in jest.
 
A thicknesser definitely has a mouth. You stuff rough wood in it and it comes out smooth. Or in my case doesn't come out at all. :(

Doing all that cladding strip over the weekend produced 12 bins full of chips. The bin under the Jet cyclone is about the size of an old fashioned dustbin. These chips have all gone on the kitchen garden paths this time rather than in the leaf compost pit.

The cyclone has a fine dust bag as well and this is about a fifth full (from empty). This is very fine particulate that would otherwise have been in the workshop atmosphere. It gives the lie to the oft heard story that PTs mostly produce chippings rather than fine dust - they do but the fine stuff is present in quantity.
 
So glad we have an accommodating recycling place. Our last town recycling place hated dust etc and chippings and so I had to come up with alternatives. Up here? I asked what to do with my bags..

"Well, it's wood, innit? Chuck it in the skip"

Still using the same bags :D
 
The council here has a garden waste recycling scheme and we pay for two wheelie bins collected fortnightly. Sawdust waste is fine in them, and that is where the dust goes, but actual chippings from the machines or shredder go on the paths. The recycling bins take all the weeds and pruning residue as my wife won't compost them.
 
Ours won’t take sawdust in the paid for garden bins.
I end up putting my modest output in the landfill bin with lots of domestic rubbish on top.
When I have a big batch I put it on free cycle and those with horses or chickens are keen to have it.

Bob
 
My local sawmill, already on our suppliers map above, is also a farm. When they're passing, they collect my shavings from the P/T and the dust from the TS and BS for bedding for their small dairy herd.
 
I take all the shavings and saw dust that Mike G wants rid of, I have a wood burner in the shop that is designed to burn them.
 
I am surprised at Mr G. Sawdust composts very well, if mixed with green material and also leaves etc. We have about 10 cubic metres of shredded leaves (picked up by a Billy Goat vacuum shredder) annually and adding sawdust (mostly chipping really from the planer etc) works really well if my wife doesn't spread it on the paths. Less good in a hot composter as it tends to clump. What I don't like putting in the home compost is the very fine dust separated out by the cyclone, as that is the most harmful material for lungs.
 
Mended.

Very thorough vacuum and wipe down everywhere.
Thoroughly cleaned the tyre with acetone and rubbed it over with wet and dry.
Wet and dry on the contact point on the cutter shaft, as it was heavily glazed.
Cleaned and lubricated chains and bearings.
Made sure infeed notched roller and smooth outfeed roller are both free.
Lubricated the table rollers.
Electrical contact cleaner on all switches.
Newly acquired Liberon lubricating wax applied to all beds.
Blades all checked for nicks and correct set, small amount of tar residue cleaned from block, and cutter block bearings lubricated.
Safety covers replaced.

And it worked. I don't know what the original problem was, but the above actions have got it going again. :D

Thanks for all the help and input everyone. Never serviced a P/T before.
 
Back
Top