• Hi all and welcome to TheWoodHaven2 brought into the 21st Century, kicking and screaming! We all have Alasdair to thank for the vast bulk of the heavy lifting to get us here, no more so than me because he's taken away a huge burden of responsibility from my shoulders and brought us to this new shiny home, with all your previous content (hopefully) still intact! Please peruse and feed back. There is still plenty to do, like changing the colour scheme, adding the banner graphic, tweaking the odd setting here and there so I have added a new thread in the 'Technical Issues, Bugs and Feature Requests' forum for you to add any issues you find, any missing settings or just anything you'd like to see added/removed from the feature set that Xenforo offers. We will get to everything over the coming weeks so please be patient, but add anything at all to the thread I mention above and we promise to get to them over the next few days/weeks/months. In the meantime, please enjoy!

Jacobean style oak dining table & chairs.

Mike G

Petrified Pine
Joined
Jul 30, 2014
Messages
12,480
Reaction score
3,031
Location
Suffolk
Name
Mike
This winter's major project is a new dining suite. It will be a big oak pedestal table and 10 chairs (8 side chairs and 2 carvers), designed for 8 place settings without extensions, and 10 or 12 with extensions. Here is the table:

rozfgWm.png

It's not a very enlightening image because it shows stuff on the underside through the table top, and it has the large extension in place. Still, you get the idea. It's going to be about 1100 wide by 2600 long unextended, sitting on 2 pedestals with a stretcher rail between, and all in solid oak. I don't think there'll be any carving on the table as it doesn't have aprons.

Here are the chairs:

pCupEXA.png

That's a side chair, obviously. The carvers are something of an oddity in that they are wider and taller than the side chairs: wider to accomodate the arms, and taller, because that's how Elizabethan and Jacobean furniture was. There'll be more carving on the carvers than on the side chairs.

Before I start on the chairs I am going to build a mock up, but before I start on that I transferred all of the drawings onto MDF templates:

ddCM124.png

I've never built a chair before, but it is only simple joinery, so it's more going to be an exercise in efficient batch production and patience than a test of skill. It will be a mix of hand and power tools, but all of the joints will be hand-cut M&Ts.

At the moment I don't have any timber! I've had a nightmare trying to buy suitable oak during this crazy period, but I hope to sort that out very shortly.

Those two hollow curves in the back panel would have been a test for my spokeshaving abilities. Do-able, but a test. Now that there is a lathe in the corner of the workshop it was a doddle to produce a quick drum sander:


RqeEy85.png

Wc4x9uh.png

I worked out the shape of the paper from first principles and a bit of schoolboy maths, and it fitted first time:


WE3eTZK.png

usaA1TE.png

Going back to the table..........It's been an interesting exercise designing it. Every house I have been in in the last couple of years I have measured the dining table. Having a pedestal puts an obstruction in the way of people's feet, if you're not careful. But with a bit of thought that problem can be designed away. The size of the table is determined by a generous 625mm wide place setting, and it is this which spaces the pedestals.

This build should be fun once it gets going, but I've got no further on the mock-up than cleaning up some reclaimed pine and starting a first cut on the bandsaw, before the bandsaw tyres let me down:


tdFzTc7.png

hNTOeff.png

9aa8U1r.png
 
That will be a very nice project. Are you just doing the extension at one end, or is this just to simplify the drawing?

Most genuine old tables that I have seen have rather thicker tops than yours appears to be. What is the dimension there?

These things at that sort of size have considerable weight. You've seen mine: my wife and I moved it from the room where the piano is, to the new kitchen and just shifting the top was a real struggle.

Would be nice to have just three wider planks if they are available?
 
Just been thinking about the chairs. Usually Elizabethan chairs have quite simple (almost bobbin style) turned front rails. Just interested in what you are basing the design on. I have a couple of books detailing genuine Tudor, Elizabethan and Jacobean furniture if you would like to borrow them.

Oak Furniture by Victor Chinnery is regarded by many as a definitive guide. Excellent book.
https://www.amazon.co.uk/Oak-Furniture- ... 1851490132

Bargain at £20.
 
AJB Temple":2toglfw9 said:
That will be a very nice project. Are you just doing the extension at one end, or is this just to simplify the drawing?

There are three extensions: A big one which will go just at one end, and that's what's in the drawing; two smaller ones, which can be used individually, or both at the same time, one on each end. The big one allows the same elbow room, and would be for dinner parties of 10 people. The two smaller ones together allow 12 people, but with slightly reduced elbow room, and that would be for christmas etc.

Most genuine old tables that I have seen have rather thicker tops than yours appears to be. What is the dimension there?

The table top will be between 38 and 45mm thick, or at least, will appear to be. The trick is that only the outer boards (and the breadboard ends will be that thick. The inner boards will be 20-ish mm thick, to try to keep the weight down a bit. I'm going to need half the village to get this top in from the workshop!

These things at that sort of size have considerable weight. You've seen mine: my wife and I moved it from the room where the piano is, to the new kitchen and just shifting the top was a real struggle.

Yep. I've been worried about the weight of this for a while. Yours is a gorgeous table, as I'm sure I said when I saw it.

Would be nice to have just three wider planks if they are available?

I'm just not sure what stock I'm going to be working with. I'd have thought 4 is likely, but yes...it's not going to be an Oak Furnitureland lash-up of 30 or 40mm wide scraps!
 
This will be worth watching.

Thanks for rekindling an idea I had for thickness sander. With a longer drum with a hinged board underneath and resting on the lathe bed with an adjusting mechanism :eusa-think:
 
AJB Temple":1qo0wdrl said:
Just been thinking about the chairs. Usually Elizabethan chairs have quite simple (almost bobbin style) turned front rails. Just interested in what you are basing the design on. I have a couple of books detailing genuine Tudor, Elizabethan and Jacobean furniture if you would like to borrow them.

Oak Furniture by Victor Chinnery is regarded by many as a definitive guide. Excellent book.
https://www.amazon.co.uk/Oak-Furniture- ... 1851490132

Bargain at £20.

Thanks for that Adrian. Yes, I've borrowed a copy of that previously from a friend. I might just invest.

I haven't shown the front rail properly because I'm not even sure if I'm going to have one. Working that out is one of the things this mock up will be for. I've seen them with flat bits of wood, too, but very low down. I know that's the authentic look, but they were around as a place to rest your feet out of the muck when straw was on earthen floors , and before Hoovers.
 
Andyp":1kmb8k8i said:
.....Thanks for rekindling an idea I had for thickness sander. With a longer drum with a hinged board underneath and resting on the lathe bed with an adjusting mechanism :eusa-think:

That should work, and be very simple to make. It might help if your lathe can run in reverse, otherwise you'd have to pull the workpiece through from the wrong side.
 
Mike G":ikjqs7vt said:
Andyp":ikjqs7vt said:
.....Thanks for rekindling an idea I had for thickness sander. With a longer drum with a hinged board underneath and resting on the lathe bed with an adjusting mechanism :eusa-think:

That should work, and be very simple to make. It might help if your lathe can run in reverse, otherwise you'd have to pull the workpiece through from the wrong side.

Not an original idea see here for further inspiration.

https://www.lumberjocks.com/projects/104464

Sorry to go off topic.
 
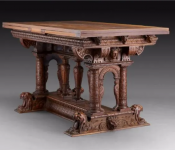
I think you need to get adventurous with the carving Mike. Here is an example to aim at. Late 16th Century French "draw table".

16th C draw table.png

Very sturdy base. Carving might take you a weekend?
 
I made a softwood and screws mock up for my chairs, thats how I found out it was very uncomfortable.
I needed to angle the seat and curve the back.

Pete
 
Looks like a good project Mike, will watch.

(I have just done a clean up on our oak table - solid - which extends to seat 8 and it is flipping heavy! :o )
 
I am sure that Mike is well aware that weight is a serious issue and the table must come apart. In his shoes I might be tempted to make either two tables or three leg sets, so that the extension involves adding another leg, another rail and a new top piece, rather than making the supports for leaf extensions (which are rarely very good unless the table mechanism winds out, like the Victorian and Edwardian mahogany dining tables that were very much in vogue in the 1980's and 90's I always think that these old pattern oak tables look best when the tops are thick (mine is nearly 3" thick so it is ludicrously heavy, but it is 400 years old and rather rustic). My preference is not to have breadboard ends, but I like the plain refectory style with very wide boards and probably a bench on one side rather than chairs.

Very good project and I am looking forward to it, especially the chair build production line. I am happy to come over and spend a weekend helping if you like Mike.
 
Ambitious! Chairs are hard. You're right to start with those and use mockups to get them right.

How much space will you have to walk around once it's in place?

Kirk
 
Loads, Kirk. The room is 3.7 x 4.7m, so there is 1200+ between the edge of the table and the wall.
 
Please do not build this in the spring!!! I started a dining table and chairs 25 years ago and I have not even finished one chair. Life, work and a Grade II listed building intervened. Though as we are currently finally refurbishing the dining room to house said table and chairs, the furniture will be required soon. I may even restart it this year.

On a serious note the front legs look like they are designed so that people do not stay at the dining table too long. I know it is the traditional way to have the leg extend higher than the rail. I would try the prototype for a few hours to see if those front legs dig in to your legs. It may depend on the width of your chairs but my bet is on them being uncomfortable.
Is the back splat designed to be removable?
 
The extended front legs should sit well below the top of the cushions, and the chair is pretty wide too. As you say, though, the test will be sitting on it for a while. I'm quite happy to give up on this detail if it proves uncomfortable, though. And no, the back splat will be fixed, although obviously the upholstery can be removed to be replaced.
 
As Kirk mentioned above, 'chairs are hard' I'd add a little caveat and say that they are really hard. The only chairs I've ever built were in a matching set of eight Hepplewhite 'shield back' carvers in maple, with red leather upholstery. The saving grace was that they were eventually sprayed black, thus effectively covering a vast multitude of constructional cock-ups. I was allocated 22.5hrs to build each chair :shock: and it eventually took two of use twice as long to build just one. They was 'ard; boss not happy!

The late and very great Alan Peters recommends somewhere in his rather excellent tome that chair work requires the building of a prototype or 'lash up' in softwood to work out all the constructional details and angles. Construction of the 'lash up' doesn't matter; glue, screws, nails, dowels etc...whatever is convenient and comes to hand - Rob
 
Yep, that's what I am doing at the moment, Rob.

I've never built a chair, but the only things I can see that are difficult about this design are the skewed tenons. Everything else about the joinery is square and straight.
 
Mike G":3go7rbf7 said:
Yep, that's what I am doing at the moment, Rob.

I've never built a chair, but the only things I can see that are difficult about this design are the skewed tenons. Everything else about the joinery is square and straight.
Fair enoughski Mike, but don't, under any circumstances assume that they'll be a 'walk in the park' :eusa-whistle: I can almost guarantee they won't - Rob
 
Is the plan to put the pairs of side rail tenons in square to the legs (ie angled tusk) as the drawing appears to suggest, with angled shoulder, or run the side rails straight (with mortices at an angle)? This is really the only bit that should test a skilled woodworkers joinery skills I would think, and lends itself to making a jig to ensure precision with those angles.

I've only made one nice quality chair, which was a reproduction, and I just made a mock up of those joints first, using a degree of trial and error to get the shoulders to fit well. It was time consuming but would have been muck quicker on subsequent chairs as I would have batch produced all the left hand and right hand parts.

I would be tempted to get a morticing machine or use a Domino as a portable mortice hogger for making a chair set, as there are 200 mortices to cut, all dead accurate, for 10 chairs. Get that sharpening station at the ready. Personally I quite like hand making M&T joints, but that is a lot.
 
Mike G":3mla6twr said:
Yep, that's what I am doing at the moment, Rob.

I've never built a chair, but the only things I can see that are difficult about this design are the skewed tenons. Everything else about the joinery is square and straight.

Mike if you can keep the tenon straight and angle the Mortice it makes for a far stronger joint.
 
I'll be watching this project with great interest Mike. I really enjoyed making my dining table and chairs although they are much plainer than yours will be. In particular the chairs were fun - getting the angle of the backs and the angled tenons correct were very satisfying. To get the angle of the tenon on the side rails with the off-set legs I drew drew the parts full size on a sheet of ply and from that was able to measure the tenon angle. I got the method from one of Paul Sellars' videos and found it fairly simple once I understood the method.
Good luck
John
 
Yes, Adrian, the tenons will be angled and the mortises square....and they'll be chiselled out by hand. Domino? DOMINO!!! Wash out your mouth....... :lol:

I've already made the template, John, and I did it by printing out that part of the drawing full size with extended lines. It was really easy, but I do have the benefit of having a drawing programme.
 
:D Domino machine is fab Mike. You don't need to use it with Dominoes, just as a glorified but very accurate drill. All you have to do then is pop the corners out with a sharp chisel. Saves loads of time. You need to get with it mate. 8-)
 
Mike, Looks like a great project. Far more than I would dare take on, but I will read with interest and looking forward to learning lots in the process. Mark
 
That's a lot of mortises.

Angled tenons aren't that easy either, but if you can put together a good jig to cut them consistently on a table saw they will go OK. If you're going to hand cut them, then by the end I think you'll have worked out the process. :)

Kirk
 
I don't have a tablesaw, Kirk. The chances are I'll set up a jig for the faces of the tenon on the bandsaw, but the shoulders will certainly be cut by hand.
 
Woodbloke":25z3aebc said:
...... :text-+1: As has been suggested above, keep the tenons straight and angle the mortices - Rob

I know that this is what people do if they have access to a morticer, or similar. As I'll be chopping these out by hand, the mortices will be vertical.
 
Mike G":gcx8dadk said:
Woodbloke":gcx8dadk said:
...... :text-+1: As has been suggested above, keep the tenons straight and angle the mortices - Rob

I know that this is what people do if they have access to a morticer, or similar. As I'll be chopping these out by hand, the mortices will be vertical.
You could cut the mortice with a router and make either angled base plate or make a jig to hold the leg at an angle and keep the router level. Given the numbers the latter may be best. Then square up the mortice or heaven forbid round over the tenons
 
Can't help thinking Peter has a logical point about the weakness of an angled tenon versus an angled mortise. A morticing machine, domino or even a drill press with a small forstner bit and a jig to hold the legs at the right angle would make repeatable and accurate angled mortice slots very easy and probably make assembly simpler too. Cranked tenons on the side rails will be a challenge to cut (not that I've tried it)?

I've seen a number of very old chairs with turned rails, where the rail fitting is circular (ie a dowel really) going into a circular hold in the legs, both at the sides and front. This must have made production a lot easier. Never thought about it until now, but if decorative turned rails are used to brace the legs low down, this is much easier than rectangular tenons. Doesn't help with the seat rails though. Some really interesting design and manufacture challenges here. Great project and thought provoking thread Mike.
 
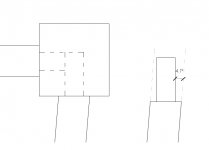
I just don't see this as an issue. The tenon is under 5 degrees off straight:

Dining furniture.jpg

There is no short grain. I don't know where this supposed weakness is coming from.
 
Hi Mike. Interesting that you are making the side rail tenons long and the front (and presumably back) ones short. The grain direction is angled diagonally across the tenon, but as you say it may not be vulnerable at a 7 degree angle.

When people break joints in chairs it is usually caused by a heavy person repeatedly rocking back on the chair's hind legs. (I am a guilty party here). This puts considerable compression on the side rail joints I imagine, tending to force the back legs towards the front. Quite a stubby tenon in the most awkward to cut, angled side rails ought to be sufficient in the lower rails, though probably not the seat rails?

The tenons could all be the same length if staggered by height or mated at at 45 degree angle internally.

I know I overthink this stuff. It stems from an interest in the huge variety of timber framing joints and also from complex structural jointing methods used in Japan. Chairs need to be built for abuse, not just sitting on: n many ways the typical design of 90 degree joints with no angle bracing is a weakness.

Adrian
 
They're going to be about 38mm long in a 45mm square leg, and they're about 60mm wide (high), pegged. If I move the rails out closer to the outside face of the leg, they'll be even longer, but of course, at the cost of weakening the leg.

I do a finger joint with the end of the tenons where they meet at right angles. Here's one on my coffee table:

Fx7nrA3.png
 
Mike, making such a large set really opens up options for efficient batch production.

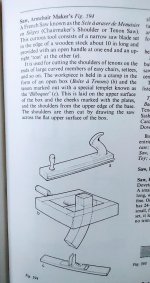
I'm sure you will have ideas about this already, but I'd like to mention a little known saw and clamp combo once used by chairmakers. Here it is in Salaman's Dictionary of Woodworking Tools.

IMG_20220111_103119978.jpg

It's shown set up for curved arms but could easily be adapted with wedge blocks to help cut shoulders on all your angled tenons.

On the other hand, I could be way out of line in suggesting fancy French techniques for accuracy all round. You'll have seen the same advice from Peter Follansbee as I have, that it's only the external, visible shoulders that are pulled up tight, with the internal ones deliberately cut short so that they can.
 
Interesting post that Andy. :text-goodpost: Never seen that before. By angling the base on a simple and cheap custom made saw it would not be hard to make that saw cut the tenon at an exact repeatable angle.

As an aside, as some of you know and have seen, I had cause to dissassemble a fire damaged valuable antique chair just over a year ago. I was surprised that that the side rail tenons had what looked like very fine cloth or linen wrapped around the tenon ends. I've never seen this before (not that I have much experience of taking antiques apart). I can't think of any reason why it would be original unless it was intended to expand with hide glue to get joints super tight. More likely a repair. We may well have forgotten quite a bit about artisan chair making nowadays.
 
Brilliant post, Andy. Thanks for that. I'll have a good look later when I've got a minute.
 
This will be interesting to watch :)

I'm sure you will go about it completely differently to me. I made loads of jigs for the router for my 10 chairs. I've not used them since so I'll bin them sometime this year.

Making thread was on WH1 but I did repost the pictures here on WH2 viewtopic.php?f=26&t=1055
 
Hi Mike, I will be watching the table build closely, I have been slowly building up a 'set' of windsor chairs, either made myself at home or made as part of a chair making course with James Mursell, I am unto 5 with 2 more underway.

The issue with our current table is the style, if is a standard oak table with 4 legs and a deep apron which precludes carver chairs completely. We are looking at pedestal type refectory table with no apron to seat 6 chairs around including a few carvers.

Ian
 
Back
Top