• Hi all and welcome to TheWoodHaven2 brought into the 21st Century, kicking and screaming! We all have Alasdair to thank for the vast bulk of the heavy lifting to get us here, no more so than me because he's taken away a huge burden of responsibility from my shoulders and brought us to this new shiny home, with all your previous content (hopefully) still intact! Please peruse and feed back. There is still plenty to do, like changing the colour scheme, adding the banner graphic, tweaking the odd setting here and there so I have added a new thread in the 'Technical Issues, Bugs and Feature Requests' forum for you to add any issues you find, any missing settings or just anything you'd like to see added/removed from the feature set that Xenforo offers. We will get to everything over the coming weeks so please be patient, but add anything at all to the thread I mention above and we promise to get to them over the next few days/weeks/months. In the meantime, please enjoy!

Jacobean style oak dining table & chairs.

I remember yours well, Robert. It was a beautiful result, but as you say, we'll probably tackle these things in quite different ways. It isn't impossible I'll make one or two router jigs, but I have to say it's fairly unlikely. Fifteen or 20 years ago I would have done it much the way you did.

I grew up with an oak pedestal dining table and a set of Windsor chairs, Ian. I loved it, especially the wedged tusk tenons.....and that one carver where you could reach around behind and rattle one of the loose spindles. I visited my old dad 20 odd years later, and just about the first thing I did was try that spindle. Still loose!

 
I've had this project on my mind for 2 or 3 years now, and the thing which I've always worried about is the back of the legs. The 2 inches either side of the change in direction:

kXEL7y1.png

I've just started the mock-up, and the highlighted area is the bit I'm talking about. OK, in the real thing there won't be knots right on the junction, but nonetheless, this is an awkward thing to get to grips with. I planed on the skew, then took a scraper to it (not great with softwood), then a spokeshave, and finally I pared it. Frankly, it's just not good enough:

eT87phd.png

Do I need a bull-nose plane, or something similar? Even most bull-nose planes seem to have something in front of the blade, though, so wouldn't get right into the corner. I don't want to just fudge this and round it, unless I absolutely have to. Does anyone know what they might have used in days gone by? Does anyone have a blockplane, and have a view on whether or not that would be my answer? I presume luthiers run into this sort of thing a lot, so what do they (you) use?
 
Chisel plane. Bull nose with the front off. They do work but you need it super sharp and take thin shavings.

I can lend you one if you want. It's a Record convertible bull/chisel. I have a LN one somewhere as well.
 
Ah, that's more like it. Thanks Adrian. Thanks for the kind offer. If I don't have luck finding one I'll come back to you.
 
AJB Temple":35yy7bpg said:
Chisel plane. Bull nose with the front off. They do work but you need it super sharp and take thin shavings.

I can lend you one if you want. It's a Record convertible bull/chisel. I have a LN one somewhere as well.
The other alternative is a proper chisel plane; I have a LN one and if used properly (and it's an art) it's an invaluable bit of kit - Rob
 
Mike, I have made just one chair, a library steps convertible. I wrote it up in another place in great detail.

Here's a picture of me planing that awkward corner

IMG_0209.jpg


According to the other thread, I just slewed the no 4 round and finished off with a scraper.
I was using some really mild hardwood (possibly sapele on the legs). I expect your softwood mock up is much harder to finesse than oak will be.
 
One of the problems, Andy, is that the leg is nearly 2 inches wide. That means a 45 degree attack on the junction leaves quite a big area untouched. Another is that I will be cutting out with a bandsaw, so I'll be sawing quite a way away from the line. There'll be a couple of mm of material to remove. I'm good at paring, but there has to be a better way.

I'm having a look at one of these, although I don't have high hopes at that price.
 
Other options include a big paring chisel flat on the wood with the bevel up, and a sideways slicing cut, or a plane iron used "bare" in a similar way.
 
Do you want a distinct transition or a gentle transition also known as a curve. I agree it is a real head scratcher as to what works. Do one of each in your mock up if you are undecided. I was undecided when I did my mock up. Given your design a distinct transition might fit the design best but it is worth considering alternatives now.
From a finishing point of view the distinct transition is a headache. The slightest chisel mark will show
 
PAC1":3cwoe9pm said:
Do you want a distinct transition or a gentle transition also known as a curve.....

I'd much prefer a distinct one, rather than a curve. I know guys who use flush trimming bits in a router would produce a rounded transition, and would then be sanding. I don't sand except as a last resort.
 
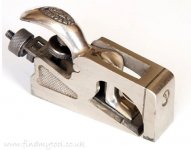
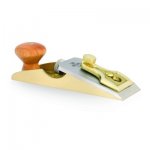
The Record is this 077A
Record 077A.jpg

The front comes off (there is a metal shim).

The LN is this and obviously bot are low angle. I use it for guitar work that I used to do when I actually had some skill. Has to be razor sharp.

Lie-Nielsen-No-97-5-Chisel-Plane-400.jpg

They work fine on hardwoods like oak, rosewood and maple. Hopeless on softwood quite often. I regard this as for fine, rather final trimming. You don't want to be taking lots of material off. You can use a piece of wood and a clamp as a plane stop if you want to guarantee really crisp angles.

A
 
Mike G":27k01vuv said:
PAC1":27k01vuv said:
Do you want a distinct transition or a gentle transition also known as a curve.....

I'd much prefer a distinct one, rather than a curve. I know guys who use flush trimming bits in a router would produce a rounded transition, and would then be sanding. I don't sand except as a last resort.
Guilty as charged :D . It depends what style I am making. A curve can also look wrong viz the rear rail let alone create setting out problems. As I say the down side of the distinct transition is getting a mark free clean junction an oil finish might be more forgiving on that front.
 
I have wondered about using a V chisel to make the clean transition and then a chisel plane to plane the two inches either side. I have not tried but it ought to work.
 
That Record looks just the job. As you say, it's just for the final finish with the grain, as I can pare the rest away.
 
PAC1":3qpw2fxj said:
I have wondered about using a V chisel to make the clean transition and then a chisel plane to plane the two inches either side. I have not tried but it ought to work.

I don't think you'd need the V tool, Peter. So long as you've a pencil mark to work to, working in from either side can leave a really nice clean junction, with care.
 
Mike G":257jdvci said:
PAC1":257jdvci said:
I have wondered about using a V chisel to make the clean transition and then a chisel plane to plane the two inches either side. I have not tried but it ought to work.

I don't think you'd need the V tool, Peter. So long as you've a pencil mark to work to, working in from either side can leave a really nice clean junction, with care.
To date I have only used a chisel and scraper as you outline to create angled transitions and with care it comes out fine. But usually I only have one or two transitions to do on such as a gothic style door head. A V tool might speed up the process with 24 to do.
 
DaveL":2pz1scq5 said:
I have a Record 311 that you can take the front off, shout if you would like to borrow it Mike.
e8567655a623f988f25e828cdda6db00.jpg

Oooh, thanks Dave. Yes please, let's give that a go. It should give an idea as to whether it's the right sort of answer for the problem.
 
Well!! I an in a huff now!!! I offer a proper chisel plane and then some imposter comes along :lol:
 
:lol: Dave's 5 minutes away, that's the difference.
 
I think it's basically the same tool with a different casting for the front Mike. Be interesting to see how you get on with it. Some people find them unusable, )in the same way some people struggle to sharpen stuff - could be a correlation there) but I find if they are well set up and properly sharp, you can do more precise work in tight spots than you can with a chisel. For your application it should work well, as long as you keep it controlled, perhaps with an end stop.
 
AJB Temple":3oejz2ds said:


They work fine on hardwoods like oak, rosewood and maple. Hopeless on softwood quite often. I regard this as for fine, rather final trimming. You don't want to be taking lots of material off. You can use a piece of wood and a clamp as a plane stop if you want to guarantee really crisp angles.

A

I can take off 2 or 3mm with that quite easily; there is a 'knack' :eusa-whistle: and yes it does have to be supersonic sharp and the the blade must be set precisely so that it just touches the work piece - Rob
 
:lol: You could take a foot off. Just takes forever as in my inexpert hands it needs very fine shavings to work well with an acceptable finish. That said, I am no expert with this and on the whole use a chisel where there is room.

The LN sharpens easier than the Record. No idea what the metals are though. My Record is quite old (still pristine but predates the modern era where people bandy around V11 and suchlike).
 
AJB Temple":2oj7xuhf said:
That said, I am no expert with this and on the whole use a chisel where there is room.
I think that's traditionally been the choice for everyone, judging by how many vintage chisel planes you don't see.

Bit out of practice with relevant sizes, but I fancy the 073 might make it a bit easier to avoid diving into the cut owing to having more length and heft at the stern than the 077. On the other hand it might be more inclined to be side-to-side tippy. Used to be that making a chisel plane would be the first plane you were likely to make, because it's so easy - and then you'd have next to no use for it, so either give up plane making or became Phil Edwards. But that's by the by. My point being, you might find making one the most effective solution, Mike, because it can have maximum length, minimum height, and whatever width of iron you think you'll be up to pushing.
 
After getting close to the line of the concave part of the chair legs with a skewed No.4 and a block plane I finished with a spokeshave, rasp and file. It was time consuming but with care I achieved a good result.
John
 
I've made the mock up. What a thoroughly worthwhile exercise it was, too. I've learnt all sorts about the process, and what I would do differently for the real things. This is rough-as-old-boots woodwork. There has been no attempt at cleaning or finishing, and of course, the real feature of these chairs will be the carving, and there is none of that:

fMejdqA.png

K7G7H6U.png

cGqKvwa.png

Here's one of the things I will definitely do differently:

KINAYUi.png

The acorn is OK, but I thought it might be sweet to mimic the stops from the chamfers just below, but it really doesn't work.

It's a big chair (Ercol for comparison):

exa5WHy.png

rjwZChk.png

But that's OK, because it is a big table in a big room. I think what I'll do, though, is use this height for the carvers and reduce the side chairs by 50mm or so. The carvers are also wider (they have to be).

Here is where I varied from the originals I was copying. This part is turned on those:

aBsmDUG.png

But I was dead set against having the back/ leg uprights in two parts, which precluded any turning. That left me with few options. As we have stopped chamfers all over the house that seemed like an idea. I'm still not convinced, but it has received design team approval.

I have also turned the bottom of the front legs down to a taper (as per the originals I was copying), but as my wife put it, it makes it look as though the chair is standing "on point". I'll turn up some balls/pillows and tenon those into the bottom of a shortened leg.

Other alterations will be bigger stretchers, a mono- rather than duo-helix for the barley twist, the back seat rail and back splat will be moved further into the rear leg, and the seat may be an inch too deep. We'll know more on that once I've upholstered it later. As this is going to be upholstered I'll probably make the seat rails deeper and mount the seat board inside them, so that the domed upholstery nails have some long grain rather than end grain to sink into.
 
I find chairs with that cross bar, like your barley twist (I think that alone should be a WIP!) mean that I cannot put my legs back under the chair and is uncomfortable/painful when I do. I don't know if I'm strange (! :) ) but I couldn't sit for that length of time with legs straight down.
 
That's why it's high, Malcolm. Obviously, you'd get your legs further under if it wasn't there at all, but you can get your heels in underneath it. Older styles had the stretchers at floor level, and you put your feet on them. This was as a result of earthen floors with rushes, which were pretty unpleasant. As an aside, this height also allows a vacuum cleaner access. Another example of societal norms being captured for posterity in our furniture and buildings.
 
Fascinating and very educational.

I'll offer a few comments now, rather than after you've made the set, if I may.

Turning on the back doesn't mean it has to be made in two parts and you'll have seen pictures of historical examples of this. I'm sure I have seen a diagram of the top part horizontal on a lathe, up to the bend, then with the foot supported on the edge of a big disk. Possibly a bit scary on a powered lathe but practical on something slower.

I do like the stopped chamfers on the back posts though and I expect they will echo similar details elsewhere in the house.

I did find my eye was drawn to the transition between the verticals and the arcs on the back panels and I don't think they are quite right. The arcs possibly need to either be full semicircles so there is no step between straight and curved, or much flatter. And there's a related question where the relatively wide arc at the bottom of the back does cut into the horizontal slat rather a lot, making the thin part in the middle look weak. I don't know what the answer is, if there needs to be an answer, but I'd hate for you to notice it too late. Maybe the central flat could be narrower?

Certainly watching with interest and admiration.
 
AndyT":kqw6jecw said:
I did find my eye was drawn to the transition between the verticals and the arcs on the back panels and I don't think they are quite right. The arcs possibly need to either be full semicircles so there is no step between straight and curved, or much flatter. And there's a related question where the relatively wide arc at the bottom of the back does cut into the horizontal slat rather a lot, making the thin part in the middle look weak. I don't know what the answer is, if there needs to be an answer, but I'd hate for you to notice it too late. Maybe the central flat could be narrower?

Certainly watching with interest and admiration.

I tend to agree AndyT, perhaps the chord length of the curved part should be made equal to the width of the central back portion.

Bob
 
:text-+1: for how you did the barley twist.
:text-+1: for extending the top arc to the width of the back panel.

But who I am to criticise?

Would take me 6-8 weeks to make one. Somewhat surprised that it would take you so long to make the whole set. :)
 
I'll do a proper WIP in this thread for the chairs when I come to do the real ones, so that will cover the barley twist etc.

Now is the time to raise these issues, and all comments are gratefully received. I did draw it initially with the arch being semi-circular. The issues are the height and grain direction of the top rail, and the thickness of the bottom rail. So, as Andy says, the answer is to maybe be a little flatter. Maybe this version is neither one thing nor the other. The only downside of flattening it a little is that the gaps around a circular Tudor Rose on the centrepoint of the same arc can start to look a little uncomfortable. I'll certainly have a look at adjusting this.

My lathe isn't long enough to do the frightening thing Andy suggests. It would need to be about 2 feet longer, I reckon, for that, and the height over the bed probably wouldn't allow it anyway. I'm glad the chamfers don't offend.
 
Fascinating project. I love these project threads. Are all the side chairs going to be the same size? And if so, what size human are they designed for?
 
The side chairs are the same size, but the carvers are going to be wider and taller. That's traditional, but for a very good reason: the arms in chairs of that era sat directly on top of the extended front legs, rather than on separate side pieces. This means the chair needs to be wider to allow someone to fit between them.
 
Excellent and that’s just the mock up
My immediate suggestion is: I would make the acorns slightly smaller.
 
The issue I have, Peter, is that the stiles are 45mm square, so essentially the base of the turning has to be 45mm in diameter. It's hard to get down to something much smaller than I've done when it's got a base that size. My wife had been worried that they'd be a bit big, but was pleasantly surprised when I showed her these. We're wondering if the effect of them might be reduced by raising the top rail a little, so that they don't stand so proud.
 
Do you need a base on the turning? You could dowel them into the leg. Not least as you have the octagonal chamfer to terminate the leg, is a circular base needed.
 
Well, I haven't got an octagonal base, because we really dislike those little chamfer stop things at the top. These finials are tenoned into the top of the stiles, as I can't turn the legs due to the kink where the leg meets the back, but the issue is aesthetic: how do you sit something round on top of something square, and have the junction pleasing to the eye?
 
My comments would be.
The acorns are just fraction large and I do quite like the chamfers under them, without the chamfers it would be a large square end presumably?
The whole top of the chair doesn’t quite work for me, for me, I would change the top so that the horizontal supports didn’t come from part of the semicircle, move them maybe two or 3 inches below that joint – just mortised into the panel frame and the chair legs, doing that it would allow the tops of the legs and the acorns to be a little lower and more in relation to the semicircular bit, just my 10 penworth. Ian
 
I'm trying to remain true to the original, Ian, which was set-up like this one.
 
Back
Top