• Hi all and welcome to TheWoodHaven2 brought into the 21st Century, kicking and screaming! We all have Alasdair to thank for the vast bulk of the heavy lifting to get us here, no more so than me because he's taken away a huge burden of responsibility from my shoulders and brought us to this new shiny home, with all your previous content (hopefully) still intact! Please peruse and feed back. There is still plenty to do, like changing the colour scheme, adding the banner graphic, tweaking the odd setting here and there so I have added a new thread in the 'Technical Issues, Bugs and Feature Requests' forum for you to add any issues you find, any missing settings or just anything you'd like to see added/removed from the feature set that Xenforo offers. We will get to everything over the coming weeks so please be patient, but add anything at all to the thread I mention above and we promise to get to them over the next few days/weeks/months. In the meantime, please enjoy!

Joint Practice

Dr.Al

Old Oak
Joined
Dec 31, 2020
Messages
3,926
Reaction score
2,842
Location
Dursley, Gloucestershire
Name
Al
I've been doing some practising of joinery. I've got to the point I'm relatively comfortable with dovetails (through, half-lap or tapered sliding), lap joints, M&T joints & housings, but bridles are one that I think of as being particularly irksome.

I'm sure it's partly down to the huge angled ones I did on the garden table, but getting a good fit does seem more awkward than some other joint types (mainly due to cleaning up the inside faces).

Anyway, I've done a couple of attempts & they both went okay:
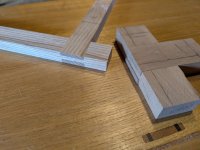
11472.jpg

The beech one (on the right) wasn't quite perfect but that wasn't because of the joint: it was because I stupidly picked a bit of wood that wasn't square and of even thickness (and I didn't bother to check). The side uppermost in the photo looks fine but the lower side is sub-flush on one side as the piece of beech tapered. I didn't bother to glue / clean up that one.

I was very happy with how the ash one came out (after gluing together with home-made liquid hide glue & cleaning up with planes):
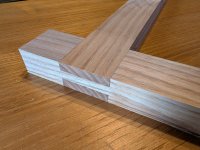
11473.jpg

That success inspired me to be brave and try an even more difficult joint. This one was quite a challenge & the result is a very long way from perfect but as a first attempt I'm quite pleased:
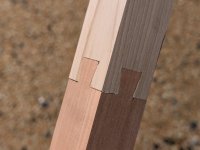
11475.jpg

(Sweet Chestnut & Cherry)

8 second video showing all the sides:


I think I'll have another go at that joint to see if I can improve my technique.
 
I think you've got it sussed!

I've only done a few bridle joints and I agree that they do feel harder.
 
I've done hundreds of bridles, and they are definitely the most difficult of the standard joints. If I were setting a woodworking test for someone, it would be to make a bridle joint. And yeah, those dovetailed-all-round scarf joints are fun, aren't they. The first time I saw one I puzzled over it for 10 minutes or more trying to work it out. Once you know, it's obvious.
 
What's your preference with the bridle joint for separating the waste?

- Drill an undersized hole near the end, freehand, coming in from each side, then pare back to the lines?
- Drill a full sized hole by machine, bang on target, leaving minimum to be pared away?
- No hole, just chop out the waste with a mortise chisel from either side.
 
It depends on the size. If it's a massive thing in a green oak beam, then an undersized hole. If It's small and set up to a chisel-width, then chop out with a chisel (actually, I'm perfectly happy to use any old bench chisel, and seldom use a mortice chisel). I can't recall ever drilling out exactly the right size.
 
I've done hundreds of bridles, and they are definitely the most difficult of the standard joints. If I were setting a woodworking test for someone, it would be to make a bridle joint. And yeah, those dovetailed-all-round scarf joints are fun, aren't they. The first time I saw one I puzzled over it for 10 minutes or more trying to work it out. Once you know, it's obvious.

Indeed. I made one many years ago out of aluminium & brass. That was mostly an exercise in making a custom angled dovetail cutter for the milling machine (which then does the work of giving accuracy): none of this hand tool nonsense when cutting metal!

I'll definitely have (at least) another go as I don't feel I've got the technique right yet.

What's your preference with the bridle joint for separating the waste?

- Drill an undersized hole near the end, freehand, coming in from each side, then pare back to the lines?
- Drill a full sized hole by machine, bang on target, leaving minimum to be pared away?
- No hole, just chop out the waste with a mortise chisel from either side.

I can't remember what I did on the huge ones on the garden table, but on these two I used a fret saw to cut out most of the waste & then a chisel to pare back to the line.

An undersize drill or mortice chisel would be fine, but I didn't bring either on holiday with me! I don't think I'd ever be tempted to drill to size.
 
I bought this course from Richard Maguire and he has an interesting way of making these angled bridals reproduceable ( he can make them and they are interchangeable. I only got as far as making the guides but need to fine tune them, then got sidetracked on other projects.

As for that complex joint, reminds me of that impossible mallet that Abe Lincoln supposedly had.
 
Back
Top