• Hi all and welcome to TheWoodHaven2 brought into the 21st Century, kicking and screaming! We all have Alasdair to thank for the vast bulk of the heavy lifting to get us here, no more so than me because he's taken away a huge burden of responsibility from my shoulders and brought us to this new shiny home, with all your previous content (hopefully) still intact! Please peruse and feed back. There is still plenty to do, like changing the colour scheme, adding the banner graphic, tweaking the odd setting here and there so I have added a new thread in the 'Technical Issues, Bugs and Feature Requests' forum for you to add any issues you find, any missing settings or just anything you'd like to see added/removed from the feature set that Xenforo offers. We will get to everything over the coming weeks so please be patient, but add anything at all to the thread I mention above and we promise to get to them over the next few days/weeks/months. In the meantime, please enjoy!

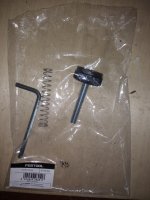
kapex KS60 what's this for?

I'd tried that Bob, a load of references in German but not a lot of help.

I am sure Malc or Roger will know
 
Looks like the spring goes over the rod then tightens down into something. Is it not a spare for one that's already there? Or look for a hole that matches the size of the thread and see if it looks right...
 
Screenshot 2019-03-04 at 17.08.44.png

There should be four raising feet and if you use them to raise the level to that of a systainer, then the screw foot and spring replaces the short one that's fitted.
 
Sorry Malc I know i can be a bit slow on the uptake sometimes but I still do not get it.

A found the accessory on the Feestol site
https://www.festool.co.uk/accessory/500 ... -sys-ks-60.

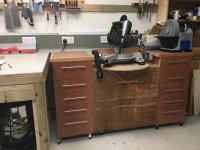
I fitted the four feet to raise the Kapex, I have not got a systainer but the extra height is good for the cabinet it is on. So why do I need the threaded knob and spring?
Do you use yours? Any chance of a piccy?

I won't be able to get out to the workshop today so not at all urgent. I am just curious.
 
'S'alright, Andy. Most of my days are like that! :D

It's the fifth foot after you've put all the other four on.
Screenshot 2019-03-04 at 17.08.44.png
fullsizeoutput_6ad.jpeg
 
OK Malc, got it :oops:

So that threaded knob and spring needs to be fitted underneath the swinging arm with or without the systainer levelling feet. I did not realise that it needed added support. I will have to enlarge the cabinet top with a curved bit like what you have done.
 
Yes. The threaded knob, or foot, replaces the short one under the swinging arm to prevent the arm from flexing.
 
Corectomundo.... Takes up flex... Your table is now exactly the same height as a Systainer 1 (box) for supporting long sections, for when you're on the deck wrecking your knees [emoji123]

Sent from my Moto G (5) using Tapatalk
 
Hijacking the thread...does anyone know how to use the internal/external angle dooberry ?
 
Sorry about the formatting. I did my best!

10.1 Bevel SM-KS60 (available as an accessory depending on the model)

The bevel can be used to gauge any angle (e.g. between two walls). The bevel therefore forms the angle bisection.

Gauging the interior angle [14A]

Open the locking device [14-2].
Swivel the router [14-1] out in order to gauge the interior angle.

Close the locking device.
The dashed mark [14-4] provides the angle bisection.
The angle bisection can be transferred via the
outside edges of the bevel to the position markings
>|< on the rotary base.


Gauging the exterior angle [14B]

Open the locking device [14-2].

Slide the aluminium profiles [14-3] on the router
forwards.

Swivel the router [14-1] out so that the aluminium
profiles are at the exterior angle.

Close the locking device.

Slide the aluminium profiles for the two routers
back again.


Transferring the angle [15]

Place the angle bevel perfectly in place on one
of the stop rulers .- press with your thumb.
 Release the rotary knob .

Hook in the detent lever .

Swivel the rotary base , until the outside
edge of the bevel is congruent with the marking
.
 (info) To do so, the bevel must be positioned so that it
is parallel to the stop of the compound mitre
saw. At the same time, apply pressure to the
stop ruler by pressing in the recessed grip with
your thumb.

Close the rotary knob , remove the angle
bevel.

The angle is transferred, the sawing process can be
started.
 
That's the Swahili instructions! Still none the wiser I'm afraid.

Sent from my SM-G930F using Tapatalk
 
Best I can do, I'm afraid - English, French, German, Latin, Russian and Swahili O Level 1966!
 
That's what I said, wasn't it?!! I bet he hasn't got Russian O Level! :lol:
 
Malc2098":2f9kc8sp said:
That's what I said, wasn't it?!! I bet he hasn't got Russian O Level! :lol:

When I did Russian 'o' level my teacher could never understand why my written homework was so colloquially perfect..in fact better than his Russian and yet my performance in class was crap. Me Mum did my homework :lol:
 
RogerS":309j6r33 said:
Malc2098":309j6r33 said:
That's what I said, wasn't it?!! I bet he hasn't got Russian O Level! :lol:

When I did Russian 'o' level my teacher could never understand why my written homework was so colloquially perfect..in fact better than his Russian and yet my performance in class was crap. Me Mum did my homework :lol:

:text-bravo: :text-lol: :text-lol:
 
Back
Top