• Hi all and welcome to TheWoodHaven2 brought into the 21st Century, kicking and screaming! We all have Alasdair to thank for the vast bulk of the heavy lifting to get us here, no more so than me because he's taken away a huge burden of responsibility from my shoulders and brought us to this new shiny home, with all your previous content (hopefully) still intact! Please peruse and feed back. There is still plenty to do, like changing the colour scheme, adding the banner graphic, tweaking the odd setting here and there so I have added a new thread in the 'Technical Issues, Bugs and Feature Requests' forum for you to add any issues you find, any missing settings or just anything you'd like to see added/removed from the feature set that Xenforo offers. We will get to everything over the coming weeks so please be patient, but add anything at all to the thread I mention above and we promise to get to them over the next few days/weeks/months. In the meantime, please enjoy!

Krenov lamp

Steve Maskery

Old Oak
Joined
Jul 27, 2014
Messages
2,421
Reaction score
1,394
Location
87290 Laplagne, France
I must be mad.

THere is a corner of my Gentleman's Residence that is a bit dark. Sure I have a ceiling light, but I prefer the floor lamp and table lamp combo. But they leave me with dark corner at one end of the sofa. Now I do have a redumdant Mother-and-Child lamp in my office, but it would look out of place, so it's an opportunity to make something I've had in my head for a very, very long time.

Once upon a time there was a gentleman called James Krenov. He was best known for his Cabinet-on-Stand creations.There are some pictures of his work here.

However he also made some clocks. This one was once on the back cover of FWW magazine. It's crying out to be interpreted as a lamp, so here is my interpretation.
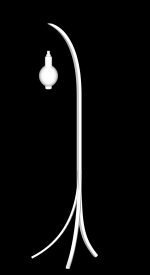
krenov lamp.png

If anyone can tell me why that image has a black backgound when, on my computer, it is white, I'd be interested to know.

There will be a swivel joint half way up so that the lamp can be over my right shoulder or my left.

So there are only 4 wooden components, how hard can it be?
 
Steve Maskery":2g53voba said:
I must be mad.

There will be a swivel joint half way up so that the lamp can be over my right shoulder or my left.

So there are only 4 wooden components, how hard can it be?
Doable Steve, but ticklishly tricky :lol: Personally, I would keep the rear leg straight as in JK's original; having it splayed as in your interpretation reminds me of a Triffid :lol: Quite how you do the swivel joint will also be interesting!

I would also, definitely and without question make a full sized laminated mock-up in pine. Apart from that, it's a piece of cake; Sunday afternoon job! :eusa-whistle: :eusa-liar: - Rob
 
Excellent, Steve. I look forward to this one. On first glance, it would appear to be quite forgiving a project. The only thing which you have to get absolutely bang-on right is the curve and mounting of the 2 secondary legs. Plus, of course, the difficulty of getting the cable up the middle.......which isn't a huge issue as I assume this will all be laminated.

What are you going to make it out of?
 
There first thing to do was to model it in Sketchup and produce some profiles on a 25mm grid.
french curves.JPG

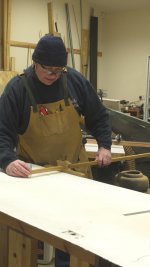
I've been given 7 doors from a 1930s house. The owner said they were pitch pine. They are not, they are Douglas Fir, but beautiful stuff, the workshop smells wonderful. But at some point (1960s/70s I assume) someone thought it was a good idea to cover them with hardboard. So Ihave lots of material to use for templates. I mark out a 25mm grid with pencil gauge, panel gauge, squares and wotnot, and transfer the crossing-points.

panel gauge.JPG

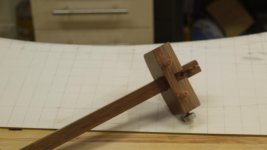
I only need to plot one edge of the curve. The other is just an offset which I can make with my pencil gauge. The lip is detachable, revealing two pegs that can follow a curved edge.

pencil gauge.JPG

offset gauging.JPG

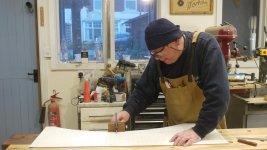
Bandsawn and cleaned up with a compass plane and spokeshave.

compass plane.JPG

first template.JPG

I've scrounged some insulation board, but it's only 25mm thcick, so I'm having to use DS tape to double up the thickness.

DS tape.JPG

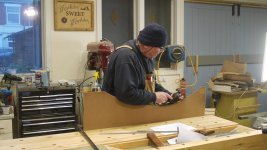
I bandsawed out the formers using the inside edge of the template (my new super-duper BS DX comes into its own for a job like this - my workshop does not look like Santa's grotto, which it would have done without, despite being as cold as Santa's Grotto...), so now I have these:

finished formers.JPG
 
Steve Maskery":37zbvgfq said:
........at some point (1960s/70s I assume) someone thought it was a good idea to cover them with hardboard...........

Hardboard has saved many a period feature. Stair handrails and ballustrading were often boarded over. So were fireplaces, and, of course, doors. Thank goodness for hardboard, I say.
 
Woodbloke":22ftcygx said:
Doable Steve, but ticklishly tricky :lol: Personally, I would keep the rear leg straight as in JK's original; having it splayed as in your interpretation reminds me of a Triffid :lol: Quite how you do the swivel joint will also be interesting!

Oh I like the back leg curve. The swivel joint will be brass, I have a tame engineer friend.

Woodbloke":22ftcygx said:
I would also, definitely and without question make a full sized laminated mock-up in pine. Apart from that, it's a piece of cake; Sunday afternoon job! :eusa-whistle: :eusa-liar: - Rob

Mike G":22ftcygx said:
What are you going to make it out of?

My first thought was that it must be oak. But this Douglas Fir is beautiful stuff, so I think I'm going to try it with that. If it doesn't look right it will be the prototype that Rob is suggesting. I'm not sure that I can actually salvage enough from the doors, as, although they are 6'6" high, there are dowels in them at the joint positions. Yes, in the 1930s they were using dowel joinery for doors. They'll never last, cowboys.

I'm certainly going to do a practice joint. I haven't finalised in my head how the blend is going to look.

Mike G":22ftcygx said:
I assume this will all be laminated.
Yes. laminate a bit, rout out for the cable, laminate again. It's too cold to glue in there at the moment, so I've ordered an electric blanket. I also, for reasons with which I shall not bore you, have the National Collection of Duvets, so between the two I hope I can keep the actual glue-up in double figures.
 
Glue it up, Steve, then tuck it under your arm and bring it into the house. My wife is well trained to accept the occasional compromise like that in order to benefit from the stuff the workshop turns out. Or, if you glue up in the morning you should be able to bring it in in the afternoon without all the clamps.
 
I’m not sure how you intend to do the joint where the legs come together Steve so jfyi this is how I made the bottom of a music stand, as you can see the middle leg is removable for ease of transport - Obviously not necessary in your case. I shall follow this build with great interest, it is something I certainly would like to make for myself as I too have a dark corner, and sometimes need a light over my shoulder for when I’m reading.
Cheers Ian
D8E5303E-9227-4D85-8967-F034A4FA453A.jpeg
 
Ian, that is so helpful, thank you. Can you show me a pic of the wider view, showing the whole joint? What happens 6" above the picture you have posted?
You little teaser, you.
:)
S
 
Ian
Looking again, it seems to me that you have your two feet at 180 degrees to each other. I want mine at 90 so the lamp can sit in a corner. But any view of your joinery would be really appreciated, thank you.
S
PS, I've just realised that 120 degrees would also work. Hmm, this is a point of detail that requires some further consideration
 
Or, in fact, any traingular angle.
What on earth have I started?
I have no doubt that, on a piece like this, the finer details will make or break it.
Aaaarrrggghhh!!!
 
Steve Maskery":286xo3f3 said:
Or, in fact, any traingular angle.
What on earth have I started?
I have no doubt that, on a piece like this, the finer details will make or break it.
Aaaarrrggghhh!!!
...which is why, in my very 'umble opinion, you need to make a full scale prototype prior to making the actual lamp. All the nasty little conundrums, problems and issues will then become instantly apparent and the ultimate solutions thereof much easier to visualise and make - Rob
 
Steve Maskery":yinxer8b said:
Or, in fact, any traingular angle.
What on earth have I started?
I have no doubt that, on a piece like this, the finer details will make or break it.
Aaaarrrggghhh!!!
Steve that’s probably one of the truest things you’ve ever said ha ha. As luck would have it the piece in question came back into the workshop when the guy emigrated – a few years ago I can’t quite remember why but it’s still there so I will take some pictures, but in reality my piece leant backwards so the two front legs were on a flat plane, yours will want to be more at 120 degrees each, This is why I was interested to see how you would get out of this conundrum lol. Ian
Ps, I would be more worried about the swivel joint in the middle I think, that could be a serious point of weakness unless the metal rod was quite long, but with the wire going up there as well it doesn’t leave a lot of room for a rod, and how long a drill at 6mm? Can you buy?
 
On the original piece the back leg looks “intact” with the front pieces tapering into it.
Sam Maloof used all sorts methods with rods, bolts etc to seamlessly join his chair pieces together.

Of course the easy way out is to buy a Serious Reader [emoji3]

Rod
 
I'm also curious as to where and how the wire goes to remain hidden.

Nice project though
 
Steve Maskery":2jpewxtf said:
I must be mad.

If anyone can tell me why that image has a black backgound when, on my computer, it is white, I'd be interested to know.

I'm guessing its a png file with the background set as 'transparent'.

Imagine it a a piece of clear paper with the lamp drawn on top, when you view the image the background will show whats 'underneath'.
Your viewer obviously has a white background, so it shows as white, but some software (including probably this forum) has trouble with transparencies, so it interprets the missing pixels as black.

In photoshop, if you had a photograph of say a living room, you could just drop the lamp picture on top of it, and only the lamp would show up - no need to do any manual masking.

Normal jpg's dont have mask (alpha) channels, so they are always 1 layer - 'what you see is what you get' :)

EDIT - like this
04-01-21-10-33-08.jpg
 
9fingers":2tuis6zf said:
Hang on, three legs = Line Neutral and Earth :lol:

Bob
Hang on a minute Bob...then you'd have three separate wires, one going up each leg, nae? That would then mean you'd have a wire coming out the bottom of each leg? Could get complicated :eusa-whistle: :lol: - Rob
 
Woodbloke":g7oqszmk said:
9fingers":g7oqszmk said:
Hang on, three legs = Line Neutral and Earth :lol:

Bob
Hang on a minute Bob...then you'd have three separate wires, one going up each leg, nae? That would then mean you'd have a wire coming out the bottom of each leg? Could get complicated :eusa-whistle: :lol: - Rob
Noooo. Make the legs conductive lol

Bob
 
if we a rewiring Steves house now so he can have a third rail on the floor, then let's not bother with wires and go with inductive coupling.


you can buy hollow m10 threaded tube Steve. you can also get threaded inserts in the same size. if you have a friendly engineer with a lathe I think it would be a fairly simply coupling for the other end, I'd draw you a picture but not right now. :)
 
Might need two of course. One always fully charged, but then it can also be used in the garden, camping etc..
 
Would it be possible to use two (stainless) tubes one sleeved over the other, the larger one fixed into the base with a bearing around it, or a bearing surface around it. The cable could run up the centre.
 
Your going to want to stop it moving axial Steve. Even if it's just peening over the bottom of the tube although id rather have a press fit collar.
 
Mike G":5d8sz3qk said:
Glue it up, Steve, then tuck it under your arm and bring it into the house. My wife is well trained to accept the occasional compromise like that in order to benefit from the stuff the workshop turns out. Or, if you glue up in the morning you should be able to bring it in in the afternoon without all the clamps.

:text-+1: Isn't that what dining room tables are for now that we can no longer have guests in for meals?
 
I wouldn't worry for own use but if you ever came to sell this you'd need a rotational stop to prevent the cable getting twisted inside that swivel idea should someone wind it round and round.

Retired lighting engineer... and retired before LEDs got going so standards will have changed but I doubt cable management standards have.
 
RogerM":230lz0q8 said:
:text-+1: Isn't that what dining room tables are for now that we can no longer have guests in for meals?
I'm currently applying Osmo to my longcase clock project and I would dearly love to bring it into the kitchen diner and dump it on our huge teak table, wack up the heating and get it finished in a couple of days. In the 'shop as it is at the moment, each coat is taking a full 24hrs to harden off :( - Rob
 
Back
Top