• Hi all and welcome to TheWoodHaven2 brought into the 21st Century, kicking and screaming! We all have Alasdair to thank for the vast bulk of the heavy lifting to get us here, no more so than me because he's taken away a huge burden of responsibility from my shoulders and brought us to this new shiny home, with all your previous content (hopefully) still intact! Please peruse and feed back. There is still plenty to do, like changing the colour scheme, adding the banner graphic, tweaking the odd setting here and there so I have added a new thread in the 'Technical Issues, Bugs and Feature Requests' forum for you to add any issues you find, any missing settings or just anything you'd like to see added/removed from the feature set that Xenforo offers. We will get to everything over the coming weeks so please be patient, but add anything at all to the thread I mention above and we promise to get to them over the next few days/weeks/months. In the meantime, please enjoy!

Kumiko

Doug

Old Oak
Joined
Jul 21, 2014
Messages
2,465
Reaction score
500
Location
@dougsworkshop
I’ve been following a couple of American cabinet makers on Instagram who make beautiful Kumiko panels from Basswood (Lime) from what I be seen it looked pretty straight forward the main items needed other than general Woodworking tool were some angle blocks used to chisel the angles on the intersecting corners.

The 45 & 67.5 degree blocks were easy to cut on the table saw after first running a groove in some Oak but the 22.5 degree block proved more troublesome in the end rather than mess about trying to make a jig to hold the Oak on the table saw I decided to cut it by hand & plane the angle.


4AC96185-2D39-4EB0-94FC-508A6D9B29A3.jpeg

To check the accuracy of the block I used the 67.5 degree block & a square until I was happy with the angle


6B55314D-D3B6-4DE4-881F-69039CEBF0AF.jpeg

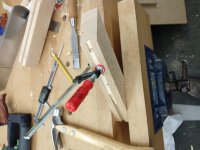
The blocks should have a movable stop in the groove but as I was keen to get making a clamp & couple of bits of scrap had to suffice

95FF6384-298D-4337-A952-859B0DC39FDC.jpeg

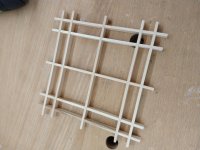
I cut the halving jointed frame on the table saw

67234C49-BD21-4BE6-B205-CF60BF712193.jpeg

I managed to get the diagonals & one set of internal pieces cut & fitted before it was time to call it a night
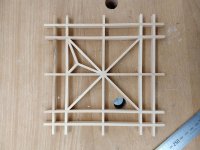

1C86C931-4B74-42D3-83B6-4CF77F56E994.jpeg

I’m happy with how this has gone together, it’s only a test piece to check the blocks worked but I think I’ll finish it though I’d like to make a more intricate panel when time permits..
 
Thanks for the comments

Andyp":2et8ifzz said:
Never heard of that before. I am imagining the effects that using different woods would make.

It seems to have gained popularity over the last year or more on Instagram with folks running classes on it, different timbers could be made to give striking effect something to try once I become more proficient.
 
My mate Andy Pickard on InstaG has been bending my ear to have a go at that. I've got a wall mounted cabinet to do later on to hold a collection of Japanese tea pots etc and I reckon a bit of 'kumiko' in the door wood look proper

How do you go about cutting the 90deg halving joints?- Rob
 
I was chatting to Andy P first thing, he’s using Tulip wood now as his Maple was a bit hard.

I cut the halving joints on the sliding table of the table saw, I’d cut all my stock to 10mm x3.3mm the kerf of my blade thought I believe many cut their stock to the height they want but before cutting into thin strips they cut the halving joints & finally cut the timber into thin strips.
 
Doug":3haiadkq said:
I was chatting to Andy P first thing, he’s using Tulip wood now as his Maple was a bit hard.

I cut the halving joints on the sliding table of the table saw, I’d cut all my stock to 10mm x3.3mm the kerf of my blade thought I believe many cut their stock to the height they want but before cutting into thin strips they cut the halving joints & finally cut the timber into thin strips.

Thought that was the case. I could do the same thing I suppose using a very small router cutter but it's very old and a bit 'tired' so I may have to get hold of a new one. I mentioned to Andy that I've got a chunk of soft maple which might be ideal for this sort of thing - Rob
 
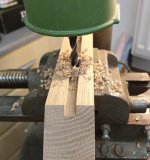
Got a little time to finish off the angle block stops this afternoon, I started by drilling 9mm holes in the channel at the pillar drill

5DDE57C1-3F13-4D9C-BCBF-408F493B532B.jpeg

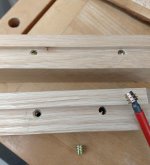
These holes were to accept captive threaded nuts screwed in with an Allen key


D11EF5C6-DBBD-4846-A48F-4FF2CDAD48C8.jpeg

The stops needed a slot cutting in them this I did at the pillar drill this time with a router bit held in the chuck advancing the timber with the cross vise.

4924D22F-0799-41E6-93FE-8F8E0901A424.jpeg

The angle blocks complete ready for finishing my panel


38FE778C-6F27-4828-86C2-9A94A61503F4.jpeg
 
Woodster":30auyf60 said:
Looking good! ;)


Thanks

With the blocks sorted I’ve managed to get this practice panel all cut & assembled it needs gluing as this will enable me to sand it but I’m pleased with the results so far


9C363035-9461-4C64-99DB-1F1C640C3B94.jpeg
 
Very clever. I am not sure how those blocks work. Do they help cut to the right length and then plane to the correct angle?
 
Thanks for the comments

DaveL":3icekwi8 said:
Very nice, the blocks must make production of the parts much easier.

They do indeed Dave once you’ve got them set up right the rest is plane sailing making as many components as you need
 
Andyp":3o6faba0 said:
Very clever. I am not sure how those blocks work. Do they help cut to the right length and then plane to the correct angle?

You cut the pieces to size, then place a piece in the block & parr the angle with a chisel Andy, setting the stop allows you to make as many pieces as you need of identical size.
 
TrimTheKing":ezi32s4g said:
Lovely Doug.

I’m still not grasping how the blocks work though. Any chance of an ‘in action’ shot?
Same here; this is something that I would like to have a go at later so an eejits guide :D would be very handy.

What happens when an angle is cut on one end...is the piece reversed in the jig to cut the other end or does it go into a another jig for another angle to be cut? - Rob
 
This might answer a few questions


[youtube]NSGmPd1vzGA[/youtube]

I’ve mainly gone on what I’ve seen on Instagram, I made the frame first after which there are only three different size pieces to make, a group of 4,one of 8 & another 16.
If your frame is square then the pieces in each group are identical, so I cut the components to a rough length, set the block to cut the angle on one end then reset the block (or change blocks) to cut the opposite end to the correct angle & by doing so cut it to its final length.
Accurately setting you blocks to the right component length is the hardest part, a matter of trial & error until they all fit together snugly. For this reason having two 45 degree blocks is handy as you can leave them set for each end, I could do with making another 67.5 degree block for the same reason
 
Thanks Doug. Makes 100% sense now I realise the size of it!

For some reason I had it in my mind that your panel was about 18” across which I couldn’t the rationalise against the size of the paring blocks!

Love it! One for me to have on the list in the future for sure!
 
Back
Top