• Hi all and welcome to TheWoodHaven2 brought into the 21st Century, kicking and screaming! We all have Alasdair to thank for the vast bulk of the heavy lifting to get us here, no more so than me because he's taken away a huge burden of responsibility from my shoulders and brought us to this new shiny home, with all your previous content (hopefully) still intact! Please peruse and feed back. There is still plenty to do, like changing the colour scheme, adding the banner graphic, tweaking the odd setting here and there so I have added a new thread in the 'Technical Issues, Bugs and Feature Requests' forum for you to add any issues you find, any missing settings or just anything you'd like to see added/removed from the feature set that Xenforo offers. We will get to everything over the coming weeks so please be patient, but add anything at all to the thread I mention above and we promise to get to them over the next few days/weeks/months. In the meantime, please enjoy!

Making a no 12 "style" scraper

Lons

Old Oak
Joined
Jul 21, 2014
Messages
2,967
Reaction score
1,118
Location
Northumberland
Name
Bob
Well I've started and it's all Mike's fault for extolling the virtues of cabinet scrapers so I managed to get hold of a Record 080 which is great but I really, really like the look of the Stanley 12.

Materials will all come from my stash of stuff, hopefully I can make the blade from an old circular saw blade so nothing lost if it doesn't work out, I could always have another try.

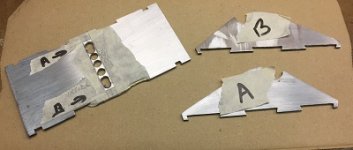
Only had 3mm steel so that will have to do for the base and sides, decided to cut dovetail joints after all how hard can it be? Wish I hadn't as I really struggled in metal to get them close so the joints need a bit of work though it's solid enough I'm not happy with them. I will need to weld some parts so might try a bit of filling, not sure yet.
Anyway this is where I am so far, I'll keep posting progress, warts and all if anyone's interested. :)
 

Attachments

  • 06.JPG
    06.JPG
    37.6 KB · Views: 5,224
  • 05.JPG
    05.JPG
    36.9 KB · Views: 5,224
  • 04.JPG
    04.JPG
    48.2 KB · Views: 5,224
  • 03.JPG
    03.JPG
    51.1 KB · Views: 5,224
  • 02.JPG
    02.JPG
    31.6 KB · Views: 5,224
  • 01.JPG
    01.JPG
    73.4 KB · Views: 5,224
Yes that looks like you’ve cleaned it up really well the from three rough bits, do you sort of hamme over like a rivet, the two sides to the base? And I can’t imagine actually trying to make anything from a circular saw blade, it seems such a hard unforgiving material to make anything from.
 
What an excellent project, an angle grinder might be the best way to cut out the blade shape as long as you manage the heat.
 
It’s looking good!

I think a circular saw blade will be the same hardness as a card scraper, I would try it out before you go to the trouble of harden it.

Pete
 
Thanks guys it's keeping the grey matter active working out (cobbling up) the parts. ;)

Ian, yes just a punch and hammer but I don't think I allowed enough through the dovetails to hammer properly, a second attempt would be better.

Michael and Pete, I had decided to use a grinder as I have some very thin cutting disks and will try it first as you suggest, worst scenario is that I have to buy some tool steel. My biggest concern is that I read somewhere that the no 12 blades are thick but can't find out how thick so my thought was to allow enough room for maybe 3mm and I will still be able to clamp thinner blades, the saw plate I have is from memory less than 2 mm. I suppose I could even use thinner and stick a shim behind if it wasn't secure. I'm just making it up as I go along.
 
I should have been more clear when I said manage the heat I meant during cutting with the grinder.
Maybe someone has a suitable pice of steel in their workshop.
 
OK I said including the warts. :shock:
Added a rear support posts, brackets threaded to accept handle fixings and a support/stiffener across the front.
I decided it wouldn't be too difficult to weld but forgot how bad I am :oops: I couldn't see the damn joins through the visor to weld and couldn't get the amps or speed right. I should have welded over it again but was concerned I might warp the steel so will grind down the welds a bit and fill the joins with JB Weld for cosmetic reasons as it's rock solid as it is.
I intend to paint the inside anyway, what paint did you use for your plane Pete?
 

Attachments

  • IMG_0170.JPG
    IMG_0170.JPG
    64.8 KB · Views: 5,030
Have you thought about making custom shoes/soles for it, for scraping various curves?
Seems like it would be a good idea.

Tom
 
That's something I hadn't thought of Tom though I had noticed there's a Stanley version with wood soles.

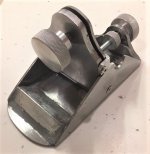
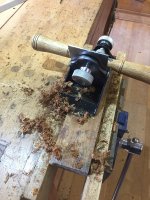
I've done a bit more and it's still very rough but now ready for a major clean up then I'll paint the inside, turn a handle and look at making a blade. I fitted a thin hand scraper on end to try it out and it did work so promising signs.
The handwheels were turned from some alloy bar as I wanted to save the brass I have and got the knurling much better and I originally fitted the swivel part too high up on the blade support then realised it would foul the handle. :eusa-doh:
 

Attachments

  • 112 a.jpg
    112 a.jpg
    47.6 KB · Views: 4,981
  • 112 b.jpg
    112 b.jpg
    52.9 KB · Views: 4,981
  • 112 c.jpg
    112 c.jpg
    65.1 KB · Views: 4,981
Now FINISHED - Yeeha

Well almost, I haven't sharpened the blade properley yet or tried heat treating it and it looks as if the mouth is a bit narrow/cap iron needs shaping as shavings are clogging a bit. The blade is 1.7mm thick from an old 10" circular saw blade.
Mistakes made and joints could be better but it's solid and heavy at 1.5 kg and even as it is it makes shavings. :eusa-dance:
 

Attachments

  • No 12 d.jpg
    No 12 d.jpg
    221.3 KB · Views: 4,890
  • No 12 c.jpg
    No 12 c.jpg
    75.4 KB · Views: 4,890
  • No 12 b.jpg
    No 12 b.jpg
    91.9 KB · Views: 4,890
  • No 12 a.jpg
    No 12 a.jpg
    91.6 KB · Views: 4,890
Excellent, Bob. Well done. I'm full of admiration. You'll find it such a useful tool, too, I warrant.

:lol: However..........lose those screws IMMEDIATELY!! I don't want to have to send Carruthers around, but those cross headed screws holding the handle on are an offence. :lol: :lol:
 
:D :D I absolutely agree with you mike, the intention is to turn something more suitable but I need to work out what, Aluminium would be too soft so steel as there isn't any other brass on it, It's just tapped out to M6 so I play around maybe with bolts rather than start from scratch. I'd sink them a bit and put oak domed plugs in but I'm a little concerned it might weaken the handle.

Carruthers can stay in his nice warm cupboard for the time being.
 
I'm not sure that screw are the problem so much as those particular screws. Swapping them out for some slotted raised head ones - possibly nickel plated brass, given the colouring of the rest of it - would be a large improvement.
 
Screws on the original Stanley are domed slotted so I think I'll make up something similar either in steel as it would be simple to convert a couple of bolts or I might try to turn and thread some brass and maybe use brass black as I have some.
 
Back
Top