

Blackswanwood
Old Oak
This is a WIP of another stool which will be similar to one that I posted a couple of months ago. They are quite enjoyable to make as firstly the dimensions are determined by what looks right using the wood I’ve got. Secondly, while it involves angles and flat faces a few undulations to the touch are welcome.
With stool and chair making, as with most woodwork, the same outcome can be achieved in different ways. Very happy for any experienced chairmakers to chip in with any pointers!
Looking through the boards I have dotted around was an offcut I picked up at British Hardwoods open day. Rounding down from the width of the board 300mm is a decent width for the seat so I marked this out.
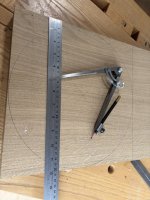
The blade in the bandsaw was too wide to cut the circle out in one go so I used straight cuts to take the corners off and then a further series of cuts to get as close to the circle line as I could.
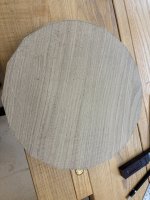
Seeing this shape made me wonder about having the seat as an octagon … perhaps next time.
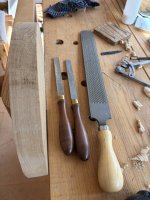
I then brought it down to the circle line and tidied the edge up using first the farriers file (rhs), rasp (middle) and Japanese carving file (lhs).
Next it’s holes for the legs. I like the look of wedged tenons so I’m going to drill all the way through. As I didn’t have anyone around to help with the sighting (to do it by hand and eye) I decided to use the drill press.
This is my sophisticated jig – two pieces of osb, two hinges, a piece of scrap wood screwed in place to drill the hole so the leg splay will be 12º.
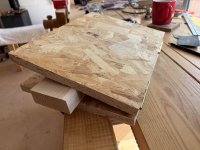
Note the pencil line which is essential for aligning the seat.
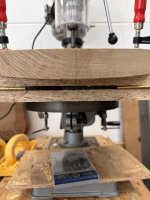
Here is the seat mounted on the jig/drill. You can see two additional circles that have been added which are 275mm and 250mm diameter. The inner circle is to locate the seat holes and the outer one is the marking for a chamfer which will be added shortly. The leg holes are at 12, 4 and 8 o’clock on the inner line. I just find these points using the compass to divide the circle into thirds.

This picture shows the seat lining up with the pencil line that I mentioned earlier. The jig isn’t big enough to see the line once this seat is on it so the lay out lines have been extended on the edge of the jig and seat to align it correctly. This needs to be as accurate as possible but in reality it’s not going to be an issue of it’s not spot on.
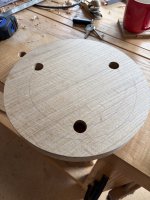
Here is the seat drilled – I was using a 24mm Forstner bit in the drill press.
I now want to get some lines drawn on the top of the seat so it can be shaped later. I could have gone back to the compass but I didn’t want to faff around finding the centre so reached for these that are for doing a similar job when marking out chairs seats.

Flipping the seat back over I have then put a chamfer on the underside. I find the quickest way to do this is with spokeshaves …
Insert seat chamfer
… and then tidied up with a cabinet scraper and sandpaper to remove the pencil lines.

To be continued ...
With stool and chair making, as with most woodwork, the same outcome can be achieved in different ways. Very happy for any experienced chairmakers to chip in with any pointers!
Looking through the boards I have dotted around was an offcut I picked up at British Hardwoods open day. Rounding down from the width of the board 300mm is a decent width for the seat so I marked this out.
The blade in the bandsaw was too wide to cut the circle out in one go so I used straight cuts to take the corners off and then a further series of cuts to get as close to the circle line as I could.
Seeing this shape made me wonder about having the seat as an octagon … perhaps next time.
I then brought it down to the circle line and tidied the edge up using first the farriers file (rhs), rasp (middle) and Japanese carving file (lhs).
Next it’s holes for the legs. I like the look of wedged tenons so I’m going to drill all the way through. As I didn’t have anyone around to help with the sighting (to do it by hand and eye) I decided to use the drill press.
This is my sophisticated jig – two pieces of osb, two hinges, a piece of scrap wood screwed in place to drill the hole so the leg splay will be 12º.
Note the pencil line which is essential for aligning the seat.
Here is the seat mounted on the jig/drill. You can see two additional circles that have been added which are 275mm and 250mm diameter. The inner circle is to locate the seat holes and the outer one is the marking for a chamfer which will be added shortly. The leg holes are at 12, 4 and 8 o’clock on the inner line. I just find these points using the compass to divide the circle into thirds.
This picture shows the seat lining up with the pencil line that I mentioned earlier. The jig isn’t big enough to see the line once this seat is on it so the lay out lines have been extended on the edge of the jig and seat to align it correctly. This needs to be as accurate as possible but in reality it’s not going to be an issue of it’s not spot on.
Here is the seat drilled – I was using a 24mm Forstner bit in the drill press.
I now want to get some lines drawn on the top of the seat so it can be shaped later. I could have gone back to the compass but I didn’t want to faff around finding the centre so reached for these that are for doing a similar job when marking out chairs seats.
Flipping the seat back over I have then put a chamfer on the underside. I find the quickest way to do this is with spokeshaves …
Insert seat chamfer
… and then tidied up with a cabinet scraper and sandpaper to remove the pencil lines.
To be continued ...


