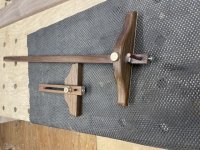
I have been wanting to make these for some time. The small gauge is a cutting gauge using a Marples replacement blade secured by a machine screw and threaded insert and the panel gauge is both a pencil gauge and a cutting gauge. Both made from off cuts of ABW

-
Hi all and welcome to TheWoodHaven2 brought into the 21st Century, kicking and screaming! We all have Alasdair to thank for the vast bulk of the heavy lifting to get us here, no more so than me because he's taken away a huge burden of responsibility from my shoulders and brought us to this new shiny home, with all your previous content (hopefully) still intact! Please peruse and feed back. There is still plenty to do, like changing the colour scheme, adding the banner graphic, tweaking the odd setting here and there so I have added a new thread in the 'Technical Issues, Bugs and Feature Requests' forum for you to add any issues you find, any missing settings or just anything you'd like to see added/removed from the feature set that Xenforo offers. We will get to everything over the coming weeks so please be patient, but add anything at all to the thread I mention above and we promise to get to them over the next few days/weeks/months. In the meantime, please enjoy!
You are using an out of date browser. It may not display this or other websites correctly.
You should upgrade or use an alternative browser.
You should upgrade or use an alternative browser.
Marking Gauge & Panel Gauge
- Thread starter PAC1
- Start date



Mike G
Petrified Pine
Very nice. That panel gauge looks just a bit nicer than mine:

What I have learnt from this quick bodge was that I want to be able to see the point of the pencil as I move the gauge along the edge of the wood, and to do that, I tilt the gauge. My next gauge, therefore, will either have a round arm, or it will have the arm rotated at 45 degrees. Both of these options will also get over the other problem, that the sharpened bit of the pencil is the place where the gripper is trying to get hold of it, which is just awkward.
What I have learnt from this quick bodge was that I want to be able to see the point of the pencil as I move the gauge along the edge of the wood, and to do that, I tilt the gauge. My next gauge, therefore, will either have a round arm, or it will have the arm rotated at 45 degrees. Both of these options will also get over the other problem, that the sharpened bit of the pencil is the place where the gripper is trying to get hold of it, which is just awkward.
There certainly is satisfaction in using your own made tools. I made a few as an apprentice and keep adding tools from time to time.
The long slot was made on the router table! The real work is done by a sliding dovetail which keeps everything square and tight.
The brass nut on the small gauge came from Wood Workers Workshop and are made by Woodpecker. The brass Knurled bolt on the panel gauge was made for me by our very own Philly Planes. "He makes really nice knobs" if I am allowed to say that in public. There was a time when I would have just used a wing nut.
The long slot was made on the router table! The real work is done by a sliding dovetail which keeps everything square and tight.
The brass nut on the small gauge came from Wood Workers Workshop and are made by Woodpecker. The brass Knurled bolt on the panel gauge was made for me by our very own Philly Planes. "He makes really nice knobs" if I am allowed to say that in public. There was a time when I would have just used a wing nut.
Cabinetman
Sequoia
- Joined
- Oct 11, 2020
- Messages
- 5,705
- Reaction score
- 1,387
- Location
- Lincolnshire Wolds + Massachusetts
- Name
- Ian
Mike, for the first half second I thought you had cannibalised your mallet ha ha. Quite correct about the angle though.
Very nice gauges PAC, always wanted a panel gauge but never really got round to making one I think you may have provided the inspiration. Ian
Very nice gauges PAC, always wanted a panel gauge but never really got round to making one I think you may have provided the inspiration. Ian
Mike, my original plan was to make an oval panel gauge with an oval stem, because I agree most gauges are used tilted over. I find they work better with the blade being dragged and rocked rather than held in one plane. The panel gauge I have made is not designed for that as it has a rebate in the fence so that it sits on the panel. It is for wide panels and I see it as a two handed tool. I intend to make a small pencil gauge which will definitely be oval once I work out how it is to be done. I started several months ago but put the wood to one side whilst I work it out in my head. I have seen some gauges where the blade or pencil runs diagonally through the stem and the hole in the fence set diagonally which definitely gives you sight of the business end. I might end up with an oval fence and diagonal stem.
Ian, it has only taken me 41 years to get around to it. The problem with panel gauges is there are so many alternatives, a straight edge, a string line or just cut it on the table saw.
The good news is the panel gauge was very quick and easy to make, a couple of hours will easily see it done including some finish.
The good news is the panel gauge was very quick and easy to make, a couple of hours will easily see it done including some finish.


Woodbloke
Sequoia
This is my version of a Panel Gauge:

It's really just an extended version of my Japanese marking gauges. This one is made with a Holly stem, Oak stock and uses a ground down masonry nail to score the timber. The 'turnscrew' is a 6mm threaded bolt with the head cut off and a small steel rectangle silver soldered in place - Rob
It's really just an extended version of my Japanese marking gauges. This one is made with a Holly stem, Oak stock and uses a ground down masonry nail to score the timber. The 'turnscrew' is a 6mm threaded bolt with the head cut off and a small steel rectangle silver soldered in place - Rob
Nico Adie
New Shoots
PAC1":1yjrx5ut said:I have been wanting to make these for some time. The small gauge is a cutting gauge using a Marples replacement blade secured by a machine screw and threaded insert and the panel gauge is both a pencil gauge and a cutting gauge. Both made from off cuts of ABW
Those look absolutely great, bet they’re a real pleasure to use.