
-
Hi all and welcome to TheWoodHaven2 brought into the 21st Century, kicking and screaming! We all have Alasdair to thank for the vast bulk of the heavy lifting to get us here, no more so than me because he's taken away a huge burden of responsibility from my shoulders and brought us to this new shiny home, with all your previous content (hopefully) still intact! Please peruse and feed back. There is still plenty to do, like changing the colour scheme, adding the banner graphic, tweaking the odd setting here and there so I have added a new thread in the 'Technical Issues, Bugs and Feature Requests' forum for you to add any issues you find, any missing settings or just anything you'd like to see added/removed from the feature set that Xenforo offers. We will get to everything over the coming weeks so please be patient, but add anything at all to the thread I mention above and we promise to get to them over the next few days/weeks/months. In the meantime, please enjoy!
You are using an out of date browser. It may not display this or other websites correctly.
You should upgrade or use an alternative browser.
You should upgrade or use an alternative browser.
Martin Guitar Kit (It's First Public Outing!)
- Thread starter Malc2098
- Start date

selectortone
Sapling
Woohoo! Looking forward to progress reports. 

Rod
Old Oak
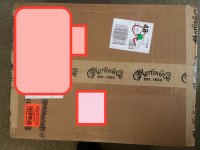
That’s a bit of a tease - a cardboard box! [emoji3]
Rod
Rod

Malc2098
Sequoia
Rod":11eowgw7 said:That’s a bit of a tease - a cardboard box! [emoji3]
Rod
Look at the parcel tape.

All you need now is a nice dry warm and drought proof workshop to build it in. 

Morning Malcolm
You may have seen this ...
https://www.youtube.com/watch?v=TzD9APh4Amg
but it's interesting, even to who aren't making guitars.
Cheers
Dave
You may have seen this ...
https://www.youtube.com/watch?v=TzD9APh4Amg
but it's interesting, even to who aren't making guitars.
Cheers
Dave
Malc2098
Sequoia
Deejay":3k8y3s4t said:Morning Malcolm
You may have seen this ...
https://www.youtube.com/watch?v=TzD9APh4Amg
but it's interesting, even to who aren't making guitars.
Cheers
Dave
Thanks, Dave. Rest of the morning viewing.
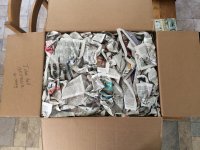
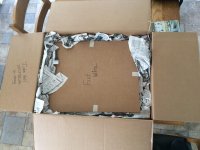

Rod
Old Oak
If the enormous stacks of timber are a years supply, how many guitars do they turn out?
Rod
Rod
Malc2098
Sequoia
Rod":3ox8vpnr said:If the enormous stacks of timber are a years supply, how many guitars do they turn out?
Rod
Loads!
I, too, have a year's supply!


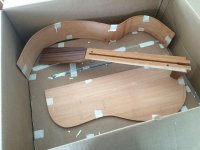



Malc2098
Sequoia
Right, that's it for now.
The project will be undertaken in the new workshop, and as you will have seen from the 'shop thread, that isn't quite finished yet.
I also have one or two projects promised to Mission Control first before I start.
But like a big kid, I couldn't stop myself from getting the kit as soon a Is could, so I could see everything in it.
I'll be back!
The project will be undertaken in the new workshop, and as you will have seen from the 'shop thread, that isn't quite finished yet.
I also have one or two projects promised to Mission Control first before I start.
But like a big kid, I couldn't stop myself from getting the kit as soon a Is could, so I could see everything in it.
I'll be back!
Malc2098
Sequoia
Right! We're off! I'm taking some time off from the balustrade, the steps, replacing the long term temporary doors and all that, and going to start on this kit!
I snuck out yesterday and bought some mdf and ply to start making the mould and jigs. I traced half the guitar body shape supplied in the kit onto some pdf from a pattern supplied with the kit, cut it on the bandsaw and sanded the edge smooth. This will now be the template for all the other pieces, the negative template, the mould, the sides the guitar, its top and its back.

It was at this point that I became a little disappointed with the supplier. The kit comes with a half body shape drawing onto one of the cardboard protections sheets for the soundboard. This shape was not the same shape as that which was marked out on the half back of the guitar, and then the supplied pre-bent sides would not fit either the front or the back. it would seem that the back, sides and front template came from three different size models.
Several emails back and forward to America didn't really resolve the issue, except to say that the materials supplied were all of sufficient size for me to be able to complete the build. This cost me quite a bit and with import duty and other tax on top, but I was not going to try and send it back and demand what was supposed to be supplied. That was just going to be too much hassle. So I just had to think about how to get the best out of this situation and got on with it.
The only things that couldn't be changed were the overall length around the two bouts and the waist of the sides and the length of the body. So, carefully, I encouraged the springy sides onto the top of the positive template and had Mission Control pencil round where they came inboard of the edge. I re-sawed and re-sanded a couple of times until they matched, and marked out the negative template from that.

I cut out and sanded the negative to the pencil line, fitted the side into it, adjusted by sanding some more here and there till it fitted perfectly.
I was then able to mark from the negative on to six pieces of ply to form each side of the mould, the piece in each.
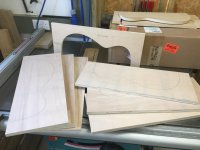
Unfortunately our forum doesn't support video format, but if you pop over to my FB or Instagram pages you can see a nice little time lapse/stop frame video of me cutting one of plies on the bandsaw. I ended up with these six.
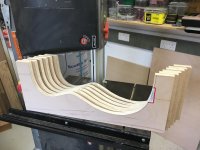
And when you lay them out three a side in mirror image, you've almost got a guitar mould.
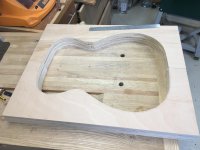
As you can see, my freehand bandsaw cutting isn't terribly accurate, so tomorrow, I'll fix each ply to the negative template and run them on the router table with a bearing guided straight cutter fitted to replicate the exact shape of the template on them before fixing them together.
I snuck out yesterday and bought some mdf and ply to start making the mould and jigs. I traced half the guitar body shape supplied in the kit onto some pdf from a pattern supplied with the kit, cut it on the bandsaw and sanded the edge smooth. This will now be the template for all the other pieces, the negative template, the mould, the sides the guitar, its top and its back.
It was at this point that I became a little disappointed with the supplier. The kit comes with a half body shape drawing onto one of the cardboard protections sheets for the soundboard. This shape was not the same shape as that which was marked out on the half back of the guitar, and then the supplied pre-bent sides would not fit either the front or the back. it would seem that the back, sides and front template came from three different size models.
Several emails back and forward to America didn't really resolve the issue, except to say that the materials supplied were all of sufficient size for me to be able to complete the build. This cost me quite a bit and with import duty and other tax on top, but I was not going to try and send it back and demand what was supposed to be supplied. That was just going to be too much hassle. So I just had to think about how to get the best out of this situation and got on with it.
The only things that couldn't be changed were the overall length around the two bouts and the waist of the sides and the length of the body. So, carefully, I encouraged the springy sides onto the top of the positive template and had Mission Control pencil round where they came inboard of the edge. I re-sawed and re-sanded a couple of times until they matched, and marked out the negative template from that.
I cut out and sanded the negative to the pencil line, fitted the side into it, adjusted by sanding some more here and there till it fitted perfectly.
I was then able to mark from the negative on to six pieces of ply to form each side of the mould, the piece in each.
Unfortunately our forum doesn't support video format, but if you pop over to my FB or Instagram pages you can see a nice little time lapse/stop frame video of me cutting one of plies on the bandsaw. I ended up with these six.
And when you lay them out three a side in mirror image, you've almost got a guitar mould.
As you can see, my freehand bandsaw cutting isn't terribly accurate, so tomorrow, I'll fix each ply to the negative template and run them on the router table with a bearing guided straight cutter fitted to replicate the exact shape of the template on them before fixing them together.

DaveL
Old Oak
Now this looks interesting! Does the kit contain all the parts precut and formed to shape?
I have bought a set of plans for a Fender P bass, just big drawings on a CD, I have started to collect different bits ready for a build but still lack any wood for the body.
I have bought a set of plans for a Fender P bass, just big drawings on a CD, I have started to collect different bits ready for a build but still lack any wood for the body.
DaveL
Old Oak
Oh well, should of scrolled up and looked at the start of the thread. [emoji849]

Pinch
Old Oak
Very nice Malc.
It seems so long ago, but if memory serves, this is your proper work.
I'm looking forward to see this progress.
:text-bravo:
It seems so long ago, but if memory serves, this is your proper work.
I'm looking forward to see this progress.
:text-bravo:
Malc, does FB or Instagram allow you to copy the URL of the a video and paste it into a post here?
Malc2098
Sequoia
Andyp":1pjtxj7f said:Malc, does FB or Instagram allow you to copy the URL of the a video and paste it into a post here?
https://www.instagram.com/p/CAdWecIBmAR/
This is the link to the series of photos which includes the video. I don't know if you have to be logged on to instagram to see it, or if I've just let you in to my account!!

Malc2098
Sequoia
DaveL":3dmab9ml said:Oh well, should of scrolled up and looked at the start of the thread. [emoji849]
I have days like that, too, Dave. In the end I ask Matron and she tells me what day it is.
Malc2098
Sequoia
Pinch":1jjys5lx said:Very nice Malc.
It seems so long ago, but if memory serves, this is your proper work.
I'm looking forward to see this progress.
:text-bravo:
It was two years ago. I had to build a workshop to build this kit!
Fear not Malc, i was just able to see the vid before Instagram wanted me to open an account in order to see more.
I don’t have a need for an Instagram nor Facebook account.
I don’t have a need for an Instagram nor Facebook account.
Malc2098
Sequoia
So today I screwed the rough cut plies one at time to the negative template and using a bearing guided cutter created six exact replicas on the router table.

Shame you can't see the video here.
https://www.instagram.com/p/CAgMPjdhlle/
They came out like this.
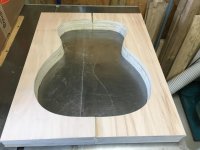
I then glued and screwed so that tomorrow I can carry on making the mould.
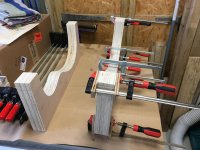

Shame you can't see the video here.
https://www.instagram.com/p/CAgMPjdhlle/
They came out like this.
I then glued and screwed so that tomorrow I can carry on making the mould.
Malc2098
Sequoia
Having made the sides of the mould, I needed to be able lock them together and then release them again, and so I fixed a pair of toggle latches at either end.

Having locked them laterally, I now needed to prevent them from moving along the join. So while they're locked together, I put all the old cutouts in the mould with wedges to lock the moulds longitudinally and bored a hole 3/4 of the way down the join to take a dowel. Fortunately I had a couple left over from the roofing build. They get glued in place on one side using greaeproof paper to prevent the glue going round the dwell on to the other side.
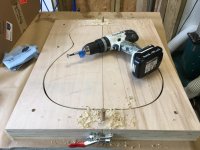

Watching glue dry.


The finished mould.

Having locked them laterally, I now needed to prevent them from moving along the join. So while they're locked together, I put all the old cutouts in the mould with wedges to lock the moulds longitudinally and bored a hole 3/4 of the way down the join to take a dowel. Fortunately I had a couple left over from the roofing build. They get glued in place on one side using greaeproof paper to prevent the glue going round the dwell on to the other side.
Watching glue dry.
The finished mould.

Looks a nice quality expensive ply that you've used for that former. Guess you are going to be making a lot of guitars then?
Seriously though from what I've seen so far it should be a quality job. Looking forward to seeing it as it progresses.
Seriously though from what I've seen so far it should be a quality job. Looking forward to seeing it as it progresses.
Malc2098
Sequoia
Robert":22ka6wle said:Looks a nice quality expensive ply that you've used for that former. Guess you are going to be making a lot of guitars then?
Seriously though from what I've seen so far it should be a quality job. Looking forward to seeing it as it progresses.
Wickes' finest!
I might be prepared to lend it out to members on a lubrication basis.
Thanks, Robert.
Malc2098
Sequoia
RogerS":3m4hl3zl said:I'm missing something here, Malc. If you've already got those sides, why do you need that mould ?
I'll try and explain in more detail tomorrow, Roger, but the sides come 'pre-bent', and even if I bent them myself, which I did on my last project, they do not form into the shape of the finished guitar and they are like a spring, so they have to be 'encouraged' to the final shape. It has to be right, because everything else is built on them, and any discrepancy will be magnified as the build goes on.
Everything will be in tension, the sides, the back, the soundboard, and the neck when strung. That's what gives the acoustic guitar its sound.

Malc2098":rp16kw8k said:RogerS":rp16kw8k said:I'm missing something here, Malc. If you've already got those sides, why do you need that mould ?
....
Everything will be in tension, the sides, the back, the soundboard, and the neck when strung. That's what gives the acoustic guitar its sound.
Now that is something I never realised. Fascinating..I really look forward to seeing this develop. :text-bravo:
Pinch
Old Oak
Very nice Malc.
Is every component you need for the build in the kit, down to the actual finish?
Is every component you need for the build in the kit, down to the actual finish?
Malc2098
Sequoia
Pinch":v09gq686 said:Very nice Malc.
Is every component you need for the build in the kit, down to the actual finish?
Every component is in the kit but not in finished condition. There are no finishes included, that choice is down to the builder. I shall be looking to see if I can, or get someone else to, spray clear cellulose after grain filling etc.
Malc2098
Sequoia
Having made the outside of the mould, the inside needs making and I just so happen to have some guitar shaped bits left over from the external mould build!  Add a couple of cheap turnbuckles and look what I've ended up with!


Adding to my comments in answer to Roger and Paul's earlier posts, you can see that the sides have been bent, but not to the finished shape, which is one reason why you need the mould. On top of that, the guitar will now stay in the mould until the back and top have both been fitted to the finished sides.
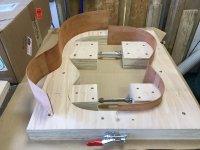
Each of the sides slightly overlap the join of the mould so, today's first job will be to accurately cut the sides so both perfectly fir the mould ready to take the neck and tail blocks.
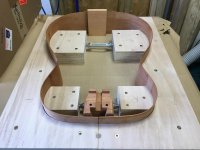
Add a couple of cheap turnbuckles and look what I've ended up with!Adding to my comments in answer to Roger and Paul's earlier posts, you can see that the sides have been bent, but not to the finished shape, which is one reason why you need the mould. On top of that, the guitar will now stay in the mould until the back and top have both been fitted to the finished sides.
Each of the sides slightly overlap the join of the mould so, today's first job will be to accurately cut the sides so both perfectly fir the mould ready to take the neck and tail blocks.
I am looking forward to the live streamed concert when finished.
Malc2098
Sequoia
Andyp":2fgix4g2 said:I am looking forward to the live streamed concert when finished.
Kind of you to suggest, Andy, but I realise now that my woodworking skills are better than any musical skills I might have.
Malc2098
Sequoia
Quelle Catastrophe!
While I was cutting then ends of the sides to fit in the mould one of them cracked! Do did I, nearly!
I t cracked about six inches long from the tail. A quick google and I found the repair answer on my supplier's YT channel. Don't try to open the crack. Don't fiddle with the crack. Stream low viscosity superglue along the crack. Let capillary action do its stuff. Spray activator and quickly wipe excess off. Squeeze together.
It bloody worked!

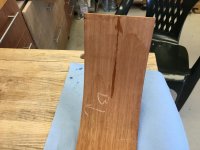
I often use Heavy Duty Stanley blades as a cabinet scraper, so if did here and got myself back to a reasonable finish that can be sanded when the time comes.

Phew!
While I was cutting then ends of the sides to fit in the mould one of them cracked! Do did I, nearly!
I t cracked about six inches long from the tail. A quick google and I found the repair answer on my supplier's YT channel. Don't try to open the crack. Don't fiddle with the crack. Stream low viscosity superglue along the crack. Let capillary action do its stuff. Spray activator and quickly wipe excess off. Squeeze together.
It bloody worked!
I often use Heavy Duty Stanley blades as a cabinet scraper, so if did here and got myself back to a reasonable finish that can be sanded when the time comes.
Phew!
DaveL
Old Oak
Nice recovery, well done.
Malc2098
Sequoia
RogerS":33bp1x1x said:oooh..if that had been me, the air would have been blue. Good recovery. Is it worth sticking veneer tape across the ends to try and prevent this from happening again ?
If I had veneer tape I might have thought about it, but I quickly went into glue the rim together with the end blocks which I've been doing, including there dry runs for the last hour.
Later in the build there's a point where you glue strips across the insides of the sides to prevent splits when it's tensioned up as a whole body.