• Hi all and welcome to TheWoodHaven2 brought into the 21st Century, kicking and screaming! We all have Alasdair to thank for the vast bulk of the heavy lifting to get us here, no more so than me because he's taken away a huge burden of responsibility from my shoulders and brought us to this new shiny home, with all your previous content (hopefully) still intact! Please peruse and feed back. There is still plenty to do, like changing the colour scheme, adding the banner graphic, tweaking the odd setting here and there so I have added a new thread in the 'Technical Issues, Bugs and Feature Requests' forum for you to add any issues you find, any missing settings or just anything you'd like to see added/removed from the feature set that Xenforo offers. We will get to everything over the coming weeks so please be patient, but add anything at all to the thread I mention above and we promise to get to them over the next few days/weeks/months. In the meantime, please enjoy!

Mike's ext'n & renovation (solar panels)

The contrast between those tortoises and the speed at which you work is not lost on me.

Great result, timber like that ends up as kindling here.
 
For most of the last 5 years the front garden has been a store area for building materials. It has been dug up a couple of times for services, and has been an overgrown mess for the last year or so. Sorting it out had been the number one priority for the spring, but unfortunately covid 19 put paid to that idea not only by shutting the builders merchants, but also by flattening us. Now that building materials are available again, it is finally time to tackle this eyesore.

We had originally planned to have a metal railing fence with a formal garden behind. It turns out that this is about the most expensive way of fencing known to man. I counted the reclaimed bricks I had left over and realised that I didn't have enough for the big brick and flint wall I'd planned to build across the back of the car parking space, but that there was enough to build a low wall at the front. I sketched up a few designs, and keen observation of cottage walls in the area on a few recent bike rides led us to the final design.

Anyway, it was time to get out the spade and the pick axe. I had to soak the ground (I mean absolutely flood it) overnight before it was diggable at all the following day as it was baked solid:

FBXP9p1.png

K5pmxCd.png

fVgrscs.png

I'm afraid there is no "before" photo of the concrete path, but here is the "after":

7r8sA5E.png

That was 8 inches thick in parts!

I also had to kango up the concrete in the splay of the drive, because that's where the corner of the wall will be:

KLmyzDp.png

I received a delivery of "quarry waste", which is unsorted flint above 50mm diameter:

JwzfLRU.png

Mt33ENh.png

That should make a lovely wall.

Final job before mixing concrete is the placement of level pegs. I threw the levels off the plinth of the house, and transferred them around the site with a straight edge and level. The peg location was marked with a dash of out of date plaster on the edge of the trench, and then we were ready for concrete:

ipIM2Xc.png

A few hours later it was all done. It was all completely straight forward:

Zt35Oqb.png

I've much more concreting to do all around the site, hence the 7 tonnes of ballast:

uHnlBsn.png

After washing up at the end of the day:

xKDPFSo.png

Bricklayers would start laying bricks tomorrow, but I'll let it set for a day at least, and will tackle the front path and other tasks tomorrow. I've also got to try to find a space to lay out all the bricks and mortar boards in quite a constrained site.
 
Looking good, Mike.

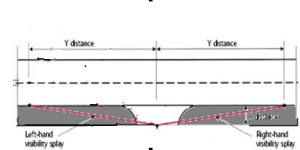
Just a thought about that splay, in my old job, the splay for a minor junction or access would be measured for the human eye at two metres back from the edge of roadway, not highway, at 1m high. If there was anything in that splay, then it was not deemed safe. We're talking x and y distances, which would be different in different speed limits. But I'm sure you know about that stuff.

foiextract20200504-16513-1musc35-5_1.png

foiextract20200504-16513-1musc35-6_1.jpg
 
The driveway, and the splay, are moving over a couple of metres away from the house/ new wall. Further, the wall will only be 565mm high. I think we're OK! :)
 
I've made a little progress with the front wall. I started by building the least visible pier, so that I could get back into bricklaying practise without too much fear of scrutiny if it wasn't perfect. These are a slow old job because of the cuts:

45csCsZ.png

I then did the bottom of the opposite corner so that I could work out the bond:

T4Li32q.png

The thing you should bear in mind above everything else is that these are reclaimed handmade bricks, saved from the plinth and chimney of the old part of the house. I feel a huge sense of surprise and relief if I ever find two the same size. This wall is not going to be bricklaying perfection!

I plodded on:

FksEe3q.png

M55VpMc.png

CPAHGyb.png

Note the height of the right hand pier, which is one side of the gateway:

16JBoRd.png

I'd drawn this two or three different ways, and that was the shortest of them. After a few days off waiting for the weather to relent, I'd changed my mind, popped the top courses off, and made it all three courses higher:

jHbnArM.png

This is going to be the most prominent view. Firstly, unpointed:

OQywa3j.png

Now note the difference pointing makes:

argaofn.png

With the bulk of the brickwork done, I could start on the flint panels. I work to lines. Some people put boards down, but firstly I find that extremely wasteful of mortar, but more importantly, you can't see the face of the wall so you're working blind. I try to lay to rough courses, but the stone we can buy these days is nowhere near as regular and large as the stone the old walls around here are made of, so it doesn't always work out that way. Any, the start of the flint panels:

SMUzlIc.png

zQsbtSa.png

PiImPRs.png

You basically work each face like you are laying bricks, and infill the spaces left in the middle with crocks (brick off-cuts) and smaller flints. It takes ages for the mortar to go off because flints are impervious and draw no moisture out of the mortar, so pointing is done late in the evening. That's when you get to see the cock-ups you've made!
 
Mike,
Whenever I'm on 'your side' of the pond again, maybe I'd come and assist you.
I can be a good 'handlanger' by carrying on cups of coffee and pointing out cock-ups...

I even have a PWBOP21: Perfessional WheelBarrow Operating Permitted To One..
 
You'd be more than welcome, Thys. There's plenty more work to be found around here. There's just the small matter of Covid 19 and the lack of international flights......

 
Flint work is not quick, especially when you try to do it properly to a line in courses. This was my view for about 9 or 10 days:

WcQFydf.png

You make two faces, and fill in the middle with unusable stones and with broken brick (more on that later). And mix up lots and lots of mortar. The pile of stone is in the background. Much of it was too small to be any use:

qFPx7Ny.png

I stood astride the wall with mortar on one side and stone on the other, taking maybe 3 hours to do a course of flints the length of the panel between piers:

VMnrpGQ.png

gsAGqru.png

hiYeGdL.png

Now, back to the broken brick.... Flint is shiny and hard, and absorbs no moisture from the mortar at all. That means it can take 4, 5 or 6 hours for the mortar to be set enough to point if you just use flint and mortar. So, the trick is to use broken brick and brick dust as a pozzolan to help the mortar set more quickly. Look that up, because the discovery of the pozzolan effect was what led the Romans to invent concrete. So, if I needed the mortar to set quickly, perhaps so I wasn't pointing at 10 o'clock at night, or perhaps because I was on the top course and wanted to lay the brick on edge coping, and wanted that on a solid base, then I would use crushed brick as a pozzolan:

6Uq7PUh.png

Anyway, for the best part of three weeks, when work and weather allowed, I've plodded on. It's been something of a performance art for the passers by, who all stop and chat and check on progress. But in the end, I got there:

ZA8AYeZ.png

I did a little cut-tile cap over the top of the piers:

2kVwezQ.png

Hopefully a bit of weather on this and it will look old very quickly. It looks a bit bright and shiny at the moment:

OCLJxhL.png

MmJOueC.png

Note the pozzolan-making area in the foreground of the above photo.

My wife started digging the ground over inside, because the garden can now happen:

h5hKxfK.png

E0QyUik.png

It doesn't show here, but the ground level on this side has got to come up by over a foot at the house:

F6wbQyz.png
 
Yes, but I don't want to close them off until I have bolted the gate posts in place. It will probably just be a brick on edge coping as per the rest of the wall, but I might just cast up a white concrete pier cap with a little cove detail and a gentle pyramid top.
 
Very nice Mike. Really fits in and frames the front of the house. And kudos for having a wife that digs the garden over! Looking forward to seeing it planted up. I bet it feels like a milestone has been reached 8-)
 
Looks great Mike. Got something similar planned for my garden using local Leith Hill stone rather than flint as the infill.

Mark
 
Thanks guys.

Leith Hill stone? I'll have to look that one up.
 
Thanks. I'd not found anything looking up Leith HIll stone. That looks absolutely beautiful. It definitely needs a very pale mortar, not a grey cement mortar.
 
Thanks for pointing up (sorry, no pun intended) the pozzolan effect Mike; reckon that could explain a few unexpected occasions when mortar suddenly 'went off' during restoration projects on an old house. It probably didn't help that the old mortar contained seashells (calcium rich) - the sand was, presumably, unwashed. House built circum 1903.

Sam
 
Next on the agenda is the setting out of the formal front garden. Once I get the levels done and the edgings, that's me finished. Over then to the gardening expert. So, I bought some steel. I bought some new tips for my welder. I cut up the steel, and started welding:

x82Bkoi.png

XuIbPJD.png

ZBB4Um6.png

Looks like a giant bear trap! That's the outer edge of the new paths sorted. Now for the inner edge, which is a whole lot more complicated. Firstly, I needed to form some quadrants with a radius of 300mm. I made a former and handle, at a radius of 290mm:

ynPqUEU.png

nfGQlIv.png

That produced a radius of around 540mm, so miles too big.

tfyrorj.png

I reduced the former to 200mm, and tried again. After some advice, I also heated the steel in situ with a blow torch, and this time the results were pretty much exact:

PTyWQI2.png

I cut those pieces carefully in half:

vpADGdb.png

I set out a frame on the workshop floor within which to make up the steelwork. I also made a corner piece to hold the quadrants in exactly the right position and radius:

4vjuZuB.png

7IoKqqr.png

jpYpFYJ.png

I needed some help to put the big frames into the garden, but the little ones were a one-man job:

iFildWC.png

a6VgmF3.png

So, now you can see what I was trying to achieve. They're only plonked roughly into place, so I need to make up a big right angle in wood, the get everything properly located and whacked down into the soil to the correct level. Then digging. More digging. Lots more digging...........
 
Thanks Steve.

So, to the collective mind.......what do we stick in the middle of the middle squares? Originally they were going to have an urn planter on a small plinth, but those are high maintenance, and look poor in the winter. We could do a feature small tree (a bay, for instance, or an ornamental willow), a piece of gentle topiary, a climber up a steel frame, or a bird bath/ fountain thingamejig. I've never done a formal garden before, so haven't a clear idea of how I want this to look. Whaddyareckon?
 
I don't 'get' the steel. :eusa-think:

Won't that just rot away over time? Is it just there for the initial setting out of the garden for giving a boundary to work up to, with the view that it will disappear over time?
 
The steel differentiates a path from planting. The planting is outside the outer steel square, and inside the inner square, with a shingle path in between. Steel garden edging is pretty common, and should last decades (it's 3mm steel). The alternative was some bendy plastic, which we really didn't like and I couldn't be sure of getting straight, or wood, which would rot away quickly and I'd struggle with those curvy bits.

It's too muddy to do any work out there today, but tomorrow I'll locate everything and bash them down to the correct level, and the effect will then become pretty obvious. In the meantime, here is a clue as to what we are trying to achieve:

HW6zDLl.png
 
Ah okay, I get it now, thanks Mike.

So back to your original question, I suggest you commission someone to make a 2 life size fountain statues of me, replicating the Mannekin Pis, one for each side, facing each other.

The strength of the water jets could then be powered with pumps to create a Vegas style light and water show with my ‘urinations’ jetting across the central path from one side to the other.

That would be absolutely perfect!
 
:lol:

Thanks Mark. Clearly just what we needed. No idea why I didn't think of that. I'm not sure why "lifesize", though. These clearly should be at least twice life size. :lol:
 
Mike G":1xnstdgc said:
:lol:

Thanks Mark. Clearly just what we needed. No idea why I didn't think of that. I'm not sure why "lifesize", though. These clearly should be at least twice life size. :lol:

:lol: At least!
:obscene-drinkingcheers:
 
Mike G":o80eqdnr said:
Thanks Steve.

So, to the collective mind.......what do we stick in the middle of the middle squares? Originally they were going to have an urn planter on a small plinth, but those are high maintenance, and look poor in the winter. We could do a feature small tree (a bay, for instance, or an ornamental willow), a piece of gentle topiary, a climber up a steel frame, or a bird bath/ fountain thingamejig. I've never done a formal garden before, so haven't a clear idea of how I want this to look. Whaddyareckon?

What's the orientation?

Would a sundial, armillary, weather-vane, moondial work?
 
The front of the house faces due west, and with trees directly across the narrow lane it's quite shady. Good idea, but I don't think it's the answer.
 
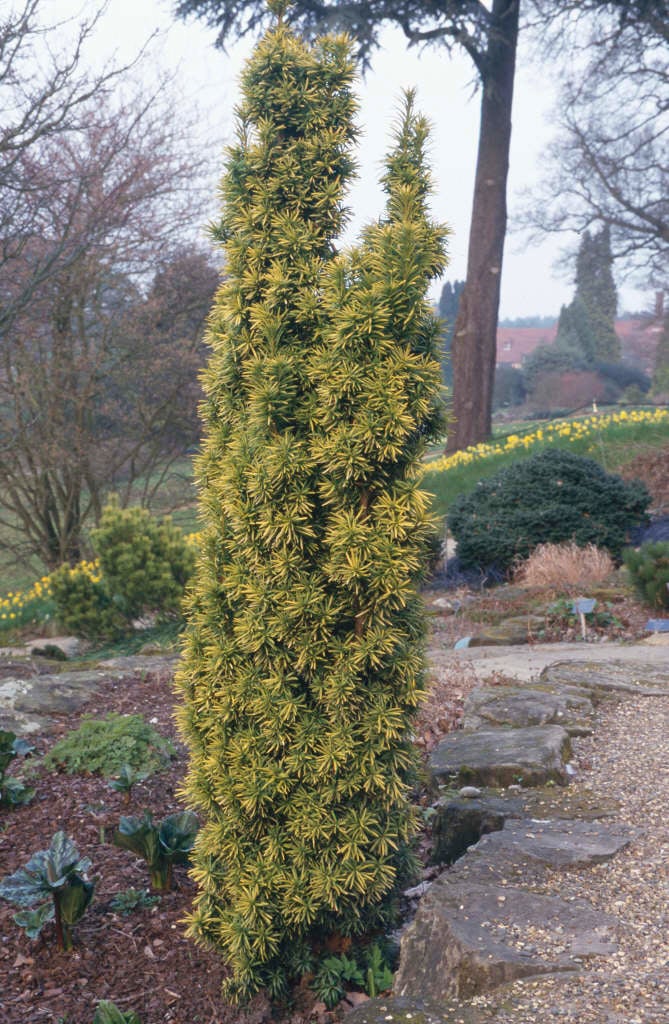
Trees would need to be evergreen to look decent in the winter, how about conifers ? A slow growing naturally conical variety that could be trimmed if they get too exuberant.

This a quick prototype knocked up by LeNotre for the French monarch :
images
 
Yep, yew was my first choice. It could be easily clipped into a nice simple shape, say a tall thin pyramid.
 
Back
Top