• Hi all and welcome to TheWoodHaven2 brought into the 21st Century, kicking and screaming! We all have Alasdair to thank for the vast bulk of the heavy lifting to get us here, no more so than me because he's taken away a huge burden of responsibility from my shoulders and brought us to this new shiny home, with all your previous content (hopefully) still intact! Please peruse and feed back. There is still plenty to do, like changing the colour scheme, adding the banner graphic, tweaking the odd setting here and there so I have added a new thread in the 'Technical Issues, Bugs and Feature Requests' forum for you to add any issues you find, any missing settings or just anything you'd like to see added/removed from the feature set that Xenforo offers. We will get to everything over the coming weeks so please be patient, but add anything at all to the thread I mention above and we promise to get to them over the next few days/weeks/months. In the meantime, please enjoy!

Mixed results with new/old brace and bits I bought

Joined
Nov 16, 2025
Messages
10
Reaction score
0
LOCATION
Portsmouth
Bought a vintage set off of gumtree of a brace and about 30 bits or so. Now I have checked them quite a few of the bits don't even fit the brace, with the square shaped thingy on the end being too big, where they will go in but the brace is not able to grab them.

For the ones that do fit though, I have had quite contrasting effects on the couple of pieces of wood I tried.

There was a spare bit of plank and grabbed one of the auger bits and tried it on that, which was about 3cm thick, and I was very impressed that the bit went through like a hot knife through butter. I thought, great, this will be par for the course, but when I tried yesterday had an opposite experience.

I have a downed mature willow from one of the recent storms so thought it would be a good opportunity to make a couple of saw horses. When I tried to drill through a thick bit of trunk piece I have cut from the tree it was very difficult and was mainly just mashing the wood in place rather than a clean action as was the case the first time.

I tried many of the different bits and the same give or take with each. I did manage to get through after much effort but very messy. Why the difference? Is it because willow is a hardwood and the first piece was most likely softwood?

I thought to myself I would most likely be better continuing to dig through with the mortise chisel which is what I had started with, as the part in question is a mortise I am attempting to make for the saw horse to join legs to main top bit.

Thoughts?
 
First of all Welcome Miserly, I’m quite tight myself lol. Well I think it’s probably just a case of sharpening the flats— the bits that do the cutting with a fine file, and checking that the spiral is unclogged and if worn that too can be given a bit of reworking.
All easily done.
Ian
 
Bought a vintage set off of gumtree of a brace and about 30 bits or so. Now I have checked them quite a few of the bits don't even fit the brace, with the square shaped thingy on the end being too big, where they will go in but the brace is not able to grab them.

For the ones that do fit though, I have had quite contrasting effects on the couple of pieces of wood I tried.

There was a spare bit of plank and grabbed one of the auger bits and tried it on that, which was about 3cm thick, and I was very impressed that the bit went through like a hot knife through butter. I thought, great, this will be par for the course, but when I tried yesterday had an opposite experience.

I have a downed mature willow from one of the recent storms so thought it would be a good opportunity to make a couple of saw horses. When I tried to drill through a thick bit of trunk piece I have cut from the tree it was very difficult and was mainly just mashing the wood in place rather than a clean action as was the case the first time.

I tried many of the different bits and the same give or take with each. I did manage to get through after much effort but very messy. Why the difference? Is it because willow is a hardwood and the first piece was most likely softwood?

I thought to myself I would most likely be better continuing to dig through with the mortise chisel which is what I had started with, as the part in question is a mortise I am attempting to make for the saw horse to join legs to main top bit.

Thoughts?
Hello and welcome.
Perhaps you are able to take some pictures to enable us to get a better idea of how to help you.
Brace bits can be fickle things especially old ones that maybe past their best or just the fact they need filing to sharpen up the cutting edges.
This sharpening must be undertaken with a thorough understanding of the geometry of the cutting edges.
Primarily it is rare to sharpen on the outside periphery of the bits.
Cheers, Andy
 
Last edited:
One thing that you may or may not be aware of is (and this is a common downfall) is to ensure that on the cutting (lower as it is in use) side of the edge that you have a flat straight line from the edge so in other words there is no hump that hits the wood before the cutting edge.
 
Willow isn't really suitable for woodwork at the best of times. With a recently fallen one you can add moisture to the already bleak picture caused by its soft fibrous nature. I suspect that the lead screw just simply can't get a grip, and isn't pulling the cutting edge in to the wood.
 
One thing that you may or may not be aware of is (and this is a common downfall) is to ensure that on the cutting (lower as it is in use) side of the edge that you have a flat straight line from the edge so in other words there is no hump that hits the wood before the cutting edge.
Thank you for the welcomes.

This doesn't account for it working the first time then not the second though eh if my technique was at fault?
 
Photos of the bits cutting ends will revel a great deal.
Your first hole was in dry, seasoned wood, the second in wet fresh wood, brace bits work best in dry seasoned wood.
There are many different types of brace bits, some work better than others.
User technic can have an effect too. As can past sharpening, there is a knack to sharpening them, not often explained these days.

Bod1
 
Thank you for the welcomes.

This doesn't account for it working the first time then not the second though eh if my technique was at fault?
No, the difference between the two attempts is that the first was in a workable timber, and the second was in willow. Nothing works in willow. It's horrible fibrous, soft stuff not suitable for woodworking.
 
It's advisable to do a bit of reading before you take a file and try to sharpen auger bits. Working on the wrong part of the bit can ruin it.

I had a couple of web links saved for bit sharpening.

One of them has gone and is now only available via the internet archive at
Unfortunately the text is archived but the images are not.

If you have access to Fine Woodworking back issues then Issue 044 page 62 has a comprehensive article on sharpening auger bits.
 
Thank you for the welcomes.

This doesn't account for it working the first time then not the second though eh if my technique was at fault?
Oh ok..... I was under the impression that you were talking about trying more than one bit.
I must say that I have only ever used willow to hit a cricket ball.... not for woodworking!
 
Some clear close-up photos would help us give you some more suggestions.
Although all styles of bit are sharpenable, there are limits, and it's always possible that an old one will have been worn out or sharpened wrongly.
 
No, the difference between the two attempts is that the first was in a workable timber, and the second was in willow. Nothing works in willow. It's horrible fibrous, soft stuff not suitable for woodworking.
Ok but to play devil's advocate, as user above states, why are cricket bats made of them? Must be workable in some cases.

Not trying to argue just wonder why they choose willow for bats.

EDIT: I just looked up 'woodworking with willow' and there seem to be plenty of articles on it. I am sure not the ideal wood from what yall are saying but seems a waste to not use a whole tree that was a literal 'windfall'.

I was doing ok with the mortise chisel and willow is what I got so might as well use it.

I have a lot of small aspen, which are too tightly spaced which could do with thinning, is that any better for woodworking?
 
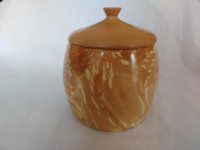
Willow, of the weeping variety, can look gorgeous when turned.

The lid is beech.
IMG_0873.jpeg

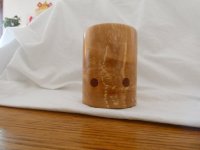
The dots on this pot are walnut; added for decoration and to disguise a knot
IMG_0671.jpeg
 
It looks like this is "cricket bat" willow: Salyx Alba: https://www.wood-database.com/white-willow/

Weeping willow (which I'm guessing is what Mike means by "common-or-garden") is Salyx Babylonica and isn't listed in the wood-database website.

(Note that I know nothing about the subject - the above is just from web searching...)
Having looked up the leaves recently the nearest I found was crack willow.

Frustrating attempt today. Didn't even try with the brace and bits and went straight in with the mallet and chisel but still made a pig's ear of things. The mortise and tenon were not shocking, though far from neat, went in but were not that fast and also split the main bit of wood it went into. I know you aren't supposed to mallet them in as that will likely cause the wood to split. Think it might already have been split, or on its way from my 'kedging'/hewing the round in two.

Got fed up and called it a day after an hour or so. Back to the drawing board now with how to make a saw horse? Was also getting annoyed due to not having a saw horse and not able to cut through legs to make for the horse; catch 22.

I am not sure how to make the legs to attach? I could 'cheat' and use metal banding and some screws but would like to know the 'fine woodwork' way of no metal crutches and just using tools and wood manipulation. Mortis and tenon attempts are tricky particularly when I don't have anything to rest them on while working.

Maybe the above is a compromise better than buying one then I can do the finer crafts once I have the horses with a more solid base to work on. Just so you know I am doing this in a field and not a workshop so very limited in conducive work environment until I cobble something together!

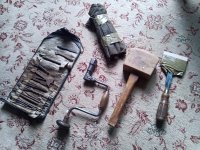
Here is an image of some of the bits, another load in the other roll but don't have image at the moment for those.
 

Attachments

  • woodworking-tools.jpg
    woodworking-tools.jpg
    330.7 KB · Views: 13
Last edited:
Without seeing the actual boring attempts, or the design you are making just to check - you aren't by any chance trying to bore into the end-grain of the wood ? Very few brace bits work well for that (Gedge pattern or bullnose augurs work best). The flat type in the tool roll lack a lead screw so won't self-feed, may need pressure on the pad of the brace. And probably, as everyone has said already, careful sharpening.
 
Without seeing the actual boring attempts, or the design you are making just to check - you aren't by any chance trying to bore into the end-grain of the wood ? Very few brace bits work well for that (Gedge pattern or bullnose augurs work best). The flat type in the tool roll lack a lead screw so won't self-feed, may need pressure on the pad of the brace. And probably, as everyone has said already, careful sharpening.
No not at the end, in the middle of a spliced trunk. Indeed I was using one of the auger bits without a guide screw.
 
lack a lead screw so won't self-feed
This was it! Based on this advice I found one of a similar thickness with a lead screw and made a huge difference!

I tried on willow again, an offcut piece from the same tree.

While it was not easy and required quite a bit of elbow grease, and some cranking rather than full turns, it was biting far better and when through it was closing in on an approximation of a circular hole this time rather than just a stringy mess as was the case with the first. A bit of scraping with a small chisel and looking pretty decent!

So it was both a case of willow being more difficult to work with and the sub optimal bits.

Thanks for yall's input. I feel I can now get creative! I found a piece of wood lying around with a similar thickness to the hole and chiseled it a bit thinner and it was very satisfying to 'peg' it in just to see proof of concept.

Oh yes and I tried with a couple of other bits on this test piece. One with a guide screw and with a more classic corkscrew drill pattern and only about 0.5cm thickness. This one went through easily or rather not easily in terms of effort as quite a bit of oomph required but progress was steady and consistent shall we say.

I found another more auger looking one again, but still with guide screw, and interestingly this one produced a really neat bore hole however I got stuck at about 3/4 of a cm and gave up with that one but that was by far the cleanest cut for what it did manage to do.
 
Back
Top