• Hi all and welcome to TheWoodHaven2 brought into the 21st Century, kicking and screaming! We all have Alasdair to thank for the vast bulk of the heavy lifting to get us here, no more so than me because he's taken away a huge burden of responsibility from my shoulders and brought us to this new shiny home, with all your previous content (hopefully) still intact! Please peruse and feed back. There is still plenty to do, like changing the colour scheme, adding the banner graphic, tweaking the odd setting here and there so I have added a new thread in the 'Technical Issues, Bugs and Feature Requests' forum for you to add any issues you find, any missing settings or just anything you'd like to see added/removed from the feature set that Xenforo offers. We will get to everything over the coming weeks so please be patient, but add anything at all to the thread I mention above and we promise to get to them over the next few days/weeks/months. In the meantime, please enjoy!

Modern style bench with inset saws

Cabinetman

Sequoia
Joined
Oct 11, 2020
Messages
5,694
Reaction score
1,383
Location
Lincolnshire Wolds + Massachusetts
Name
Ian
As you may know I am in Colonial Williamsburg in Virginia. Helping newly acquired Daughter move in and I am building her an L shaped bench with inset tablesaw and chop saw.
It is being built in a garage with a large covered area outside which is super useful shade in the strong sunlight here. Glazed brick walls and a concrete floor which seems to slope in every direction all at the same time lol, there is a large shelf built into the wall of the garage which we are incorporating into the design.
Started with the framework onto the walls.
9F04B36D-055F-408E-847E-BBD9DE344032.jpeg
Then building out the L shape, Sarah Is very artistic and any visual anomalies jar enormously. All leg spacing is critical to her design and they obviously have to take into account the uneven floor, not easy determining the position of the leg then holding up the rail against the leg balancing a 12” level on top whilst marking the height taking into account that it’s CLS with rounded edges - on you own, the air has been a little blue at times.
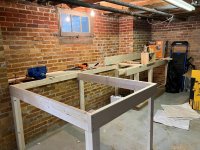
582D93CC-73B0-4EF6-9375-5EF59BC5BAD1.jpeg
Then comes the tricky bit, building in the drop boxes for the saws so that the top surfaces are spot on level with the 18mm ply top.
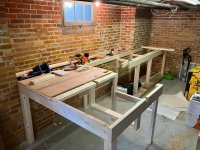
16ED8F6D-D95B-44FA-8509-2BBC7EDBDB0B.jpeg
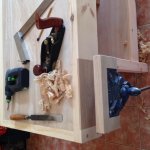
At this time I have got as far as adding the vice, which is an American make called Yost, seems pretty good, it’s a 9” across the top of the front face with quick release, very like a Record.
Vice ( or Vise as they say here) installed with lots of 2x4's beefing up the area around. Four 3” Coach screws (lag bolts here) fastening the vice to the underside of the beefed up area. More later. Ian
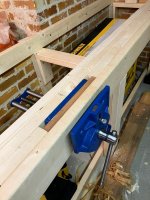
132B09C5-CDA4-4EAF-B30F-CC39E227DBCC.jpeg
 
I thought Williamsburg didn't allow tailed apprentices. Did you sneak them in in the dead of night, like a sneaky night thing
 
The tablesaw outfeed looks a bit small? Or maybe you have a cunning plan?
I normally reckon on 5’ behind the blade if at all possible so a rip cut along the long side of an 8x4 sheet cannot tip and be accomplished unassisted.

Bob
 
Baldrick to the rescue with a cunning plan, yes there will be a 3 foot hinged/lift up extension panel for longer cuts, there is about 3 feet the rest of the time.
I know I should have had an extension to my Sedgwick back home but just never got round to it and managed all these years. But then I have always reduced sheet goods by hand and then trimmed on the saw.
 
Woodbloke":f583wxwa said:
Cabinetman":f583wxwa said:
You’ve got me there Droogs, tailed apprentice?

Power tools with mains electrickery cords - Rob
Ah yes thanks lol. Quite right it’s all 18 Century around here. Very strange seeing people going to work in the town in period costume. The living museum is well worth a visit if anyone is down this way.
 
Under a really tight deadline before heading North again, it’s going quite well and should get all the main fabrication finished leaving Sarah to finish off the odds and ends.
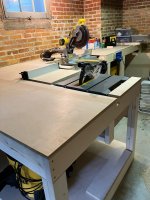
Picture shows both saws in tentative positions.
C23ACF5D-BABA-4F95-BC3D-3E83670B3ED1.jpeg
Next is finishing the boxes, The tablesaw has two arms which slide from left to right and it necessitates having 2 inch wide and 2 inch deep grooves running across the table which is a bit of a pain but can’t be helped if you want the saw top level with the worktop. It’s taken a lot of careful planning to ensure that the cuts are in the right place – all seems to be good up to now.
 
I'd be worried that everything is in the way of everything else. Those combination workspaces are great in theory, until you have a bench full of tools and workpieces, and then need to get to the SCMS. Anyway, if it works for her that's all that matters. I'll bet the wood was a bit cheaper than it is over here!!
 
Mike G":la9igil3 said:
I'd be worried that everything is in the way of everything else. Those combination workspaces are great in theory, until you have a bench full of tools and workpieces, and then need to get to the SCMS. Anyway, if it works for her that's all that matters. I'll bet the wood was a bit cheaper than it is over here!!
Yes you’re quite right but I’m sure she’ll be happy, it’s possible to rip 25 inches from a sheet of plywood and to be able to cut just over 8 feet on the chopsaw, but the tools are already a problem it seems you have to tidy up before you do anything haha.
Timber prices have eased here but 18 mil ply is still $80 a sheet and an 8 foot of 2 x 4 is $5 and an 8 foot of 6 x 2 is just under $9, the whole thing cost about $800 I think, plus of course 5 days hard labour.
 
I’m totally mystified by the method used to fix the vice to the bench with the bench cheek running through like that, is this an intermediate stage of the fitting or am I missing something?
 
Cabinetman":xcez282c said:
Twice now I’ve written a load added 3pics and it has all disappeared into the ether. Will try again tomorrow night with better internet.

Ian, I know Mark has looked into this and is convinced that the forum software is OK and not the cause.

Maybe it is poor internet as you imply but after hitting send, wait for the confirmation and if you don't see your post you still should have it by hitting the back button in your browser.
This thing not to do is move off to another site before getting the confirmation of success as depending on your browser you can lose the ability to get back to the original local copy.
Bob
 
Mike Jordan":1uwh6t7o said:
I’m totally mystified by the method used to fix the vice to the bench with the bench cheek running through like that, is this an intermediate stage of the fitting or am I missing something?

Seems reasonable to me? (Although I don't use vices). An easy way to have inner jaw flush with the edge of the bench. Ok it costs a little off the max opening capacity.

Bob
 
What happens when the softwood rear face becomes marked or worn ? And why has the fixed part of the jaws got a hardwood facing behind the front facing? The replaceable jaw linings are normally there for a reason! Easy replacement when worn.
 
9fingers":euon1dz9 said:
Cabinetman":euon1dz9 said:
Twice now I’ve written a load added 3pics and it has all disappeared into the ether. Will try again tomorrow night with better internet.

Ian, I know Mark has looked into this and is convinced that the forum software is OK and not the cause.

Maybe it is poor internet as you imply but after hitting send, wait for the confirmation and if you don't see your post you still should have it by hitting the back button in your browser.
This thing not to do is move off to another site before getting the confirmation of success as depending on your browser you can lose the ability to get back to the original local copy.
Bob
Oh thanks, no it was loading the last photo when everything froze up, then I think the signal dropped and it all disappeared, I felt sure it was this end and not the site. Ian
 
I don’t know Mike as I say I don’t have any vices. An f clamp or two holds the odd item to my bench if I ever need it.
Ian has a lot of experience so presumably his reasons are sound even if not the way you would do things?

Bob
 
Mike Jordan":3oi86ot1 said:
I’m totally mystified by the method used to fix the vice to the bench with the bench cheek running through like that, is this an intermediate stage of the fitting or am I missing something?
It’s the way I like to mount a vice, as was said you lose a little of the opening depth but gain a full uninterrupted front apron to hold long pieces against, a hole or few for holdfasts in the legs and apron can hold the wood securely for grooving etc, handy to have a couple of holes level with the vice bars as well. Ian
 
Looks a compact & bijou way of utilising the space Ian :eusa-clap:
Re the vice that’s my preferred method of installation, being able to hold long panels against the apron is so useful.

DA45C8A9-A32D-4517-837C-A10F48AF40F4.jpeg

A sacrificial piece of hard wood let into the apron deals with any damage caused from use
 
Doug":3i4ajb9d said:
Looks a compact & bijou way of utilising the space Ian :eusa-clap:
Re the vice that’s my preferred method of installation, being able to hold long panels against the apron is so useful.

A sacrificial piece of hard wood let into the apron deals with any damage caused from use

My old tenth-hand Record is also mounted like that (not as smart as Doug's), the back jaw is in a cut out in the top.
 
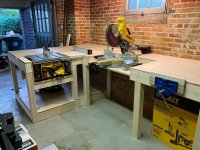
Fitting the boxes for the saws was a design challenge in itself, the grooves running through the bench top allow the fence to extend across the ply top like this, placement is critical.
7E659DD4-8533-4E03-806C-9A28A73A4999.jpeg
Next came all the 18mm ply for the top and base. Quite pleased that fitting the base ply around all the legs worked perfectly first fit with a gentle tap to lower it. We think there may me an ingress of water under the long section of bench so no base until after winter.
The vice front jaw is a bit of Poplar that Home Depot sell by the foot, so she bought a foot lol. And it’s a job left for her to do, as well as screwing down all the ply.
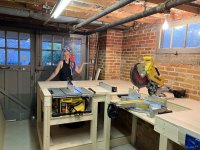
Finished, mission accomplished.
23A25299-9923-434F-B112-6773DF72E25E.jpeg
 
Cracking good job Ian.

I hope you can encourage Sarah to sign up and share her work here. I’ve made a few replacement shutters. Getting the details right to prevent water collecting on horizontal surfaces and running between the braces and the vertical boards encouraging rot to set in can make all the difference.
 
Andyp":3c9s4slq said:
.....Getting the details right.......

The absolute key to anything you make, particularly if exposed to the weather. I would spend quite a lot of time drawing shutters before I picked up the first piece of wood.
 
In the village where a friend of mine lives in France there is a shutter factory and he has collected quite a few of reject shutters as a source of timber.
The design is very simple but very weather resistant.
The shutters are made from TG&V with vertical joints and holes for steel rods horizontally that hold them together and connect them to the mechanism.
Nowhere to catch water and anything that gets in the joint can drain out. no glue involved either.

Bob
 
Mike G":1s09xdtd said:
Andyp":1s09xdtd said:
.....Getting the details right.......

The absolute key to anything you make, particularly if exposed to the weather. I would spend quite a lot of time drawing shutters before I picked up the first piece of wood.

I looked at the old shutters saw where and why they were rotting and tried to design out those defects. So far so good.
 
Andyp":2ejvavjn said:
Cracking good job Ian.

I hope you can encourage Sarah to sign up and share her work here. I’ve made a few replacement shutters. Getting the details right to prevent water collecting on horizontal surfaces and running between the braces and the vertical boards encouraging rot to set in can make all the difference.
Thanks for that.
You should be careful what you ask for lol !! It takes me all my time to sort that young lady out, her mind is always working on the next project. Extremely artistic and very focused, her imitation sugar flowers fruit and berries for cakes are unbelievable, and her attention to detail makes me look like a sloth.
Case in point Mike, we have been round all the museum houses in Williamsburg taking pictures of Shutters and close-ups of corners etc. But thanks for the warning I shall be reviewing designs with that in mind.
 
I’ve just googled Williamsburg Shutters. Most appear to be either louvred or raised panel both of which are way more complicated than the Z braced tongue and groove which is ubiquitous in these parts.
 
Andyp":1l826zbc said:
I’ve just googled Williamsburg Shutters. Most appear to be either louvred or raised panel both of which are way more complicated than the Z braced tongue and groove which is ubiquitous in these parts.
Yes you’re right, and she lives in the historic area and things are well controlled re what is allowed, she fancies panels which may have to wait till l can set up my workshop here with a spindle moulder. She will be starting on internal folding shutters first and is already set up with a morticer and a tenon jig that fits her tablesaw. I shall be there to assist and check it’s a safe thing to use, internal panels we can fabricate from ply and applied mouldings. Ian
 
Looks brilliant. But surely? You've missed a trick. If the table saw was the other way round then as you ripped, you could use the mitresaw to cut it to length.... :D
 
Nice job Ian. Very nice. Now, this Sarah.....she looks quite persuasive.
 
Haha yes I’m sure she can twist young men around her little finger, it’s nice to be able to show her how to do things, amazed that she picked up how to plane a piece of wood really quickly, as I said before she’s really artistic and practical.
 
Back
Top