
-
Hi all and welcome to TheWoodHaven2 brought into the 21st Century, kicking and screaming! We all have Alasdair to thank for the vast bulk of the heavy lifting to get us here, no more so than me because he's taken away a huge burden of responsibility from my shoulders and brought us to this new shiny home, with all your previous content (hopefully) still intact! Please peruse and feed back. There is still plenty to do, like changing the colour scheme, adding the banner graphic, tweaking the odd setting here and there so I have added a new thread in the 'Technical Issues, Bugs and Feature Requests' forum for you to add any issues you find, any missing settings or just anything you'd like to see added/removed from the feature set that Xenforo offers. We will get to everything over the coming weeks so please be patient, but add anything at all to the thread I mention above and we promise to get to them over the next few days/weeks/months. In the meantime, please enjoy!
You are using an out of date browser. It may not display this or other websites correctly.
You should upgrade or use an alternative browser.
You should upgrade or use an alternative browser.
My first attempt at bandsaw boxes
- Thread starter Malc2098
- Start date

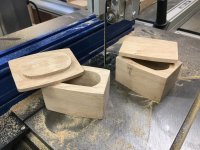

Quite fun to do aren't they?
Next have a ago at bandsaw boxes with a drawer.
Next have a ago at bandsaw boxes with a drawer.

Malc2098
Sequoia
Andyp":3knw52z4 said:Quite fun to do aren't they?
Next have a ago at bandsaw boxes with a drawer.
I was quite pleased as they were my first attempts. The kerf such quite a gap that makes the lid a little loose.
The next one I'l try just cutting the sides by going in and out so I won't need to go round a corner. I'll post and seek comment.

Phil
Old Oak
Nice one Malc 
Malc2098
Sequoia
So I started getting cocky!
I got given a lovely book on trinket boxes for my birthday and it had two bandsaw boxes in there, but not the 'wacky' (my description, sorry) style that some guys employ. This one had even thickness walls all the way round and the trick was to cut the top, the bottom, the walls and the ends separately and then glue them together.
Well, I got the hang of the bandsaw and cutting relatively neat curves, and cutting the straight bits, too.
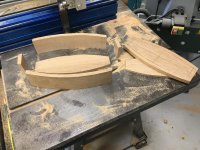
But, when I came to glue it, well.........!
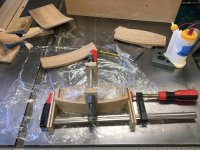
I had the plug wrapped in clingfilm as was the saw table. I had the plug wedged to take up the kerf slack. I even used the curved off cuts to try and clamp the ends but they came off the curve quicker than Usain Bolt popping down to the wages office at Virgin!
I double glued the surfaces to make sure enough as absorbed into the grain. I let them both go off a bit before offering them together, and I clamped clamps to stop them flying off, and in the end I got there, I think.
But........forgot one fundamental trick with bandsaw boxes which might not work with this style of construction. You're supposed to leave the bottom and top off the sides and ends so that you can slide the top's insert through the box to glue fit onto the top in exactly its right position. Only, I'd glued the sides to the bottom.
So I had to come up with a way to locate the insert onto the top, and that how I left it for today.


I got given a lovely book on trinket boxes for my birthday and it had two bandsaw boxes in there, but not the 'wacky' (my description, sorry) style that some guys employ. This one had even thickness walls all the way round and the trick was to cut the top, the bottom, the walls and the ends separately and then glue them together.
Well, I got the hang of the bandsaw and cutting relatively neat curves, and cutting the straight bits, too.
But, when I came to glue it, well.........!
I had the plug wrapped in clingfilm as was the saw table. I had the plug wedged to take up the kerf slack. I even used the curved off cuts to try and clamp the ends but they came off the curve quicker than Usain Bolt popping down to the wages office at Virgin!
I double glued the surfaces to make sure enough as absorbed into the grain. I let them both go off a bit before offering them together, and I clamped clamps to stop them flying off, and in the end I got there, I think.
But........forgot one fundamental trick with bandsaw boxes which might not work with this style of construction. You're supposed to leave the bottom and top off the sides and ends so that you can slide the top's insert through the box to glue fit onto the top in exactly its right position. Only, I'd glued the sides to the bottom.
So I had to come up with a way to locate the insert onto the top, and that how I left it for today.

DaveL
Old Oak
I think full marks for cutting such neat curved sides. Not sure how to best way to clamp for the glue up, maybe a jig cut to hold them in place?
Malc2098
Sequoia
DaveL":3dpjlb6f said:I think full marks for cutting such neat curved sides. Not sure how to best way to clamp for the glue up, maybe a jig cut to hold them in place?
Thanks, Dave.
I used a jig which derives from the circle cutting jig to cut the first over arcs. Then I used a home made resew guide (20mm dowel) to cut the inner curve. And it's a 5/8th" blade, too!


Very neat mate, lovely tight joints there.
With that amount of grain I cant see how the join could possibly be any better.
Are you planning on burying a hamster?
Are you planning on burying a hamster?
Malc2098
Sequoia
Malc2098
Sequoia
Mission Control knitted a spectacular Tooth Fairy for our granddaughter to handle financial transactions on her behalf.

I though I might try something a little more rufty tufty for our grandson. These are two boxes from the same billet, one with a leather lining just visible. I might employ that one so the sound a of a coin hitting the bottom won't wake him!

I though I might try something a little more rufty tufty for our grandson. These are two boxes from the same billet, one with a leather lining just visible. I might employ that one so the sound a of a coin hitting the bottom won't wake him!
Malc2098
Sequoia
Personalised for the little chap and colour coded to show which way round the lid fits.
(It was a nightmare making a stencil out of A4 plastic stuff, sticking it to the wood, sponging paint, and scalpelling the bleeding paint away!)

(It was a nightmare making a stencil out of A4 plastic stuff, sticking it to the wood, sponging paint, and scalpelling the bleeding paint away!)
Well worth the trouble Malc.
Malc2098
Sequoia
I thought I'd have a go at something a little trickier.
This one is curved like one of the previous ones, but it is also tapered. This means the curves and the ends are cut with the BS table tilted a few degrees; 4.6 to be precise, or imprecise, because the quality of the trunnion on the SIP BS is probably not as good as many others on the market, and 4.6 was the closest I could get to 5.
Anyway, here's the first pair of curved cuts followed by the lid cut off the top. I used the same technique to cut the curve using an adaption to my circle cutting jig. The problem I came across was that I had to cut the lid off with the table at 90 degrees, so that meant changing it and then changing again to cut the ends on a taper.
I used the masking tape and superglue tip to secure the work to the circle cutting jig adaptation.
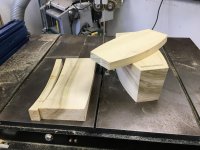
Next I cut the sides to the parallel curve using the jig again and then cut off the ends while the table was still tilted.


Next, I had to cut the bottom from the lower side of there remaining plug and the lid insert from the top side of the plug. Now as the plug was both curved and tilted on the reference edge relative to the BS blade, I rested the plug in the curved offcuts which still had a face square to the blade. I did the lid insert first.

Then I cut the bottom.

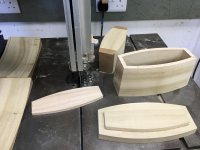
And these are all the component parts of the box, including the plug which after use could be used to make a smaller box in the same style. But the plug is the former used in order to glue the components together. So using parcel tape to stop gluing the ends and sides to the plug and the curved offcuts, I clamped everything together, eventually, sides and ends first, then the lid insert, using the glued carcass to facilitate exact placement on to the inside of the lid.
I then used the plug to aid pushing the bottom to ...the bottom.

And there it is, finished apart from sanding and finishing/painting.

And with the plug.

As you can see from the photos, the glue lines are clearly visible on the ends of the box. I used the tulip wood because one of Coley dog ends was a newel post cut off, which is just the right size for this type of box. It is also an interesting wood to look and the grain carries on through the box with hardly any zig-zagging due to the tapering. But it is quite soft and I've dented it a few times just putting it on the bench, dents too deep to sand out. I shall put felt on the bottom, paint one side of the lid and one side of the box with chalk paint to colour code which way the lid goes on, but also to make it more interesting to look at.
I have used Michael's (MY63) tip of cutting a cornflakes packet cardboard insert for the inside and will stick some suede to that tomorrow like I did with the tooth fairy box. That tip works really well, Michael.
The other reason I used the tulip wood was to practice the tapered technique so that I can make one out of a beautiful piece of figured oak in Coley's dog ends! If it comes out well, I'll post a photo. If not, well.......
This one is curved like one of the previous ones, but it is also tapered. This means the curves and the ends are cut with the BS table tilted a few degrees; 4.6 to be precise, or imprecise, because the quality of the trunnion on the SIP BS is probably not as good as many others on the market, and 4.6 was the closest I could get to 5.
Anyway, here's the first pair of curved cuts followed by the lid cut off the top. I used the same technique to cut the curve using an adaption to my circle cutting jig. The problem I came across was that I had to cut the lid off with the table at 90 degrees, so that meant changing it and then changing again to cut the ends on a taper.
I used the masking tape and superglue tip to secure the work to the circle cutting jig adaptation.
Next I cut the sides to the parallel curve using the jig again and then cut off the ends while the table was still tilted.
Next, I had to cut the bottom from the lower side of there remaining plug and the lid insert from the top side of the plug. Now as the plug was both curved and tilted on the reference edge relative to the BS blade, I rested the plug in the curved offcuts which still had a face square to the blade. I did the lid insert first.
Then I cut the bottom.
And these are all the component parts of the box, including the plug which after use could be used to make a smaller box in the same style. But the plug is the former used in order to glue the components together. So using parcel tape to stop gluing the ends and sides to the plug and the curved offcuts, I clamped everything together, eventually, sides and ends first, then the lid insert, using the glued carcass to facilitate exact placement on to the inside of the lid.
I then used the plug to aid pushing the bottom to ...the bottom.
And there it is, finished apart from sanding and finishing/painting.
And with the plug.
As you can see from the photos, the glue lines are clearly visible on the ends of the box. I used the tulip wood because one of Coley dog ends was a newel post cut off, which is just the right size for this type of box. It is also an interesting wood to look and the grain carries on through the box with hardly any zig-zagging due to the tapering. But it is quite soft and I've dented it a few times just putting it on the bench, dents too deep to sand out. I shall put felt on the bottom, paint one side of the lid and one side of the box with chalk paint to colour code which way the lid goes on, but also to make it more interesting to look at.
I have used Michael's (MY63) tip of cutting a cornflakes packet cardboard insert for the inside and will stick some suede to that tomorrow like I did with the tooth fairy box. That tip works really well, Michael.
The other reason I used the tulip wood was to practice the tapered technique so that I can make one out of a beautiful piece of figured oak in Coley's dog ends! If it comes out well, I'll post a photo. If not, well.......