• Hi all and welcome to TheWoodHaven2 brought into the 21st Century, kicking and screaming! We all have Alasdair to thank for the vast bulk of the heavy lifting to get us here, no more so than me because he's taken away a huge burden of responsibility from my shoulders and brought us to this new shiny home, with all your previous content (hopefully) still intact! Please peruse and feed back. There is still plenty to do, like changing the colour scheme, adding the banner graphic, tweaking the odd setting here and there so I have added a new thread in the 'Technical Issues, Bugs and Feature Requests' forum for you to add any issues you find, any missing settings or just anything you'd like to see added/removed from the feature set that Xenforo offers. We will get to everything over the coming weeks so please be patient, but add anything at all to the thread I mention above and we promise to get to them over the next few days/weeks/months. In the meantime, please enjoy!

My second box

MikeAnblips

New Shoots
Joined
Oct 15, 2025
Messages
52
Reaction score
55
Name
Michele Ancis
LOCATION
Linz (AT)
Hi,
as promised in my presentation post, I kept the latest and greatest for a separate thread :ROFLMAO:

I set out to substitute this mistreated cardbox for my screwdrivers and pliers:
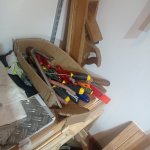
WhatsApp Image 2025-10-10 at 8.41.33 AM.jpg

I also wanted to give some purpose to my badly resawn boards, out of my first experiments with that operation:
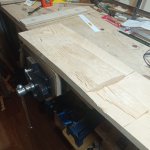
WhatsApp Image 2025-10-09 at 8.29.37 PM.jpg

The things I wanted to try with this were:
  1. 45 deg (splined) miters - I like their aesthetics very much and I'd really would like to learn how to do them super nice
  2. A bottom-in-the-groove construction (sorry, my poor English: feel free to teach me 😘)
  3. A sliding lid
Actually, the whole process was started by the classic "brilliant idea" I had on how to cut the lid handle oh-so-nicely.

So I set out to size/square the pieces, as usual:

WhatsApp Image 2025-10-09 at 10.19.03 PM.jpg

For cutting the grooves, I tried all possible marking/chiseling combinations in conjunction with the use of my router plane.
Results were ranging from barely acceptable to complete mess
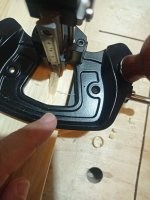
WhatsApp Image 2025-10-10 at 8.47.49 AM.jpg

In the pic I try to show the case when the blade, starting fine a few cm before, suddenly "catches in" and rips off an uncontrolled amount of wood. I had issues with setting/fixing the blade depth reliably, so I had to do back and forth a gazillion times. And, of course, out of those gazillion times, there was the time where I got distracted or impatient, with the result of ruining the shoulders of the groove :-/

Another thing that tended to happen, is that the fence lost lock and I drove - again - the cutter outside of the prescribed route.

All in all, I got some extra tips on how to tackle the blade depth issue, plus the classic advice that "it's a plough plane job - get one!":geek:

We'll see going forward.

I've made my 45 bevels using an extra jig on my shooting board - all hand made by yours truly (I'm mildly proud of it, in case you're wondering):


WhatsApp Image 2025-10-11 at 1.23.17 PM.jpg

After a non negligible amount of fettling with the in-the-groove bottom, which ended up being seriously cupped, so it took me a while to fit in and test properly... I glued the ensemble up, using tape.

WhatsApp Image 2025-10-07 at 9.00.38 PM.jpg
(that's not the final glue-up pic, the bottom is missing, but you get the idea)

It's something I did for the first time, it seems to work OK, but some of the vertices didn't come out as I wish they'd do:

WhatsApp Image 2025-10-09 at 8.29.35 PM.jpg

Nothing you can't fix with a bit of elbow grease and a plane, though :)

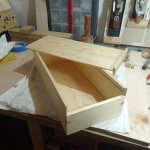
Lo and behold, here's a couple of pics of the final product:
WhatsApp Image 2025-10-14 at 10.07.27 AM.jpegWhatsApp Image 2025-10-14 at 10.07.28 AM (2).jpegWhatsApp Image 2025-10-14 at 10.07.28 AM (1).jpegWhatsApp Image 2025-10-14 at 10.07.28 AM.jpeg


Tips, tricks, comments, suggestions, critique... All welcome!

Cheers,
Michele
 
Nice box for they tools! It's extremely awkward to make four long mitres line up exactly! Not to hijack your thread, I was gluing up this:

IMG_5781.jpeg

...deep picture frame job last night and one particular corner didn't quite pull up as well as I'd hoped. As you correctly say, a few strokes with a nice sharp plane will soon rectify the problem; however this timber is quarter sawn Bubinga which will tear out violently if you only just start to think about planing it! Plane it I must but I'll take some über whispy shavings off using a No.4 with a 'back bevel' on the cutter, so it acts almost as a scraper plane.

The pertinent aspect though, with regard to your project is that moi, personally would have added an extra spline(s) in the joint to discourage the mitres from opening up as the timber moves (which it will do). If you're lucky, it won't happen...but it might!

My next job then on this project is to use a jig on the router table to add some Bog Oak splines to each of the mitres and then the cleaning up starts - Rob
 
Yeah Rob,
the 45 miters are no easy trip! About the single spline, it's a gamble, I agree.
My line of "reasoning" has been: what's my narrowest chisel? A: 6mm. Right, that sets the minimum width I can make the inserts. Will two 6mm inserts/splines look nice on the side (given that part of it is verboten, being the lid handle)? A: mmh, no.
The conclusion is left to the kind reader, as a useful exercise :ROFLMAO:

Big improvement over the cardboard box. Are you going to stain and or treat the wood with a finish?
Thanks! It's probably not visible from the pics, but I've finished with oil (parquet) - I don't plan on using stain on my work for the time being. The whole finishing topic is postponed a few years in the future :)
 
Yeah Rob,
the 45 miters are no easy trip! About the single spline, it's a gamble, I agree.
My line of "reasoning" has been: what's my narrowest chisel? A: 6mm. Right, that sets the minimum width I can make the inserts. Will two 6mm inserts/splines look nice on the side (given that part of it is verboten, being the lid handle)? A: mmh, no.
The conclusion is left to the kind reader, as a useful exercise :ROFLMAO:
If 6mm is your narrowest chisel then yes, you're 'twixt a rock and a hard place, but two inserts would look fine IMO, also bearing in mind that the space on the sliding lid end would be different to the other end. Again, not wishing to steal any thunder:

IMG_5782.jpeg

...but shown as an example, this little sliding lid box in Paduk and Indian Rosewood has Bog Oak splines which are separated vertically by a different distance at each end but the overall effect looks quite respectable.

I understand that you're currently working with hand tools but as Dr.Al has probably mentioned, should you venture into the murky world of powered machinery, a bandsaw of some description is invaluable followed by a router table (though others would disagree) The spline slots take but mere seconds to machine on the router table with a wing cutter bit - Rob
 
Wow nice one Rob!

Not to worry about stealing any thunder (nice expression, I never heard it before but that's probably normal not being mother tongue :-D) - I welcome examples and focus for me is about learning/getting inputs... Yours is a very good example: I would not have thought of organizing the sliding lid this way, for instance!

(It's true that at times I just venture into things without looking what's already there on purpose - that was one such case with the sliding lid...)

So, the back side is 45 miters, but the front side is butt joint?

Those splines do look narrower than 6mm - but probably your point was to show what an "asymmetric" layout can look like?

On the power tools, I'm with you in principle. Having said that I am right now just enjoying the journey and I have no rush nor the desire to get things done quicker or more efficiently (think about my resolve to resawn by hand :ROFLMAO:) - plus dire spatial constraints, I'm not sure I've written it here - I'm now feeling like I'm in one of those Twilight Zone episodes where I'm living a double life or something - but in future I very well see exactly the tools you mentioned: a band saw first, and a router table. I believe with the latter, 45 miters would be a breeze (after a few tries, that is).

EDIT: actually, I don't quite understand how you built that box! Do you have a link to a thread maybe? It's enticing!
 
Wow nice one Rob!

Not to worry about stealing any thunder (nice expression, I never heard it before but that's probably normal not being mother tongue :-D) - I welcome examples and focus for me is about learning/getting inputs... Yours is a very good example: I would not have thought of organizing the sliding lid this way, for instance!

(It's true that at times I just venture into things without looking what's already there on purpose - that was one such case with the sliding lid...)

So, the back side is 45 miters, but the front side is butt joint?

Those splines do look narrower than 6mm - but probably your point was to show what an "asymmetric" layout can look like?

On the power tools, I'm with you in principle. Having said that I am right now just enjoying the journey and I have no rush nor the desire to get things done quicker or more efficiently (think about my resolve to resawn by hand :ROFLMAO:) - plus dire spatial constraints, I'm not sure I've written it here - I'm now feeling like I'm in one of those Twilight Zone episodes where I'm living a double life or something - but in future I very well see exactly the tools you mentioned: a band saw first, and a router table. I believe with the latter, 45 miters would be a breeze (after a few tries, that is).

EDIT: actually, I don't quite understand how you built that box! Do you have a link to a thread maybe? It's enticing!
Very briefly as it's your thread and you have asked, the front side of the box is also mitred, but it's a 'stopped' mitre so has to be produced on the bench top with a chisel and mitre jig; the lower half is mitred and the top bit contains the groove for the lid. The splines are about 2mm thick which is the thickness of the wing cutter, different thicknesses are available.
There are huge variations on how boxes etc are constructed so I generally do a bit of research (Google, Pinterest >>> excellent, etc) before I start mangling a bit of wood. If I don't think about what I'm doing there's a better than even chance that the job will end up as firewood!:ROFLMAO: - Rob

Edit - I can show you the jig if interested?
 
the front side of the box is also mitred, but it's a 'stopped' mitre so has to be produced on the bench top with a chisel and mitre jig;
/me speechless 🤩

Edit - I can show you the jig if interested?
Sure thing!!

There are huge variations on how boxes etc are constructed so I generally do a bit of research (Google, Pinterest >>> excellent, etc) before I start mangling a bit of wood. If I don't think about what I'm doing there's a better than even chance that the job will end up as firewood!:ROFLMAO:
Yeah, I understand. It's not that I don't think about what I'm doing - it's that, and I don't pretend that's a good trait, sometimes I like to run in my own direction. Of course, this is allowed to mean crappy outcome, but is something I somehow decide internally is acceptable.
 
Last edited:
Mitres are very tricky the opposite sides have to be the same length and thickness and the miter angles error adds up so half a degree on each one ends up to 4 degrees out on the last one.
Try a lap joint easily done with a saw and router plane. Leave the front and back the full width and I think they look good.


Pete
 
These guys know more about box making than I ever will. From a purely aesthetic point of view one spline just doesn’t look right to me.
 
Yeah, I understand. It's not that I don't think about what I'm doing - it's that, and I don't pretend that's a good trait, sometimes I like to run in my own direction. Of course, this is allowed to mean crappy outcome, but is something I somehow decide internally is acceptable.
I agree, up to a point. When you're trying to find out what this wood mangling lark is all about, it's good to experiment with ideas and techniques and see where they lead and if you find success or something close to it, it's at least a pat on the back or preferably another beer! :ROFLMAO:

However, at some point in your 'journey' (what a bloody idiotic expression) you may well (and it's happened to all of us) decide to try something a little more adventurous, which may well push your skills to their current limit and beyond. You may decide say, to invest some hard won spondulicos (that's a WH2 term for 'cash') in a bit of seriously decent, well figured timber which you can't afford to have go TU (Google is your friend:ROFLMAO:) in which case you'd be very well advised to really stop and think your way through every part of what you're trying to achieve. Sometimes you'll get there in which case it's two beers and on other occasions it'll not meet your expectations and then it's a shrug of Gallic shoulders and and exclamation of 'medre, c'est la guere'...or similar:ROFLMAO::ROFLMAO: - Rob
 
Love your prose, Rob!

And I totally get you. In fact, you may notice, all my produce is out of 'cheap' wood :geek:

And, mind you, that's for a reason :ROFLMAO:

(I might have shown somewhere my first box. Its lid and sides are made out of a pallet. Just to help you frame my character)
 
with the veritas router plane the key is to enure it's ultra sharp, especially with pine, even more important than other species, also only take off a tiny amount at a time, this is great though for a second box, you should be proud of it.
 
Thanks @thetyreman !

I'm totally proud... In a sense :ROFLMAO:
In other ways, I'm just trying to approx what my ideal would be, while at the same time changing what ideal really means to me, thanks to our interactions and my own experience :cool:

I'll see to ultra-sharpening, to be honest I just left it at what it came out of fab. I can think of honing it. but sharpening is a whole new world.

Nevertheless: if that's the key so solving my problem, I'll see to it.
 
Thanks @thetyreman !

I'm totally proud... In a sense :ROFLMAO:
In other ways, I'm just trying to approx what my ideal would be, while at the same time changing what ideal really means to me, thanks to our interactions and my own experience :cool:

I'll see to ultra-sharpening, to be honest I just left it at what it came out of fab. I can think of honing it. but sharpening is a whole new world.

Nevertheless: if that's the key so solving my problem, I'll see to it.

Sharpening router plane blades is easier than it looks at first glance. David Charlesworth had a really simple method involving a block of wood with a hole in it and a slit sawn down the length, used in combination with a honing guide. I made a 3D-printed version of his one; it's quick and easy to use. If you don't have access to a 3D printer then you could just make one out of wood like David Charlesworth did. The jig sorts out the top surface of the blade; the router plane itself (sitting on a steel rule or a bit of plastic) sorts out the bottom. Photos showing both parts of the process are on that page I've linked to; I can't remember which David Charlesworth video covered his version, but it was one I bought rather than one I found on youtube, so either "Drawer Making", "The Mortice and Tenon" or "Secret Mitre Dovetail" as those are the three I bought.
 
You probably know all this, but regarding grooving, the catch you describe is probably either the prevailing grain direction or a change in the grain direction leading the blade deeper into the wood and one fix is to go the other way with your router plane.

Going slowly and using a small cutting depth will give you a chance to detect the change in grain direction as you go, but also worth looking (along the side of your wood) to spot direction changes (rising or falling grain) before you start. You can also see direction changes from the top surface: you can see the grain that might lead your tool sideways, and if you see knots or whorls, the grain direction is almost certainly changing in the up/down direction in those areas too. Depending on your surface, you may also be able to feel direction changes with your finger tips.

Cutting is another technique to prevent your chisel or plane being carried too far in the grain direction. Scoring the edges of your groove with a knife is useful to limit sideways tearing. Looks like you’ve already done that. In addition, you can chisel across your groove at intervals that will limit any tearing to the area between your blade and the next chisel break.
 
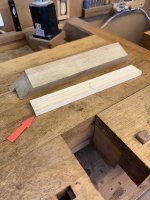
Replying to your request to see a stopped mitre, the chiseling jig and how to cut one half of the joint. First and foremost:

IMG_5786.jpeg

Mark out the joint (arrowed) and shade waste. Self-explanatory double ended jig is shown behind the job. Second and foremost, remove the bulk of the waste with saw(s) of your choice:

IMG_5787.jpeg

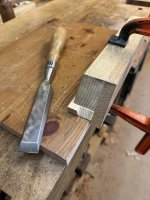
Third and foremost, cramp the jig to a chiseling board on top of the bench and pare away small slices, gradually sneaking up on the line.

IMG_5788.jpeg

As this could be the side of a hypothetical wee box:

IMG_5789.jpeg

...a 6mm groove has been milled for the sliding lid - Rob
 
Thanks Rob, inspiring :)

About that chisel jig: do you think it can be made accurately, with hand tools? If so, any tips 'n tricks?
 
Thanks Rob, inspiring :)

About that chisel jig: do you think it can be made accurately, with hand tools? If so, any tips 'n tricks?
You can definitely make them with hand tools: I made a big one at home & even managed to make a small one while travelling (with my travel toolchest).

Saw it roughly to the right shape, then use a shooting board to bring it to the correct angle. Check the angle with a combination square or angle gauge and tweak if necessary (e.g. by putting a thin shim, like a steel rule, under one corner to lift that corner up a shade before doing another shooting board pass).

The little one I made while on holiday is described here: https://www.cgtk.co.uk/woodwork/boxes/sycamoredrawerbox/blog/page2 and on the following page.
 
Wot Dr.Al said above ^. It goes without saying that the jig needs to be accurate and the 45deg slope checked in both planes...but you knew that :ROFLMAO: - Rob
 
Wot Dr.Al said above ^. It goes without saying that the jig needs to be accurate and the 45deg slope checked in both planes...but you knew that :ROFLMAO: - Rob
Hmm, can't say I knew it, as I'm not sure I understand 🙃
The 45 that matters is between the bottom of the jig and the bevel, right? Which other plane is important here?
 
Hmm, can't say I knew it, as I'm not sure I understand 🙃
The 45 that matters is between the bottom of the jig and the bevel, right? Which other plane is important here?
It's not as critical, but it's useful to make sure that it's square to the two long edges as well as at 45° to the base. I think that's probably what Rob means. Otherwise you end up with something 45° to the base but which could be twisted relatively to the edge of your box (if you line the long edge of the jig up to the edge of the box as I do).

Start with a piece of wood planed parallel & square, saw & plane the 45° angle, then check/adjust relative to the base with a 45° reference and relative to the sides with a 90° reference and you'll be fine.
 
It's not as critical, but it's useful to make sure that it's square to the two long edges as well as at 45° to the base. I think that's probably what Rob means. Otherwise you end up with something 45° to the base but which could be twisted relatively to the edge of your box (if you line the long edge of the jig up to the edge of the box as I do).
Correct Dr.Al; 45deg to the base and 90deg to the long sides - Rob
 
Thanks guys - yes I was a bit puzzled by the "double 45", so I was thinking somehow I needed to be very precise with my thicknessing... 😱
 
Back
Top