-
Hi all and welcome to TheWoodHaven2 brought into the 21st Century, kicking and screaming! We all have Alasdair to thank for the vast bulk of the heavy lifting to get us here, no more so than me because he's taken away a huge burden of responsibility from my shoulders and brought us to this new shiny home, with all your previous content (hopefully) still intact! Please peruse and feed back. There is still plenty to do, like changing the colour scheme, adding the banner graphic, tweaking the odd setting here and there so I have added a new thread in the 'Technical Issues, Bugs and Feature Requests' forum for you to add any issues you find, any missing settings or just anything you'd like to see added/removed from the feature set that Xenforo offers. We will get to everything over the coming weeks so please be patient, but add anything at all to the thread I mention above and we promise to get to them over the next few days/weeks/months. In the meantime, please enjoy!
You are using an out of date browser. It may not display this or other websites correctly.
You should upgrade or use an alternative browser.
You should upgrade or use an alternative browser.
Now for the Chairs
- Thread starter PAC1
- Start date
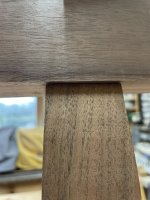
The set up I have for fitting the crest rails is below. The 3x2 serves two purposes. First it is fixed to my bench so I can work with minimal clamps. Second it offsets so the clamping pressure on the crest rails down is vertical so it clamps on the shoulders evenly. 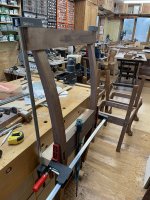
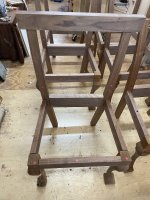

One of the great virtues of mortise and tenon joints is the way they can still function and look perfect, even if the internals have been "creatively adjusted" 
I'm sure the next batch will be right first time.
I'm sure the next batch will be right first time.
NickM
Old Oak
Well done. Looking good!
The problem was my reference flat surface was only about 40mm long and marking a square line from it is proving harder then I thought. Knowing what I know now, I would have added another inch to the length and given myself a 60-70mm flat surface to work from. The other issue is getting the angles of the shoulder right when pairing from the edge to the tenon. They are not 90 degrees to the leg after you have sawn the tenon and I think muscle memory took over on the first one.One of the great virtues of mortise and tenon joints is the way they can still function and look perfect, even if the internals have been "creatively adjusted"
I'm sure the next batch will be right first time.
But cutting more waste on the shoulder and pairing back slowly to the lines is working.

Mike G
Petrified Pine
Am I understanding this correctly..........the issue is marking the front shoulders correctly?
If so (and ignore this, obviously, if I've misunderstood the problem), how about a jig which sits on the back seat rail and has a straight edge horizontally to allow you to make this mark. With some thinking, I'm sure you could add to it in such a way as to enable the side shoulders to be marked at the same time.
If so (and ignore this, obviously, if I've misunderstood the problem), how about a jig which sits on the back seat rail and has a straight edge horizontally to allow you to make this mark. With some thinking, I'm sure you could add to it in such a way as to enable the side shoulders to be marked at the same time.
Mike, the problem is getting the line front to back line accurate. It should be 90 degrees to the small vertical reference point I have on back face on the top of each leg. I mark the front shoulder using a rule as shown above. From that I mark the inside edge and then set a rule from the two inside edge marks. These are proving not to be as accurate as needed. The scope for error is the reference faces may not be 100% accurate. The squaring across is quite difficult. Also the rear shoulder is invariable right on the transition from curve to flat reference face and so placing my rule precisely where needed so I can mark a shoulder on the upper face of the rule is hard and itself has some scope for error. There is also a bit of flex in the leg when pairing the shoulders. It all adds up.Am I understanding this correctly..........the issue is marking the front shoulders correctly?
If so (and ignore this, obviously, if I've misunderstood the problem), how about a jig which sits on the back seat rail and has a straight edge horizontally to allow you to make this mark. With some thinking, I'm sure you could add to it in such a way as to enable the side shoulders to be marked at the same time.
AndyT suggested a jig for marking and cutting the shoulders. The problem for such a jig is the leg curves and is angled.
What might work is to make a marking devise from a piece of rebated hardwood that sits on the reference face and marks 90 degrees across the inside edge. I might be able to clamp it in place rather than the current contortion with a small square
My current method is to mark the shoulders with a pencil and then when I am happy it all lines up to knife them in and slowly pair to the lines and adjust each one to suit its crest rail. Slow but ultimately a satisfying fit.
I always knew that this was going to be the hardest joint to fit. I am used to cutting joints that fit first time. With this you need to be patient and sneak up on the fit. It took about 4 hours to do the first chair. I learnt a lot and sharpened a lot. If I can do the other 5 in 2 hours per chair I will be very happy. If it takes longer so be it.
Mike G
Petrified Pine
Ah, right, I get it. Thanks. How about something like this to aid marking. Again, it would reference the back seat rail (you could add something at the bottom to ensure it sat in the same place every time):
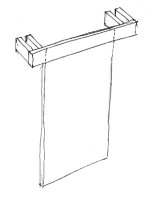
I started to make something similar when I first set about the crest rail. I then re-watched a video of Dan Faia making Queen Anne chairs and he just clamped a rule across as I currently do.
I can see how it would work, if that view was from the front and I fixed something on the back to clamp to my reference face. The mark would then be the top face of your drawing. The problem would be the leg curves away from the face and slopes out at the sides so to have an edge snug on the leg at the top is very complicated.
I will give it some thought as it will probably be Saturday before I get back to them.
Thank you.
I can see how it would work, if that view was from the front and I fixed something on the back to clamp to my reference face. The mark would then be the top face of your drawing. The problem would be the leg curves away from the face and slopes out at the sides so to have an edge snug on the leg at the top is very complicated.
I will give it some thought as it will probably be Saturday before I get back to them.
Thank you.
NickM
Old Oak
I'm glad you've watched that. I thought it was a really good series of videos. I was going to rewatch it to see if there's anything in there that might help you, but I don't need to now!I then re-watched a video of Dan Faia making Queen Anne chairs and he just clamped a rule across as I currently do.
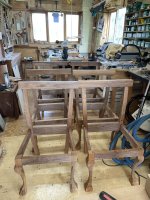
Let the carving begin. I am going to make a new set of carving chops to hold the front legs for carving. I hope to start shaping the rear legs but with one thing and another it will be late April or May before there is much more progress.
Andy, yes just dry fitted and not completely fitted ready for gluing. I realised that the final fit of the crest rail only occurs when the rear legs and back seat rail are glued up. That only occurs when the back legs have been shaped. Also I need to do as much carving as possible before any glue up. What it does mark is that the vast majority of the joinery is complete and I transition to carving and shaping. There is still a lot to do.That does look very satisfying and well organised. I'm a touch envious of your space and natural light too.
Would I be right in thinking that the chairs are all just dry fitted at present?
As for the space yes it is nice and that is only half. There is a separate machine room. As for natural light at this time of year, it is as much a pita as a benefit. For example from 8am until 10 am yesterday I could not see detail at my bench as the sun was straight in front of my face at the vice but on the whole it makes it a nice room to work from.
fiveeyes
Sapling
PAC1..impressive, and top notch skills.
My skill set limits what comments, I can make. Perhaps I will gain some knowledge.
My skill set limits what comments, I can make. Perhaps I will gain some knowledge.
We have a similar problem in some of the rooms at the back of our house, so have fitted simple roller blinds with a plain, light fabric. It works for us and would be a simple modification, especially if you get the sun low in the sky or direct into the room. But you might not want another side project distraction!As for natural light at this time of year, it is as much a pita as a benefit. For example from 8am until 10 am yesterday I could not see detail at my bench as the sun was straight in front of my face at the vice but on the whole it makes it a nice room to work from.
NickM
Old Oak
That's a good milestone to have reached.
When do you fit the splat?
When do you fit the splat?
I cannot decide. I can either do all the back or just the shaping of the back legs and glue the back rail then do the front legs and do the splats last. A bit of me wants to do the front legs and a bit says get the entire back finished. Decisions decisions.That's a good milestone to have reached.
When do you fit the splat?
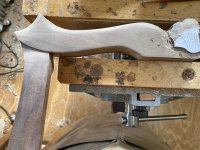
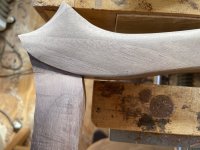
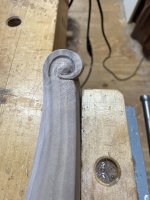
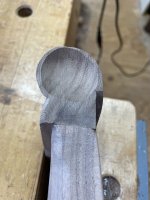

AJB Temple
Sequoia
- Joined
- Apr 15, 2019
- Messages
- 7,720
- Reaction score
- 1,200
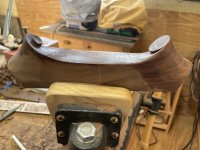
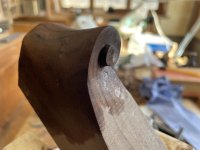
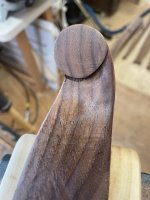
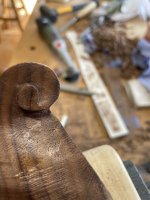
Depends where it is. If at the end of an arm, the recess looks like an ashtray, but if at the top of a leg then I think the recess is more unusual and classy. I always think of violin headstocks when I see scrolls and they have to be very neat to look good.
NickM
Old Oak
I like the recess I think.
fiveeyes
Sapling
scroll

Scroll for me too

Dr.Al
Old Oak
I like the clean simplicity of the right-hand one.
So do I but there is so much interaction between the parts that it's really difficult to judge.
Is the thickness between the scrolls / circles as you want it? Or will there be some shaping and/or chamfering there as well?
I wonder if shaping the middle part would change the look of the ends... maybe if the middle were lighter it would look more as if the ends were formed by curling them up like a long scroll.
Do bear in mind that I find it enjoyable but difficult to say what would look best, so I'm hoping my comments may hit areas you would like to have thought about before you commit to a design.
(I'd probably be slavishly copying if I were making these, which is beyond what I would attempt anyway.)
Is the thickness between the scrolls / circles as you want it? Or will there be some shaping and/or chamfering there as well?
I wonder if shaping the middle part would change the look of the ends... maybe if the middle were lighter it would look more as if the ends were formed by curling them up like a long scroll.
Do bear in mind that I find it enjoyable but difficult to say what would look best, so I'm hoping my comments may hit areas you would like to have thought about before you commit to a design.
(I'd probably be slavishly copying if I were making these, which is beyond what I would attempt anyway.)
AJB Temple
Sequoia
- Joined
- Apr 15, 2019
- Messages
- 7,720
- Reaction score
- 1,200
Right. No brainer. Much cleaner and will be more consistent across the chairs.
I am Andy. The one you like is similar to Doucette and Wolfe. The other is similar to the Chuck Bender chair on the first page of this thread.So do I but there is so much interaction between the parts that it's really difficult to judge.
Is the thickness between the scrolls / circles as you want it? Or will there be some shaping and/or chamfering there as well?
I wonder if shaping the middle part would change the look of the ends... maybe if the middle were lighter it would look more as if the ends were formed by curling them up like a long scroll.
Do bear in mind that I find it enjoyable but difficult to say what would look best, so I'm hoping my comments may hit areas you would like to have thought about before you commit to a design.
(I'd probably be slavishly copying if I were making these, which is beyond what I would attempt anyway.)
fiveeyes
Sapling
The left one. Right side, for me, is plain, it does not speak to me.
Perhaps something in the center of the left one. A dome shape.
Perhaps something in the center of the left one. A dome shape.
Mike G
Petrified Pine
Am I reading this right, Peter........you've glued up the seat rail, but the top rail is dry fitted? That seems very sensible given the amount of work left to do on the top rail. What glue are you using for the project?
Yes that is correct. I have only glued the rear seat rail. The reason for this was it gave greater stability for final fitting the crest rail. I was finding it was a difficult joint to get right without introducing the rigidity of fitting the seat rail. When I considered this I concluded there was no reason not to glue the rail at this point. I cannot glue the crest rail until I have the back splat and the crest rail 90/95% finishedAm I reading this right, Peter........you've glued up the seat rail, but the top rail is dry fitted? That seems very sensible given the amount of work left to do on the top rail. What glue are you using for the project?
The next step will be to size the back splat and its shoe. I have also been making a jig/structure to hold the rear legs and back whilst I work on them.
I am using traditional hide glue. It is working well now it is spring but I would not have wanted to glue up in my unheated workshop in winter. I am getting sufficient working time. Warming the wood before gluing helps as otherwise the hide glue can jell on contact with a cold surface.
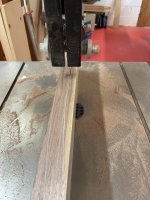
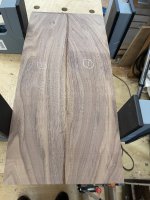
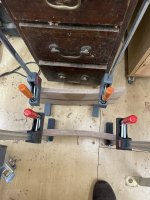
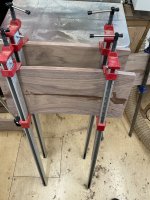
I started shaping the back splats today. I rough cut them on the bandsaw. Plan A was to further refine them on the spindle moulder using a helical block and bearings. Let’s just say that did not work. Plan B was to hand plane them. That changed when I saw how much material I had left on. Plan C was to carefully belt sand the face to within 1mm over size and bobbin sand the back side. Then I realised I could use my drum sander on the back side as the drum would follow the face curve. So now they are all glued up ready for hand planing to final thickness. So all in all a good days work even if a few changes along the way.