MattS
Nordic Pine
I'd glue back but not try too hard to close it right up and plane away the marks. So it looks as if the owner fashioned a repair but wasn't a woodworker.
")
Too late Mark. Whilst I agree with you, I'm not the only one who gets a vote.....I think it looks better left out. Nothing you do to put it back in is going to make it looks like it's natural, so make a feature of it.
As is oft the way Mike, and who are we to argue...Too late Mark. Whilst I agree with you, I'm not the only one who gets a vote.....
Agreed when it (or they) are used deliberately:


Mike, presumably you have already decided what sort of finish you intend to use and how big a part it will play in making this table (and the chairs) look older than they are. I'm guessing it might help play down or emphasise knots and dings. (There was a passing reference to "stain" in post #54.)
I expect it will be a personal preference, supported by experience, not decided by a referendum on here!
But I'll be interested to find out.
I'm not sure I've got a photo, but I have filled the cracks with black Milliput epoxy putty.Personally, would still like to see it with some fine dark wood (American walnut?) sanding dust fed into the remaining cracks to see how it looks.
If not a acceptable it can be blown out again, if it blends in then can be fixed in place.


I've never heard of such a thing. Does it work better than a rolling pin?Mike, Shinto rasp for smoothing the outside curves.
I wouldn't be with out mine.
Pete

 ).
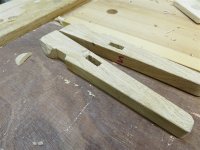
).The wedge to remove a wedge idea is built-in redundancy. All that's needed to remove the wedge that locks the tusk tenon is to tap up or hammer up the bottom small end of the locking wedge. Others would say that the shaped upper part of the wedge is designed specifically to assist its removal.Starting with the wedges, which I realised I couldn't easily remove once driven home. I came up with this solution:
View attachment 37312
........a wedge to remove a wedge.
The wedge to remove a wedge idea is built-in redundancy. All that's needed to remove the wedge that locks the tusk tenon is to tap up or hammer up the bottom small end of the locking wedge. Others would say that the shaped upper part of the wedge is designed specifically to assist its removal.
On the other hand it may be that you simply just like the look of the redundant horizontal wedge. Slainte.
PS. Enjoying the build and seeing how you tackle challenges.
Looking excellent.
Are the mystery notches where you fit lifting eyes for the crane to attach to when you lift it into the dining room?

You've got it, Matt. Exactly.Will those notches have anything to do with the additional leaf you have planned for one end?
Which says in English?!!I had printed out full size the text I planned to carve on the stretcher, and made a start:
View attachment 37352
There are a lot of very similar cuts with this font, so I did all the 1" vertical cuts in one go:
View attachment 37353
I then took to the gouges and V chisel, and just started at the left:
View attachment 37354
I got better and quicker as I moved to the right. This phase is quite convincing. You think the carving looks great, and very neat. When the paper comes off it looks awful, and you spend a long time going over everything again, so this is a roughing-out stage really.
I moved the commas, as they didn't leave enough meat to the gap:
View attachment 37355
View attachment 37356
I stopped when my neck started aching. Carving is hard on the body.
Good friends, good food, good times.Which says in English?!!
I must admit I hadn't appreciated that the space available was quite so limited.There's about 60mm of space below the bottom end of the tusk-tenon wedge (above the foot of the pedestal), so even using a hammer sideways in that gap is a challenge.
I suspect you'd get more wedge removals than you expect. I say that because in my experience of a fair number of tusk tenons on tables and workbenches that that shaping is generally pretty tough. It also helps that the blows to remove the wedge aren't generally parallel with the long grain, they're angled somewhat so that you're sort of partly driving the wedge towards the leg. Also, it's often been the case that the wedges have worked a little loose over time through racking and it's been necessary every now and then to tighten them up. You may be right though, so perhaps caution and the wedge to lock a wedge is a good solution. Slainte.Tapping the top part of the wedge upwards looks like something you could perhaps do 2 or 3 times before the rounded head breaks off

........ the wedge to lock a wedge is a good solution. ...
True, my misspeaking, so a wedge to loosen a wedge. You could screw the 'wedge loosener' to the table top's underside, I suppose. Slainte.It's the opposite, Richard. It's only to unlock it. It'll live somewhere else until it's needed.
I hadn't thought of that. I planed them flat with the little off-cut of hardboard around them. I'm quite happy with them like that. All the pegs in the oak framing in the house are left proud, albeit sticking out a bit further and not smoothed off. So it fits in with that.I’m curious about the pegs Mike, if you now plane them flush they will be proud of the surface in a few months — or will they at 5%? it’s possible they might be under the surface if the wood expands in your home, personally I’ve always done mine like Ercol do, a few whacks with an upturned chisel so that it looks like a rose headed nail, I suspect that’s what you’re planning anyway?
Great wip and the tables turning out really well.
Surely a couple of little wooden stops under the middle of the table, with a turn-button of some kind to hold it in place is the answer. That way it stays with the table and doesn't disappear into a drawer or just disappear...View attachment 37312
........a wedge to remove a wedge. Now I just have to think of somewhere to store it for the rare occasion when it will be needed.