• Hi all and welcome to TheWoodHaven2 brought into the 21st Century, kicking and screaming! We all have Alasdair to thank for the vast bulk of the heavy lifting to get us here, no more so than me because he's taken away a huge burden of responsibility from my shoulders and brought us to this new shiny home, with all your previous content (hopefully) still intact! Please peruse and feed back. There is still plenty to do, like changing the colour scheme, adding the banner graphic, tweaking the odd setting here and there so I have added a new thread in the 'Technical Issues, Bugs and Feature Requests' forum for you to add any issues you find, any missing settings or just anything you'd like to see added/removed from the feature set that Xenforo offers. We will get to everything over the coming weeks so please be patient, but add anything at all to the thread I mention above and we promise to get to them over the next few days/weeks/months. In the meantime, please enjoy!

Patchwork an restoration work

heimlaga

New Shoots
Joined
Sep 15, 2020
Messages
132
Reaction score
79
Location
Österbotten Finland
As requested by Mike here are a few pictures of things I have made:

Year 2024.
I jacked up a church tower and fitted some new logs and a few graving pieces.
IMG_6335.JPG
IMG_6334.JPG

Turning a windshaft for a windmill on my mill shaft lathe.
IMG_5936.JPG
Making wings for the same windmill
IMG_5923.JPG

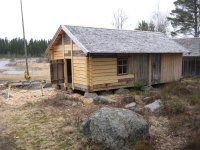
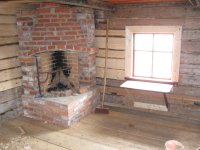
Shingle roofing and a bit of galvanized iron fitted around the chimney
IMG_5909.JPG

Seats and engine installation and stern tube and shaft and everything in a 20 foot motorboat which was delivered unfinished by the builder 40 years ago and not finished until now.
IMG_5916.JPG
Regrinding the secondhand propeller with damaged blade ends from 14 to 13 inches.
IMG_5781.JPG
Pouring home made putty around the home made stern tube.
IMG_5769.JPG


A bit of home grown timber. Logged and sawn and stacked.
IMG_5890.JPG
 
Some cooper's tools I made for a class I taught

IMG_5729.JPG

Logging windfalls. Mostly firewood though some trees were still good enough for timber. The sea ice was strong enough to carry tractor and loaded trailer across the bay to the mainland.
IMG_5711.JPG
A bit of windmill framing. I uprooted two spruce trees for the crooks that meet above the shaft opening.
IMG_5865.JPG

Year 2023
Decking a roof 1890-ies style with unedged boards
IMG_5670.JPG

The engine bed for the boat. Theese weird modern engines have the flywheel on the stern end of the block to I had to weld up a rather unconventional stainless steel engine bed.

IMG_5539.JPG

A bit of foundation work. The foundation boulders has sunk into the ground so we dug down to bedrock by hand and filled in the trench with rocks and placed new bigger boulders on top. After jacking up the building some 30 cm. My tractor was made in Coventry in 1971 and is still going strong.
IMG_5506.JPG

New keel and new garboards in a 19 foot doubleender
IMG_5426.JPG
IMG_5382.JPG

A bit of maintainance on the tractor. New bearings, new pistons, new small end bushings and piston pins, new oil pump and new valves and valve springs.
IMG_5328.JPG
 
Well I don’t think you will ever be bored, looks like a super variation in the work coming in, and I can imagine your reputation spreading for unusual work will bring in even more strange stuff.
Thanks for showing us.
 
Fantastic stuff, Heimlaga. Fantastic. That's the best lathe I've ever seen! I'd always imagined that the big shafts in mills (water and wind) were shaped in the manner of a mast......endless planing along the grain, removing corners in a sequential manner.

Possibly the most impressive of all the really impressive things in your photos is the replacement garboards. To replace garboards in a carvel-planked boat is difficult enough, but to do it in a clinker-built boat is mind-boggling. The constantly changing bevels of the junction with the next board up are going to be almost blind to you, and you've got to thread the garboard up at the same time as bending it in. Goodness knows how you spiled for that (although I guess the removed board gave you most of the shape)......and goodness knows how many times you tried to wrestle it into place only to have to take it out again and shave a bit more off. Superb.
 
Last edited:
Fantastic stuff, Heimlaga. Fantastic. That's the best lathe I've ever seen! I'd always imagined that the big shafts in mills (water and wind) were shaped in the manner of a mast......endless planing along the grain, removing corners in a sequential manner.

Possibly the most impressive of all the really impressive things in your photos is the replacement garboards. To replace garboards in a carvel-planked boat is difficult enough, but to do it in a clinker-built boat is mind-boggling. The constantly changing bevels of the junction with the next board up are going to be almost blind to you, and you've got to thread the garboard up at the same time as bending it in. Goodness knows how you spiled for that (although I guess the removed board gave you most of the shape)......and goodness knows how many times you tried to wrestle it into place only to have to take it out again and shave a bit more off. Superb.
In the old days many maybe most mill shafts were made the way you describe. However some were turned. Probably just the last few millimetres on some sort of makeshift handcranked lathe onsite. I have seen the toolmarks and centermarks but no man alive can tell exactly what such a lathe looked like.
I have hewn and planed one wind shaft for another windmill in the past and found that it was so laborious that I could build this lathe from scrap yard materials and turn this shaft in less time. Modernisation.

I cheated a bit with the garboards. I made the T-shaped keel in two pieces. First I shapeded the inner part (I think you call it hog in English) and nailed it in. The flat underside follows the line of the corner between the outer keel and the planking bevel. I had roughed out the bevels with a hatchet beforehand but I did the last adjustments in place using a piece of planking stock as a guide. At the ends I chiseled out the stem and sternpost rabbet where they gradually blend into the keel but kept them a bit shallow.
I made each garboard in two halves. One forward and one aft. I steamed them with a bit of overbend on a mould so when they were taken off the mould the twist was very close. 16mm spruce springs back a fair bit. A smear of pine tar helped me find the high spots.
Then I fitted one garboard half at a time. Driving them in with a mallet step by thep as I shaved off a little here and there with chisel and block plane. Until they fitted. Then I marked on the keel and on the plank above where the scarph was to be. Then I transfered those marks to each half plank and cut the scarph accordingly. Then I glued a temporary striking block to the outside of each half plank so that I could drive it in place without damage to the scarph. Then I put a mixture of pine tar and boiled linseed oil on the lands and a bit of unspun cotton on that and drove in eack plank half using the striking block. Then I drilled nail holes with an old eggbeater drill cranking back and forth so the cotton wouldn't make a ball on the drill. Then I countersunk the holes on the outside using a gouge and clench nailed with traditional galvanized flat boat nails. Then I fitted the outer keel. Tarred all surfaces that weren't to be glued and glued it to the inner keel using epoxy.
IMG_5353.JPG
IMG_5343.JPG
IMG_5351.JPG
IMG_5395.JPG
IMG_5384.JPG
IMG_5369.JPG
IMG_5368.JPG
IMG_5402.JPG
IMG_5411.JPG

Carvel building is beyond my capabilities. It looks difficult to frame a boat before planking it.
 
... especially when you do it in the snow!
Thank you for showing us your working world.
 
Heimlaga, what type of engine are you using to power your shaft lathe?
An ordinary 2,2kw 1400 RPM 400 volt 3 phase electric motor. Found at a local scrapyard. Driving through a variator and a set of gears also found at the same scrapyard.
The "flyweel" looking thing provides me with 4 locked positions at right angles to each others so I can square the shaft where the gearwheel will sit and cut the mortises for the spars all at right angles to one another
Proper guarding is still missing. I built the lathe ahead of this job and it is still a work in progress. A proper bed and a proper tool rest are also still missing. I am looking for some cheap used C or I beams. I had to test it out before building the guards and spending money on a bed.
 

Attachments

  • IMG_5891.JPG
    IMG_5891.JPG
    358.1 KB · Views: 18
Last edited:
A picture from today. We put the last two sails in place on the mill. 6 local retirees turned up as volunteer helpers.

IMG_6420.JPG

Sometimes I rebuild machinery for my own use. As a way of saving money. This old book binder's press became a glue press in my workshop. When I found it at a local scrap yard quite a few cast iron parts were broken and the main screws were bent. They had dropped the counterweight from a scrapped forklift on top of it.
After some rather significant nickel welding I got it operational a few weeks ago. I didn't have time to repaint it so it still looks a bit shabby but technically it is absolutely sound.
IMG_6390.JPG
 
Last edited:
See, folks, I knew it wasn't straightforward..........
For sure it wasn't........ but thanks to sound advice from three people it was possible:
-An Englishman called Nick who is an active amateur boatbuilder and retired naval architect. He gave me some advice over the internet.
-My uncle Vidar who has built a dozen boats or so and rebuilt a few more starting in the late 50-ies.
-Rainer, a long retired very reputable local boatbuilder who probably built close to 100 boats before his health failed.

They made it possible. I did the job.
 
Above the door there is 1911 burned into the log using a firkin approver's branding iron (I am unsure about English terminology but at the time firkins used to sell salt fish had to be examined by an official who made sure they were the correct size and burned in the legally reqired markings).
Anyway this is a likely build date. In any case the build year must be between 1890 and 1914.

The corners are made like this. The protruding log ends will be cut to an even lenght when everything else is finished.

Theese simple corners are common on outbuildings that didn't have to be very draught proof.
 

Attachments

  • IMG_6454.JPG
    IMG_6454.JPG
    129.6 KB · Views: 12
  • IMG_6448.JPG
    IMG_6448.JPG
    163.2 KB · Views: 12
The log wall repair project has come this far.
IMG_6546.JPG

In between I have been spent a fair bit of time logging. Materials for two upcoming projects plus some logs for my own needs and so far five and a half tractor trailer loads of firewood. I need a couple firewood loads more.

IMG_6526.JPG

IMG_6536.JPG
My tractor was made in Coventry in 1971. Still going strong.


In my very limited spare time I have worked on a low speed grinder for sharpening firewood crosscut saw blades. Built from scrapyard materials. The cast iron base is from a waterpump, the motor from another water pump, arbour from a wood framed table saw, and pulleys from some ventilation macchinery and the material for the guard is from an old oil tank.
IMG_6544.JPG
 
Is this the only wall that needs to be rebuilt ? Impressive work!
Thanks.
Only one log was shifted in the other end wall. Now I just have to patch up that last hole and hew the walls smooth and reinstall doors and windows and the fishing cabin will be pretty sound throughout.

However behind my back when I took the photo is an upcoming project. With help from museum volunteers I have logged 11 metre long logs for that job. A boatshed in need of three whole new log courses and a new ridge pole. And a totally new roof.
 
I’m interested in the choice of corner joints. Are these typical for the area?
A few years ago I messed around with some timber I had felled to make a large raised bed taking inspiration from the 18th century log cabin technique I had seen from the USA. No nails necessary of course and if I remember correctly these were the joints used by the early settlers from europe. By using a kind of half dovetail any rain water is forced away from the joint.

IMG_20200727_153339211.jpeg
IMG_20200912_171018977.jpeg
 
I’m interested in the choice of corner joints. Are these typical for the area?
(...)
Very typical though there are many other types as well. This type is particularly common in buildings that need to be reasonably tight yet not permanently heated. For instance threshing barns and cow sheds and mills and boatsheds and fishing huts like this one where fishermen lived for a month or two every year.
Some farmhouses are built with this joint but it was generally considered a bit...... well.... not quite as good as it should be.

The reason for hewing the sides of the log smooth and straight where the joint will be is to make it tighter. In the old days before sawing became cost effective logs were very roughly hewn. Within an inch or so from finished dimension. Even today logs may twist a bit after sawing. Therefore you make everything straight and parallel where the joint is to come.
After the building is assembled the walls are hewn smooth all at once.

To me having roots in our tradition the American log building practises seem a bit primitive. The sort of building I would build if the task was to get a semi-temporary roof over someone's head before winter using a semi-skilled workforce and an unlimited amount of timber.
Which was probably exactly the situation that American log buildings were developed and adapted for. A perfect case of functionalism. For some weird reason though the Americans kept building like that even in permanent buildings.
Makes ideal raised beds though. Well done.
 
The fisherman's hut is now finished. I did not do the bricklaying. The rest is my work with occasional through very crucial help from a couple of volunteers. Sometimes you need a pair of extra hands or a fresh and sane mind to juggle ideas with.
The board and batten siding is still missing but the log walls must be allowed to dry and settle a couple of years first.
 

Attachments

  • IMG_6614.JPG
    IMG_6614.JPG
    282.4 KB · Views: 26
  • IMG_6615.JPG
    IMG_6615.JPG
    264.6 KB · Views: 27
  • IMG_6619.JPG
    IMG_6619.JPG
    160.5 KB · Views: 26
  • IMG_6617.JPG
    IMG_6617.JPG
    156.8 KB · Views: 17
The fisherman's hut is now finished. I did not do the bricklaying. The rest is my work with occasional through very crucial help from a couple of volunteers. Sometimes you need a pair of extra hands or a fresh and sane mind to juggle ideas with.
The board and batten siding is still missing but the log walls must be allowed to dry and settle a couple of years first.
Really interesting flashing around the chimney. I've never seen flashing curved like that. What's it made of, and how is it formed?
 
The material is 0,6mm "soft" galvanized steel.
I formed it and made all the folds by hand with mallet and backing iron and a piece of 2x4 and roofer's pliers and an old tinsmith's hammer.

The standing seams are curved because it is easier to make a continous water tight double fold that way. There are no corners where water can seep in. Because I am not a professional tinsmith nor roofer the curves became a wee bit more prominent and not quite as deep as they should have been.
Otherwise this is the classic way of making chimney flashing in Finland. Commonly seen on roofs made from the late 1800-s up to the early 2000-s. Sometimes still made today.
 
A log load heading for a local sawmill. Timber for an upcoming project this summer.
IMG_6657.JPG

And the same timber being stickered to dry
IMG_6683.JPG

Installing a frame made from spruce root crooks in a badly hogged 16 foot runabout to keep it's hull shape so I can repair the bottom planking and make it watertight. Over the winter the weight of the stones in combination with strathegically placed blocking and propping underneath have slowly brought the hull back to pretty much it's proper shape. The loading strap was used for the last fine tuning of the beam.
IMG_6673.JPG
IMG_6688.JPG

Shifting the rotten breasthook in another boat. Also a spruce root crook.
IMG_6687.JPG
 
I've never (knowingly) worked with spruce. It sounds really useful, being durable, stable and light. Did you extract the crook from a root yourself? If so, how, because there's all sorts of crap in tree roots ready to wreck your tools.
 
Spruce is one of those species that vary tremendously in quality and usefulness depending on how and where it has grown. I think you could get decent quality spruce if you grew it in particularly cold places in the Scottish highlands or the foothills of the French Alps. The rest of UK and France are too warm and fertile so you get only punky pulpwood.

It's durability in boats is very dependant on selecting the right trees for the purpose and on treating the boat thoroughly with raw linseed oil and/or pine tar in some suitable mixture. You must never ever under any cirkumstances paint or varnish the inside of a spruce boat.
A spruce boat that is painted or varnished inside and out English style without prior treatment will rot out in 5-10 years or sometimes even less. With proper treatment and maintainance (tar and linseed oil) you will get between 40 and 80 years out of it. In rare cases up to 100 years.

The timber must be air dried to be workable. If kiln dried or dried below 15% the knots become too hard to be worked with steel tools. Hard enough to scratch or ever wear grooves in cast iron machine tables.

As with so many wood species it is all about knowing your timber.
 
Alpine Spruce, or Spruce grown in alpine condition - Englemann, Sitka and Alpine, are the timbers traditionally used for instrument soundboards. The alpine climate can create conditions where the tree's growth is almost equal between seasons and also slow growing creating closely spaced rings. That makes the board stiff, light and strong, the right conditions to reverberate and sustain the energy of the plucked string.
 
Aye. I have heard the spruce that grows in the alps is high quality.


I forgot to answer the question.

I harvest and process most boat timber I use and all grown crooks. That is the only way to get what I want at a reasonable cost.

There is barely any speciality timber on the market in Finland. Almost none. There are quite a few small sawmills and there are plenty of small woodland owners. If I cannot find what I need in our 4,5 hectare parcel of woodland I can usually find it in someone elses parcel and buy a couple of trees at a reasonable cost.
 
Back
Top