• Hi all and welcome to TheWoodHaven2 brought into the 21st Century, kicking and screaming! We all have Alasdair to thank for the vast bulk of the heavy lifting to get us here, no more so than me because he's taken away a huge burden of responsibility from my shoulders and brought us to this new shiny home, with all your previous content (hopefully) still intact! Please peruse and feed back. There is still plenty to do, like changing the colour scheme, adding the banner graphic, tweaking the odd setting here and there so I have added a new thread in the 'Technical Issues, Bugs and Feature Requests' forum for you to add any issues you find, any missing settings or just anything you'd like to see added/removed from the feature set that Xenforo offers. We will get to everything over the coming weeks so please be patient, but add anything at all to the thread I mention above and we promise to get to them over the next few days/weeks/months. In the meantime, please enjoy!

Pencil Box...BIG!

Woodbloke

Sequoia
Joined
Jul 22, 2014
Messages
7,521
Reaction score
1,632
Location
Salisbury, UK
My younger bro's 25 wedding anniversary is coming up in early Dec and I asked him if there was anything I could make to celebrate the event?

"One of your boxes please would be great, to hold bits n' pieces and other assorted rubbish" was more or less the reply.

I went for a pretty straight forward Krenov box, which he made back in the 60's to hold the pieces for a peculiar Swedish game, so it had a removable lining with compartments for the various items needed to play the game. As my bro's box was to be just for crap various I decided not to go for a lining, but I did make it bigger than the original.

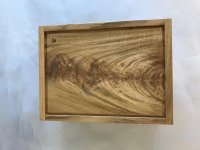
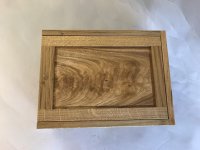
Made in plain oak, with quite spectacular, matched 'flame' panels for the solid top and bottom. I didn't want quarter sawn sides to clash with the panels, hence the choice of oak 'ordinaires'.

An early shot from last week;

.
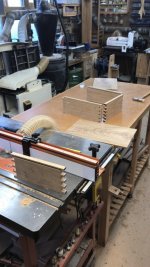
95357394-7868-471D-818E-F0CBF762A150_1_201_a.jpeg

...showing the shovetails and the bookmatched panels, yet to be sized and rebated.

Gory constructional details. Through dovetailed all round:
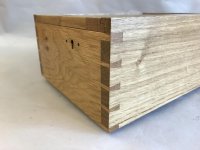
IMG_6101.jpeg

...and panels with a 'curved' rebate (very JK)

IMG_6104.jpeg

...made using this cutter on the router table: https://www.axminstertools.com/axcalibe ... ter-666038

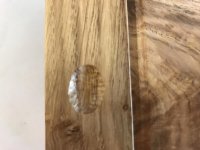
Carved 'thumb pull' :
IMG_6105.jpeg

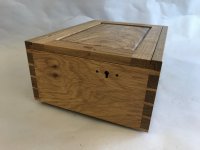
...left from the tool. After a request for recommendations earlier for a suitable lock, Andy T supplied me with something that was absolutely ideal, so much kudos and massive thanks! The screw countersinks were enlarged for No.5 brass screws, suitably polished and 'clocked' :D
IMG_6100.jpeg

IMG_6107.jpeg

A view of the underside:

IMG_6106.jpeg

...and the top panel:

IMG_6102.jpeg

IMG_6103.jpeg

...and a final pic of the completed box:

IMG_6099.jpeg

In the true spirit of any of my projects, there's a humongous gaff there which I had to 'fix' in the finest tradition of the late and very great Alan Peters :D Cyber Mars Bar if you can spot it! :lol:

Finished with a few coats of satin Osmo-PolyX and waxed with Swedish beeswax from CHT using a grey Webrax pad and finally polished with a soft duster - Rob
 
Nope. Can't spot it. You could have got away with it, whatever it is!

Very nice indeed, as we have come to expect.
 
AndyT":2usx2n3v said:
Nope. Can't spot it. You could have got away with it, whatever it is!

Very nice indeed, as we have come to expect.

Thanks Andy. Hint...look a little closer at your lock :eusa-whistle: - Rob
 
Oh, do you mean that pair of decorative beauty spots either side of the keyhole? Don't all locks need them? ;)
 
AndyT":q2cnnnpo said:
Oh, do you mean that pair of decorative beauty spots either side of the keyhole? Don't all locks need them? ;)
Cyber Mars Bar on it's way, FedX OK? :lol:

I marked out what I thought was the correct position for the key 'ole on the escutcheon but I was 20mm out. The problem was that I'd marked it deeply (ready for drilling) with an awl and there was absolutely no way I could sand/scrape/plane out the mark; it was just too deep. The only option I could see was to replicate the awl mark on the other side of the key hole, drill them both out 4mm and glue in a couple of tiny ebony dowels (which were a real pig to make :evil: )

The overall effect doesn't look too bad, but the initial awl mark, had I left it, would have stood out like the proverbial 'sore thumb' - Rob
 
I thought you'd drilled it to fit a brass escutcheon plate and discovered the body of the lock was in the way of the screws.

Still, looks rather nice.
 
Sheffield Tony":3bqhzmsm said:
I thought you'd drilled it to fit a brass escutcheon plate and discovered the body of the lock was in the way of the screws.

Still, looks rather nice.
Nope, the original didn't have an escutcheon plate so I didn't fit one either. Nor is there a striker plate on the mortice on the underside of the lid - Rob
 
Looks fantastic. I did wonder what those marks were. I didn't look closely and assumed they were holes - air holes for a hamster perhaps, I wondered...
 
Also a pleasure to view your WIPs Bob. Always an excellent result BUT....

That lock should be in the middle. :)
 
Andyp":27xquyxi said:
Also a pleasure to view your WIPs Bob. Always an excellent result BUT....

That lock should be in the middle. :)

Nope, it can't. There's a deep carved thumb pull in the middle on the upper side and if the lock was underneath it the mortice would break through. Bad news :D - Rob
 
I knew there would be a justifiable reason. It is unusual more than anything else. Still a great piece. I wish my elder brother had your skills.
He is lucky to have you.
 
Beautiful box Rob. The grain and the lid detail are very attractive.
I also thought the two black spots were deliberate but couldn't figure out what for!

John
 
Spotted the lock wasn’t in the centre obviously, and also reasoned about the pull depression, but couldn’t work out what the black dots were for as the holes were so neatly drilled they looked like they were on the surface! How about some bog Oak pins with domed heads in the holes? What is it they say? Make a feature your cockups? Lovely clean dovetails. Ian
 
Cabinetman":4gcc5q2i said:
...as the holes were so neatly drilled they looked like they were on the surface! How about some bog Oak pins with domed heads in the holes? What is it they say? Make a feature your cockups? Ian

Read what I writ earlier Ian :D - Rob
 
Nice box Rob. Out of interest how long did it take? I've been making some and they need patience and time.
 
pitch pine":2c7rin0t said:
Nice box Rob. Out of interest how long did it take? I've been making some and they need patience and time.
About two weeks, roughly, but that's not working on it full tilt...there were other jobs that SWIMBO said required my attention :eusa-whistle:

Out of interest, this was JK's original box:

a (45).jpg

...and having had a look at it again this morning, I've just carved the thumb pull on my one a little deeper and more pronounced - Rob
 
Woodbloke":21eouhr4 said:
Cabinetman":21eouhr4 said:
...as the holes were so neatly drilled they looked like they were on the surface! How about some bog Oak pins with domed heads in the holes? What is it they say? Make a feature your cockups? Ian

Read what I writ earlier Ian :D - Rob
Haha, missed that bit! Similar solution though.
Just imagining the blue air when you marked the hole wrongly, we’ve all done it.
 
Back
Top