

Phil
Old Oak
Picture Frame
This has taken me a lot longer than what it should, fortunately they have been away from home for a couple of months. (São Tomé, Mexico, USA and Eswatini)
Last Xmas family lunch was at our house, including extended.
I asked my DIL dad what he would like, “a sheet of hardboard to glue a puzzle onto”.
Puzzle size and how wide border?
Puzzle 737mm X 508mm
Border 30mm all round
The 3mm hardboard comes in small cut sheets, 1225mm X 600mm, which would fit with very little cut off.
Xmas day he gets the hardboard and a small bottle of wood glue.
Soon puzzle built and glued.
How are you going to hang it? Not sure.
Ok, so I volunteer to make a frame from whatever scrap pine is in stock. Picture delivered, hmmmmmmm the gap around is between 30mm and 33mm, need to chew on that.
The pine is 40mm wide and 22mm thick, enough in stock, no need to saw and plane more.
The frame needs some profile, grab ruler, paper and pencil.
First problem – the 40mm wide is not enough for a frame and decent overhang. Go for a walk looking for inspiration.
Trim the hardboard cutting off 12mm, bearing in mind that the puzzle is glued down and needs protection from the fine sawdust. Mark the 20mm gap required on the hardboard.

From the kitchen appears wife’s baking paper! Cut 2 strips and stick it down with masking tape.

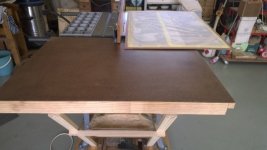
Set up table saw with extended table top (specially made for this job) and carefully push the board through for 4 sides. Looks ok!
Next is to sketch the frame profile, do not need something fancy or complicated.
Setup router table with bits and rout some pieces of scrap. Settle on one profile.

Clamp some blocks to the fence to act as hold-downs bearing in mind that a large chunk of the routing is underneath and needs to be kept square. Also feeding the pine requires hands on pressure passing very close to the spinning bit.
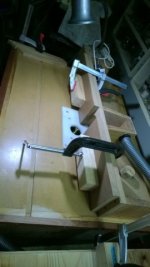


Sh1t! the long section for the sides has a slight curve, saw in half and re-rout.
The corners – I would have preferred overlaps but just not enough wood for it and so settled on mitres. Actually easy-peasy on the Radial Arm saw, and quite good flush fit.
Assembly with these corners can be tricky based on previous experience.
Flip over face down and then line up corner with square, shoot 2 staples in and move to next corner.
See if picture fits. Yes. Flip frame over for gluing.
The staples allow the corner to be opened slightly for the glue to be forced in. Clamp down, clean off excess, leave till next day. Repeat for other 3 corners. Nice and sturdy.
The slight curve came back to bite me as the fit was too tight. Only solution was to widen the recess where the actual puzzle rested.
Record 43 Plough Plane to the rescue with some Stanley chisels and the mallet.

Final fit ok, could now mark where the panel pins would go to hold it in, at the same time mark and drill holes for the eyelets.
Final job was to apply an undercoat, white, to the frame. They can spray on the final colour once decided. Just not white as the white tends to show all the timber marks, despite lots of sanding and filler.

Securing the hardboard to the frame.
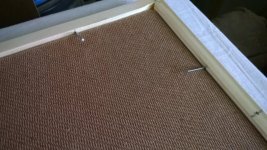
Some colour suggestions using AI software

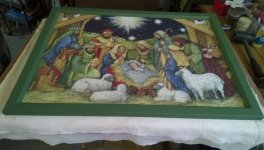
Thank you for reading.
This has taken me a lot longer than what it should, fortunately they have been away from home for a couple of months. (São Tomé, Mexico, USA and Eswatini)
Last Xmas family lunch was at our house, including extended.
I asked my DIL dad what he would like, “a sheet of hardboard to glue a puzzle onto”.
Puzzle size and how wide border?
Puzzle 737mm X 508mm
Border 30mm all round
The 3mm hardboard comes in small cut sheets, 1225mm X 600mm, which would fit with very little cut off.
Xmas day he gets the hardboard and a small bottle of wood glue.
Soon puzzle built and glued.
How are you going to hang it? Not sure.
Ok, so I volunteer to make a frame from whatever scrap pine is in stock. Picture delivered, hmmmmmmm the gap around is between 30mm and 33mm, need to chew on that.
The pine is 40mm wide and 22mm thick, enough in stock, no need to saw and plane more.
The frame needs some profile, grab ruler, paper and pencil.
First problem – the 40mm wide is not enough for a frame and decent overhang. Go for a walk looking for inspiration.
Trim the hardboard cutting off 12mm, bearing in mind that the puzzle is glued down and needs protection from the fine sawdust. Mark the 20mm gap required on the hardboard.
From the kitchen appears wife’s baking paper! Cut 2 strips and stick it down with masking tape.
Set up table saw with extended table top (specially made for this job) and carefully push the board through for 4 sides. Looks ok!
Next is to sketch the frame profile, do not need something fancy or complicated.
Setup router table with bits and rout some pieces of scrap. Settle on one profile.
Clamp some blocks to the fence to act as hold-downs bearing in mind that a large chunk of the routing is underneath and needs to be kept square. Also feeding the pine requires hands on pressure passing very close to the spinning bit.
Sh1t! the long section for the sides has a slight curve, saw in half and re-rout.
The corners – I would have preferred overlaps but just not enough wood for it and so settled on mitres. Actually easy-peasy on the Radial Arm saw, and quite good flush fit.
Assembly with these corners can be tricky based on previous experience.
Flip over face down and then line up corner with square, shoot 2 staples in and move to next corner.
See if picture fits. Yes. Flip frame over for gluing.
The staples allow the corner to be opened slightly for the glue to be forced in. Clamp down, clean off excess, leave till next day. Repeat for other 3 corners. Nice and sturdy.
The slight curve came back to bite me as the fit was too tight. Only solution was to widen the recess where the actual puzzle rested.
Record 43 Plough Plane to the rescue with some Stanley chisels and the mallet.
Final fit ok, could now mark where the panel pins would go to hold it in, at the same time mark and drill holes for the eyelets.
Final job was to apply an undercoat, white, to the frame. They can spray on the final colour once decided. Just not white as the white tends to show all the timber marks, despite lots of sanding and filler.
Securing the hardboard to the frame.
Some colour suggestions using AI software
Thank you for reading.


