
I need to make a small table for my Pizza oven. Even softwood is expensive at the moment but it will have to do. I was thinking to just bolt stuff together with stainless bolts but whilst looking for inspiration on the net I’ve seen quite a few small softwood tables made with pocket screws. I think I’ve mentioned this before but I’ve no experience of using them and need to buy or make a jig and get a drill bit and some screws. Any advice on the topic? I don’t want to spend too much on the hardware as I don’t think it’s going to get a lot of use once the tables done.

-
Hi all and welcome to TheWoodHaven2 brought into the 21st Century, kicking and screaming! We all have Alasdair to thank for the vast bulk of the heavy lifting to get us here, no more so than me because he's taken away a huge burden of responsibility from my shoulders and brought us to this new shiny home, with all your previous content (hopefully) still intact! Please peruse and feed back. There is still plenty to do, like changing the colour scheme, adding the banner graphic, tweaking the odd setting here and there so I have added a new thread in the 'Technical Issues, Bugs and Feature Requests' forum for you to add any issues you find, any missing settings or just anything you'd like to see added/removed from the feature set that Xenforo offers. We will get to everything over the coming weeks so please be patient, but add anything at all to the thread I mention above and we promise to get to them over the next few days/weeks/months. In the meantime, please enjoy!
You are using an out of date browser. It may not display this or other websites correctly.
You should upgrade or use an alternative browser.
You should upgrade or use an alternative browser.
Pocket Hole jig
- Thread starter Woodster
- Start date

I've not used a pocket hole jig, but isn't the point of them that they let you make a simple joint that doesn't show?
For something like a short term garden table, concealing the construction would be a low priority, wouldn't it?
I've made the odd quick table just by screwing through 1x2 laid flat on square legs. Easy enough to do on the bench. You could even countersink and fill the screws if you wanted!
Also, even if you don't want low stretchers between the legs, a scrap piece of the right length is handy for keeping everything square during assembly.
For something like a short term garden table, concealing the construction would be a low priority, wouldn't it?
I've made the odd quick table just by screwing through 1x2 laid flat on square legs. Easy enough to do on the bench. You could even countersink and fill the screws if you wanted!
Also, even if you don't want low stretchers between the legs, a scrap piece of the right length is handy for keeping everything square during assembly.

- Joined
- Jul 21, 2014
- Messages
- 10,414
- Reaction score
- 165
There are simple PH jigs but you need to spend more time aligning them than jigs you spend a little more on.
I use a jig from Rutlands and despite all the nay-sayers on Rutlands quality and service, I've been pleased with it. For softwood you will need the coarse screws and the length to use is a function of the jig setting and the thickness of the timber to be joined.
The kits come with a selection of washer head screws that can be pricey to buy but a csk crew and flat washer (m4 plain is the correct size) make an acceptable substitute. DONT just use csk screws as the wood will likely split either on assembly or in use.
I always clamp the two parts before fitting the screws for perfect alignment and tend to use glue as well on natural timber. (pointless on MFC)
PH is just another tool in the armoury - make sure you have enough access to get the driver in when you design the project.
This is the nearest jig to the one I use but mine is aluminium with steel drill guides which seems fine to me
Premium Steel Pocket Hole Jig
Rutlands®
Part No. R6000
£69.99 inc. vat
This is the one that needs a bit more care
Premium Aluminium Mini Pocket Hole Jig
Rutlands®
Part No. R6002
£19.99 inc. vat
HTH
Bob
Was: £29.99
I use a jig from Rutlands and despite all the nay-sayers on Rutlands quality and service, I've been pleased with it. For softwood you will need the coarse screws and the length to use is a function of the jig setting and the thickness of the timber to be joined.
The kits come with a selection of washer head screws that can be pricey to buy but a csk crew and flat washer (m4 plain is the correct size) make an acceptable substitute. DONT just use csk screws as the wood will likely split either on assembly or in use.
I always clamp the two parts before fitting the screws for perfect alignment and tend to use glue as well on natural timber. (pointless on MFC)
PH is just another tool in the armoury - make sure you have enough access to get the driver in when you design the project.
This is the nearest jig to the one I use but mine is aluminium with steel drill guides which seems fine to me
Premium Steel Pocket Hole Jig
Rutlands®
Part No. R6000
£69.99 inc. vat
This is the one that needs a bit more care
Premium Aluminium Mini Pocket Hole Jig
Rutlands®
Part No. R6002
£19.99 inc. vat
HTH
Bob
Was: £29.99
Thanks Bob, most helpful. I’ll have a look.
Andy, sometimes you either need or want to butt one piece of wood against another. The most obvious way of doing this with screws is to go through one piece into the end grain of the other. Putting screws into end grain is not good though and I always try to avoid it unless it’s a temporary fit. Using pocket holes though you can put screws in the other way into side grain making a stronger joint, if I’ve missed something (quite likely) and there’s another way please let me know, I’m open to suggestions. What made me revisit the topic of pocket screws again was seeing this.
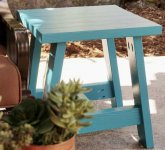
Andy, sometimes you either need or want to butt one piece of wood against another. The most obvious way of doing this with screws is to go through one piece into the end grain of the other. Putting screws into end grain is not good though and I always try to avoid it unless it’s a temporary fit. Using pocket holes though you can put screws in the other way into side grain making a stronger joint, if I’ve missed something (quite likely) and there’s another way please let me know, I’m open to suggestions. What made me revisit the topic of pocket screws again was seeing this.
I have the cheapest worth while option of a kreg mini.
Yes it takes a few seconds longer to set. But it was 15 quid. For your purpose I think it would be perfect. Comes with drill.
If I'm doing the deepest setting I use a compound square. I have a quick clamp I use. Takes maybe 3 seconds to setup each hole.
I use normal wood screws with a washer to take up the counter sink.
For quick knock ups where real joinery isn't needed they are great. I Also use them for thin floating shelves.
Yes it takes a few seconds longer to set. But it was 15 quid. For your purpose I think it would be perfect. Comes with drill.
If I'm doing the deepest setting I use a compound square. I have a quick clamp I use. Takes maybe 3 seconds to setup each hole.
I use normal wood screws with a washer to take up the counter sink.
For quick knock ups where real joinery isn't needed they are great. I Also use them for thin floating shelves.
Lurker
Old Oak
Regards the cost of wood:
If you keep a eye on Facebook (I know, I know) marketplace there will be someone (best time to check is Saturday mornings) offloading a dining table for free. I have now aquired three all for the collecting and all within a 4 mile round trip.
One is still a table,used in the workshop.
One has been cut up and is now a portable stand for my mini metal working lathe.
And the most recent which is all beech (not veneer)\ laminate is waiting to be cut up for three projects that will soon be underway.
If you keep a eye on Facebook (I know, I know) marketplace there will be someone (best time to check is Saturday mornings) offloading a dining table for free. I have now aquired three all for the collecting and all within a 4 mile round trip.
One is still a table,used in the workshop.
One has been cut up and is now a portable stand for my mini metal working lathe.
And the most recent which is all beech (not veneer)\ laminate is waiting to be cut up for three projects that will soon be underway.
This is the sort of very basic thing I had in mind. You never need to put screws in end grain.
Attach a top with brackets.
Angle the legs, scale up the sizes, round off the corners, etc etc. Don't scale off this drawing!
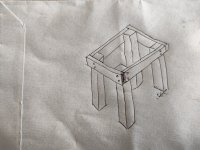
Attach a top with brackets.
Angle the legs, scale up the sizes, round off the corners, etc etc. Don't scale off this drawing!
No offence but that’s the kind of construction I was trying to avoid.
I quite like using barrel nuts and furniture bolts but only have plain steel & plated which I’m sure will rust pretty quickly. Stainless are available but cost a lot more.
The last time I made a bench CLS timber was a lot cheaper so I may use it again for this project.
I quite like using barrel nuts and furniture bolts but only have plain steel & plated which I’m sure will rust pretty quickly. Stainless are available but cost a lot more.
The last time I made a bench CLS timber was a lot cheaper so I may use it again for this project.
I've just built a pocket hole jig over the weekend this thread shows it
viewtopic.php?f=19&t=6331
it is based on the Holder available from Bangggood and the design by Denis of Hooked on wood, his video below
https://www.youtube.com/watch?v=eAvdnT-f2rE&t=643s
a useful bit of kit if you want to make a lot of quick cabinets and frames etc
viewtopic.php?f=19&t=6331
it is based on the Holder available from Bangggood and the design by Denis of Hooked on wood, his video below
https://www.youtube.com/watch?v=eAvdnT-f2rE&t=643s
a useful bit of kit if you want to make a lot of quick cabinets and frames etc
Mike Jordan
Sapling
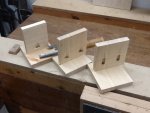
Why not use one of these methods? The one on the left only requires the use of a gouge and drill. The centre version involves a tongue and groove which is quickly done if you own a router, it's real advantage is the absence of movement as the screws are tightened. The one on the right simply uses the router to make the sinkings to take the screws. In all cases pan head screws are best for the job.
No matter whether you use a costly jig with all the extras, or one of the above, these are very limited quality joints. Proper joinery is vastly better! Like most proprietary short cuts they promise much more than they deliver.

Mike Jordan
Sapling
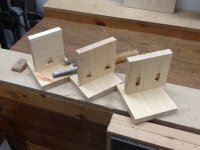
Hope this one is better quality
Mike
Not having used pocket hole screws before I’ve been looking online for more information.
Steve Ramsey says the screws should go inwards like this to give more strength, which makes sense. Particularly on thin boards.
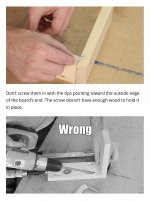
I then saw this guide which goes against that advice and you can really see the issue on thin boards.
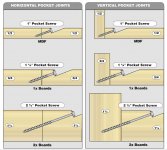
The thing is, it’s easier to hide the pocket holes if they’re on the inside and I’ll be using 38mm stock like the bottom example. Should be strong enough for a small table? Personally I think using two screws, one from each direction might be best but not sure I can be bothered with that! :lol:
Steve Ramsey says the screws should go inwards like this to give more strength, which makes sense. Particularly on thin boards.
I then saw this guide which goes against that advice and you can really see the issue on thin boards.
The thing is, it’s easier to hide the pocket holes if they’re on the inside and I’ll be using 38mm stock like the bottom example. Should be strong enough for a small table? Personally I think using two screws, one from each direction might be best but not sure I can be bothered with that! :lol:

Steve Maskery
Old Oak
You can screw into endgrain quite successfully if you insert a wooden cross-dowel first. Here I'm doing it on an Adirondack chair that will get lifted up by its arms. It's as solid as anything. Start at 15:40:
[youtubessl]8or-Umfm-5k[/youtubessl]
[youtubessl]8or-Umfm-5k[/youtubessl]
I think you might be thinking to much.
As an example, the table my piller drill sits on is pocket screwed together, from the inside,made from soft wood. Been together for 8 years without an issue. The pillar drill is a damn sight heavier than your pizza oven.
As an example, the table my piller drill sits on is pocket screwed together, from the inside,made from soft wood. Been together for 8 years without an issue. The pillar drill is a damn sight heavier than your pizza oven.
novocaine":meu54w1k said:I think you might be thinking to much.
As an example, the table my piller drill sits on is pocket screwed together, from the inside,made from soft wood. Been together for 8 years without an issue. The pillar drill is a damn sight heavier than your pizza oven.
As I’m new to pocket hole construction I’m just trying to take advantage of the advice of more experienced users like Steve Ramsey.
[youtubessl]EuA1a9d1kBY[/youtubessl]
Steve Maskery
Old Oak
I have a love-hate relationship with pocket hole joints. I like the fact that they are strong and can be dismantled. Great for getting wardrobes up the stairs, for example. And on carcase work, it's easy to make them totally invisible, too, bt putting them on surfaces that are not seen.
But where they ARE seen they are hideously ugly.
So, in the example shown of joinring a couple of 3x1s at a corner, they are always going to look better on the inside, but at the risk of not holding so well, so close to the end.
Another way of cutting them, though slower, is to use a router to rout a flat poclet (as opposed to the angled ones made by a PH jig, then drill a horizontal clearance hole. The screw goes in straight (which makes it more difficult to use a screwdrive, I know), but you don't get the problem of the pieces pulling out of flush and you don't get the problem of grain breakout close to the end.
It does take more time, but for a small project like yours, it shouldn't be too onerous.
S
But where they ARE seen they are hideously ugly.
So, in the example shown of joinring a couple of 3x1s at a corner, they are always going to look better on the inside, but at the risk of not holding so well, so close to the end.
Another way of cutting them, though slower, is to use a router to rout a flat poclet (as opposed to the angled ones made by a PH jig, then drill a horizontal clearance hole. The screw goes in straight (which makes it more difficult to use a screwdrive, I know), but you don't get the problem of the pieces pulling out of flush and you don't get the problem of grain breakout close to the end.
It does take more time, but for a small project like yours, it shouldn't be too onerous.
S