• Hi all and welcome to TheWoodHaven2 brought into the 21st Century, kicking and screaming! We all have Alasdair to thank for the vast bulk of the heavy lifting to get us here, no more so than me because he's taken away a huge burden of responsibility from my shoulders and brought us to this new shiny home, with all your previous content (hopefully) still intact! Please peruse and feed back. There is still plenty to do, like changing the colour scheme, adding the banner graphic, tweaking the odd setting here and there so I have added a new thread in the 'Technical Issues, Bugs and Feature Requests' forum for you to add any issues you find, any missing settings or just anything you'd like to see added/removed from the feature set that Xenforo offers. We will get to everything over the coming weeks so please be patient, but add anything at all to the thread I mention above and we promise to get to them over the next few days/weeks/months. In the meantime, please enjoy!

Potting shed

woodstalker

Nordic Pine
Joined
Apr 16, 2016
Messages
629
Reaction score
33
Location
Amesbury, Wiltshire
Having successfully completed the latest project in the garden for SWMBO with my assistant (pictured drilling the final holes in the reclaimed tropical hardwood sleeper raised flower beds):

IMG_9543.JPG

I am now tasked with completing the potting shed i started earlier this year, conscious that I don't want to go overkill with a MikeG Workshop for the wife to potter in and me to store the lawnmower in I am after some ideas for the wall composition.

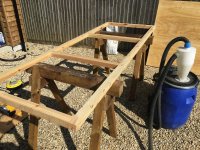
The base is basically a deck sat on plastic supports to raise it off the concrete slab already there (it was not level). The base measures 3910x1600mm.
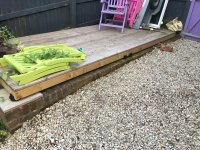
IMG_9551.JPG

I am going to make basic stud walls and the outer layer will be shiplap but what should go in between? I was thinking thin OSB with battens then the shiplap but i want to keep the costs down as much as possible and, as i mentioned, this is for pottering and mower storage. Could i get away with a membrane around the frame and then the shiplap?

For the roof i was looking at corrugated bitumen sheets on an OSB single pitch roof, any suggestions welcome?
 
The two fundamentals are to have an air gap and a breather membrane between with frame and the cladding, and to pick the sole plate up off the ground. Do this, and everything else is secondary.
 
Mike G":2af8hfn0 said:
The two fundamentals are to have an air gap and a breather membrane between with frame and the cladding, and to pick the sole plate up off the ground. Do this, and everything else is secondary.

So the entire shed base is up off the ground, tick?

Then frame, membrane, counter batten and cladding from inside to outside? (with insect mesh at the top and bottom of the air gap)

The membrane could be thin orb i suppose? I am just thinking i will need to build the rear wall flat before putting it up due to the proximity to the fence preventing me getting behind to do the cladding.
 
woodstalker":36cjekv5 said:
.........So the entire shed base is up off the ground, tick?

Correct.

Then frame, membrane, counter batten and cladding from inside to outside? (with insect mesh at the top and bottom of the air gap)

With no source of heat inside, and no source of moisture, then you needn't bother with the purpose-made air gaps. Enough gets in inadvertently.

The membrane could be thin orb i suppose?

ORB? You mean OSB? If so, then yes is the answer. It doesn't act as a breathable membrane (it isn't breathable), but it does act as a barrier to moisture, keeping the frame dry even if water penetrates the cladding. Again, without heating, there is no difference in the moisture content of the air internally and externally, and thus the OSB can go on the "wrong" side of the frame, the outside.

I am just thinking i will need to build the rear wall flat before putting it up due to the proximity to the fence preventing me getting behind to do the cladding.

Doable, but do bear maintenance in mind.
 
Mike thanks for the replies, I will have enough of a gap at the back to squeeze in with a brush and some stain but not enough to wield a hammer or drill so I will have to build the back wall in its entirety and then raise it up.

Yes OSB, autocorrect! I’ll use say 9mm OSB and add battens to fix the cladding to.

In terms of the corner detail where the classes sides meet, would you but the ends up against a simple vertical piece of timber or would you try and create some sort of overlap?
 
Can I suggest that you swap your stain for another of MikeG s ideas Bedec Barn paint is a little more expensive than stain but you get much better results it can also be thinned down with water to make it go further.
I painted all of my cladding before I put it on you could paint your back panel before installation and save a lot of hassle.
 
I'm sure I've drawn the corner detail somewhere. If you have the patience to go through my workshop build thread I am sure you'll see it in great detail.....but essentially I screw two bits of 3x1 together to form an L shape, and fix this to the corner such that it sticks out the same distance from each wall. The subtlety is that I rip one of the pieces (the outside one) to 63mm, as this is what works for the feather edge boards that I use.
 
MY63":1xhi49rh said:
Can I suggest that you swap your stain for another of MikeG s ideas Bedec Barn paint is a little more expensive than stain but you get much better results it can also be thinned down with water to make it go further.
I painted all of my cladding before I put it on you could paint your back panel before installation and save a lot of hassle.

I’ll have to check with the boss what colour she wants it!
 
Mike G":1wt0nejl said:
I'm sure I've drawn the corner detail somewhere. If you have the patience to go through my workshop build thread I am sure you'll see it in great detail.....but essentially I screw two bits of 3x1 together to form an L shape, and fix this to the corner such that it sticks out the same distance from each wall. The subtlety is that I rip one of the pieces (the outside one) to 63mm, as this is what works for the feather edge boards that I use.

Cheers Mike will have a look.

*edit* just looked and you show some pictures on page 11 of your thread and also describe it as an "L" shape profile. Do the boards just butt up against the corner piece? I can remember seeing a profile sketch, top down, of the arrangement; maybe in someone else's thread. I'll keep digging.
 
Got it, page 21 of Malcom's Garden Workshop:

Picture taken from his thread, hope you don't mind Malc? Would this work the same with Shiplap?
 

Attachments

  • Cladding%20Corner%20Detail%20Iso.jpg
    Cladding%20Corner%20Detail%20Iso.jpg
    199.5 KB · Views: 10,777
I don't see why not. It gives the shiplap an edge to butt up to each side of the corner.

The only difference I would see is that the detail would not have to stick out so far, because the shiplap overlaps within its own thickness, unlike the weatherboard which over laps the previous board. So that's something you might have to calculate or make a model and adjust it till you like it.
 
Yep, that's my detail. Adjust, as Malc says, for the thickness of the boards, and be sure to paint it thoroughly all round prior to fitting it.
 
As this question keeps popping up I have added the corner detail image to the How to Build a Shed sticky.
 
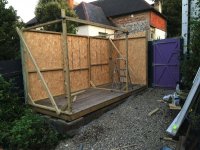
So a small update, progress slowed with this one due to some other stuff going on and I am only now trying to get it finished enough for the winter.

6D241313-0E17-4F88-8D04-D88830407576.jpeg
739F8286-CCEA-40F0-811C-693C46CA375A.jpeg
03C549FB-C806-482C-8EF3-A0B233B97C3E.jpeg
A750A97E-122D-48C0-820C-352F31172BC2.jpeg
E1CA56E3-B943-40FE-B0C7-6575D468823C.jpeg

Will get some more noggins in the inside frames before i board it out, built as it was because of the materials at hand at the time.

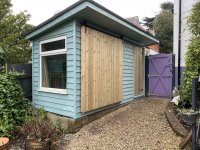
Ended up as two thirds SWMBOs potting shed with a sliding door (closest to camera) one third normal garden shed for locking the mower etc. away.
 
Still need to put another coat of paint on, fit gutter and down pipe and paint window and doors.

Plus will need to build the bench in the potting side.
 
I really like that sliding door :obscene-drinkingcheers:
 
cheers for the nice comments. Sliding door was on and off a few times as i tried to make it fit and would certainly do it differently next time in terms of the door design but half of the point of doing on the shed was to practise and understand the build process. I have a bigger one to do inside that will serve as a room divider.

The colours will most likely change depending on the whim of the "Design Bureau" but they at least provide a bit of protection to start with.

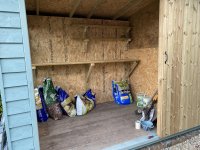
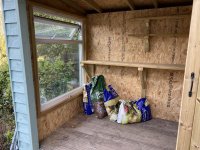
No room for pots currently because i stuffed all the wooden garden furniture in that we don't have anywhere for currently. I can feel another shed coming on to stick it in!
 
So a good weather day today; being as we are planting up the veg patch this year I cleared out the potting shed and boarded it out. I then made a bench and put a couple of shelves in.:

IMG_0116.jpg

STRENGT.jpg

SWMBO is so excited she is already painting it in some old magnolia paint we have left over!
 
Back
Top