• Hi all and welcome to TheWoodHaven2 brought into the 21st Century, kicking and screaming! We all have Alasdair to thank for the vast bulk of the heavy lifting to get us here, no more so than me because he's taken away a huge burden of responsibility from my shoulders and brought us to this new shiny home, with all your previous content (hopefully) still intact! Please peruse and feed back. There is still plenty to do, like changing the colour scheme, adding the banner graphic, tweaking the odd setting here and there so I have added a new thread in the 'Technical Issues, Bugs and Feature Requests' forum for you to add any issues you find, any missing settings or just anything you'd like to see added/removed from the feature set that Xenforo offers. We will get to everything over the coming weeks so please be patient, but add anything at all to the thread I mention above and we promise to get to them over the next few days/weeks/months. In the meantime, please enjoy!

Questions about drawers

Dr.Al

Old Oak
Joined
Dec 31, 2020
Messages
3,707
Reaction score
2,494
Location
Dursley, Gloucestershire
Name
Al
My travel tool chest thing is going to have drawers. I've never made or fitted drawers before (unless you count pocket-hole construction plywood boxes with ball bearing sliders used for workshop storage), so this is going to be another first for me!

I've got David Charlesworth's DVD to work my way through, but in the meantime I've got some questions.

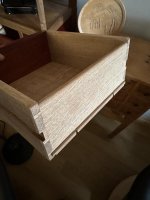
Firstly, mounting the drawers. My limited thoughts so far are that the drawers will be vaguely this shape (possibly with holes instead of handles, as suggested by Ian - I'm still thinking about that aspect):
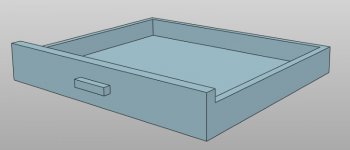
drawer_example.jpg

The difference in height between the top and the sides/back is so there's space for a drawer runner for the drawer above.

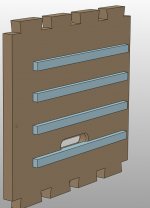
The runners will probably be a strip of wood attached to the side, something like this (ignore the fact it goes through the handle hole, I haven't decided the drawer heights or the location of the handle hole yet, so that'll all change):
drawer_runners.jpg

That looks simple, but the grain direction of the side piece is top to bottom whereas the grain direction of the runners would be front-to-back, so that makes it more complicated.

The options I've thought of so far are

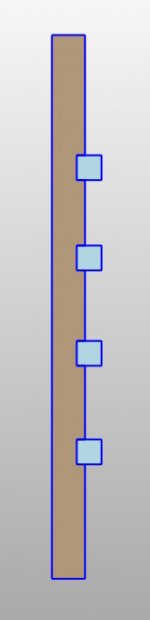
1. Make some blind housing joints and fix the runners into the sides. This has the advantage that the weight of the drawers would be well supported, but gluing the runners into the side is problematic with conflicting grain direction.
drawer_runners_cross_section.jpg

2. Mount the drawer runners flush with the sides (so no housings to cut) with a screw in a hole at the front and a screw in a slot at the back (and maybe another in the middle). No glue to be seen and the slot(s) would allow for movement. This has two advantages: it allows for wood movement and it means I don't have to commit to a particular drawer spacing before assembling the chest (the housings for option 1 would be much easier to cut pre-assembly).

It feels to me like option 2 is a much better answer, but I suspect there are other options out there that I don't know about. I'd welcome any thoughts.

More questions to follow....
 
3: a combination of 1 & 2, with the runners screwed into the housings.

4: Dovetail housings.

It's always my preference to see frames between drawers, rather than drawer fronts separated only by a small gap. That would mean your drawer fronts would be the same height as the back and sides.
 
Thanks Mike

Mike G":hawk1b1l said:
3: a combination of 1 & 2, with the runners screwed into the housings.

Ah yes, I hadn't thought of that. I guess that would mean being very careful about the length of the screws, but that's probably manageable!

Mike G":hawk1b1l said:
4: Dovetail housings.

That sounds exceptionally hard...

Mike G":hawk1b1l said:
It's always my preference to see frames between drawers, rather than drawer fronts separated only by a small gap. That would mean your drawer fronts would be the same height as the back and sides.

I'm not sure I follow. Any chance of a sketch?
 
spb":3cuwjwoh said:
Will a photo work instead of a sketch?

bNed8l3.png

Ah, I see. I hadn't imagined the bar going all the way across: in my head there had just been a gap above the drawer, which seemed odd. Thanks for the explanation.

I'll have to have a ponder about how that would work with the set-back drawers on my tool chest (and make sure I still have enough space for everything I want to store!)
 
Dr.Al":5rn5uz8j said:
...I'm not sure I follow. Any chance of a sketch?

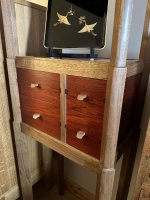
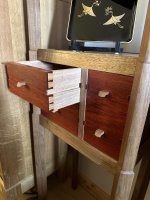
Sure. These are new in my workshop this week:

tmqfe3X.png

0QyjDH9.png

The drawers are easier to make, and your particular problem can go away if you build the side runners into the frame members at the front with a tenon into a groove, for instance. You can see my horizontal members are located in a housing in the sides. These drawers are only 200mm deep (front to back), so I just glued the runners into the housing. If they were bigger I would have glued in the front member, and left the runners floating, but glued into the front horizontal.
 
How important is keeping the weight down? Putting 4 frames in to hold drawers is going to add weight to what, I imagine, is an already heavy box.
 
I don't think so, Andy. The extra stretcher (is that what it is?) between each drawer reduces the size of the the drawer front by the same amount of wood. I suspect the net effect is about zero.
 
Thanks for all the advice.

Cabinetman":2dvq6253 said:
Or you could go with idea 2 and groove out the sides of the drawers, olde style.

I think that may be an issue with the wall thickness (I'm only planning to have 10 mm thick sides and backs to the drawers, so there wouldn't be much material to cut the groove into). If you think that's nonsense though, please do say!

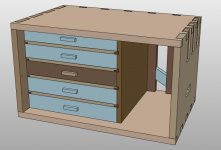
I thought I'd scheme out what it would look like with this arrangement. I haven't bothered to model the right hand side yet; the drawer spacing will be different as I'm planning to restrict my plane choice to nothing bigger than a smoothing plane, which makes it (just!) possible to put the planes in the right-hand half rather than in a separate case that sits on top, although they may have to sit directly in the bottom of the box rather than be in a drawer.

drawer_shelves_1.jpg

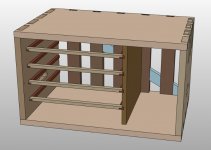
This is what it looks like without the drawers:

drawer_shelves_2.jpg

I've mounted the front stretcher thing with a half-lap joint into the side rails. I figured that way I could dimension and fit the front stretcher thing after assembling the chest, which would probably be a lot easier than trying to fit it at the same time as assembling the chest. At the moment I haven't add a rear stretcher, but I guess that's probably a sensible addition?

Does that look sensible?

I've scribbled down the resulting (reduced height) dimensions of all the drawers (they reduce in height slightly as you go up the chest, with the top one being 45 mm outside height and the bottom one 53 mm outside height. That's not going to leave a lot of room for anything very tall once the drawer bottom is in and taking some of that height away (possibly as much as 8 or 9 mm with the base thickness and the bit of the side that supports the base).

Without the stretchers, the bottom drawer would have been 63 mm outside height.

Of course I could reduce the number of drawers to 4, but that'll obviously also reduce the amount of storage area.

I'm going to take my scribbled-down dimensions to the garage and have a go at laying the tools out to see what it looks like.
 
With drawers that small and thin, I'd probably rebate the underside and just glue and pin the ply into that, rather than setting them in a groove. That should gain you a bit of space (height).
 
My two euros on this topic. Loads of different ways to do drawers and none of them are easy but on a project completed just before Christmas, I tried (for the first time) to use centrally hung drawer runners...and I won't ever be doing it again. It's hard, really hard to fit them accurately and on the ones shown below there were 'adjustments' :eusa-whistle: that needed to be made:

IMG_0772.jpeg

IMG_0774.jpeg

I'd advise using something hard for the runners and drawer sides (paduk, which is a lot harder than oak with oak sides) and if dovetailing, the runner needs to pass through the dovetail both at the front and rear. For this method of construction, you can get away with 8mm thick sides; I generally make them thinner and use drawer slips for the bottom. I dislike with a passion thick, clunky drawer sides; to my mind, there's very little that looks less elegant; thin drawer sides are the thing!

The drawer backs:

IMG_0775.jpeg

....are usually slightly lower than the sides with the tops rounded over (why I don't know, it's just somat I do) and bases are always quarter sawn oak (or similar) slot screwed with brass cs screws.

I realise that in this particular application, the drawers are for a tool chest, which probably means that they'll get more wear n'tear than mine which is an even better reason to make 'em good and make 'em proper. Were it me, I would definitely NOT use the central drawer runner method as it may all end in tears, as mine very nearly did - Rob
 
Mike G":3fdxde38 said:
With drawers that small and thin, I'd probably rebate the underside and just glue and pin the ply into that, rather than setting them in a groove. That should gain you a bit of space (height).

Oh, okay, I hadn't considered that. Thanks. That would certainly help.

Woodbloke":3fdxde38 said:
My two euros on this topic. Loads of different ways to do drawers and none of them are easy but on a project completed just before Christmas, I tried (for the first time) to use centrally hung drawer runners...and I won't ever be doing it again.

That certainly doesn't look tempting to me :)

Woodbloke":3fdxde38 said:
I'd advise using something hard for the runners and drawer sides (paduk, which is a lot harder than oak with oak sides) and if dovetailing, the runner needs to pass through the dovetail both at the front and rear.

I was planning to use something harder for the runners (probably American black walnut as I have some), but was going to stick to QS sweet chestnut for the sides... hopefully that'll be okay given I'm not going to use grooved runners.

Woodbloke":3fdxde38 said:
For this method of construction, you can get away with 8mm thick sides...

That's good to know; I'd planned for 10 mm sides & back (and a 15 mm front), but every reduction in thickness gives a bit more storage space!

Woodbloke":3fdxde38 said:
Were it me, I would definitely NOT use the central drawer runner method as it may all end in tears, as mine very nearly did - Rob

You've convinced me :lol:
 
I've done some messing about with stuff to see how it would fit and I think it might work even with the shallow drawers. That topic feels like it's more about the tool chest than general drawer questions, so I'll post some waffle about it on the other thread and save this one for all my follow-on drawer questions!
 
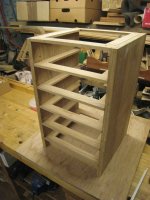
The support frames are using up 80 to 100 mm of the height. I think grooving the runners into the drawer sides is better. Extending the runners allows the drawers to be pulled out further for access.9E416CE2-BE19-4B2C-AB71-C9DBEA169BB5.jpeg
 
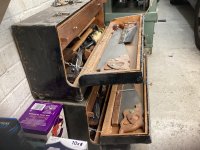
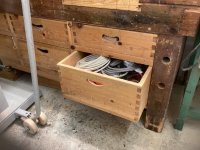
An original part of my mobile plan involved the bench drawers, each has a handle front and back and a specific use. Plumbing tools, electrical fittings. Hinges and fastenings etc. loaded into the van or car as needed.67D4E90B-7103-4E94-A9C1-77CF37609335.jpeg
 
A few years ago, I made a little bedside chest of five drawers. All of them were about 70mm deep inside, with 9mm sides, which I think is the sort of scale you are planning. There's a full build thread over on UKW but without the pictures now.
It was my first foray into drawer making and I was keen to adopt full-on traditional methods, so the runners on which the drawers slide were dry fitted into housings cut into the cabinet sides, held at the back by a screw in a slot and at the front by a tenon into the side to side stretcher. They were 9mm thick, with 3mm M&T joints. Here are some photos to show the sort of thing.

IMG_3699_zpseopvqbod.jpg

IMG_4020_zpsxswx6udz.jpg

IMG_4022_zpsncfg4qmn.jpg

IMG_4071_zps1arfp4g1.jpg

Doing it this way was enjoyable but almost certainly over-kill. I don't think there has been any movement in the wood at all. (It probably helped that it was all recycled from old furniture and had been indoors for years.) You could simplify this a lot. Glue the bottoms of the drawers onto the sides for max depth and simplicity. Butt joint the corners, unless you want an exercise in dovetailing.
 
AndyT":14wj7tqh said:
A few years ago, I made a little bedside chest of five drawers. All of them were about 70mm deep inside, with 9mm sides, which I think is the sort of scale you are planning. There's a full build thread over on UKW but without the pictures now.
It was my first foray into drawer making and I was keen to adopt full-on traditional methods, so the runners on which the drawers slide were dry fitted into housings cut into the cabinet sides, held at the back by a screw in a slot and at the front by a tenon into the side to side stretcher. They were 9mm thick, with 3mm M&T joints. Here are some photos to show the sort of thing.

View attachment 3

View attachment 2


View attachment 1

Doing it this way was enjoyable but almost certainly over-kill. I don't think there has been any movement in the wood at all. (It probably helped that it was all recycled from old furniture and had been indoors for years.) You could simplify this a lot. Glue the bottoms of the drawers onto the sides for max depth and simplicity. Butt joint the corners, unless you want an exercise in dovetailing.

That chest looks very good & interesting to see the construction of the side-to-side stretcher.

Gluing the bottoms into rebates on the sides sounds like a good idea if there won't be problems from doing so (I guess using a plywood base would help there).

I'm going to dovetail the corners of the drawers as I want the dovetail practice.
 
Dr.Al":3unl4n79 said:
Gluing the bottoms into rebates on the sides sounds like a good idea if there won't be problems from doing so (I guess using a plywood base would help there).

I'm going to dovetail the corners of the drawers as I want the dovetail practice.

This is for a 'utilitarian' tool chest n'est pas? I'd advise keeping it simple and robust so 6mm ply drawer bottoms, locating in grooves in the front and sides and pinned to the drawer back is the way I'd do it. You'll loose a bit of depth but gain in strength and rigidity.

As it's a toolchest and liable to be choc a block with all sorts of woodmangling kit I would definitely go for shovetails at the corners as the joint by it's very nature and construction will resist mechanical pull in one direction (as I used to demonstrate to bemused Yr8 students who tried to pull one apart...they couldn't! :D ) - Rob
 
As it’s a utilitarian chest how about using another material, Anodised Aluminium angle "iron" to run the drawers on say 3mm thick screwed to the box sides would give 3mm between the drawers and save quite a bit to give more storage room. Not the most attractive solution I’ll admit but practical. Could be let into the sides which would be more pleasing.
Ian
 
Cabinetman":1sh6vci5 said:
As it’s a utilitarian chest how about using another material, Anodised Aluminium angle "iron" to run the drawers on say 3mm thick screwed to the box sides would give 3mm between the drawers and save quite a bit to give more storage room. Not the most attractive solution I’ll admit but practical. Could be let into the sides which would be more pleasing.
Ian

That is an interesting idea and I like the lateral thinking, but I'm doing this exercise partly as woodworking practice (and having a project in which to use some joints I've never cut before), so it would seem a bit of a shame to me to take the easy way out and use metal.
 
Yes, that’s good and understandable, so now's the time for some inlay on the drawer fronts then!
Andy's very nice set of drawers it is then with tiny mortice and tenons on the dividers, and Robs properly constructed drawers in the old fashioned but good way.
 
you could use plywood for the bottom but I'd still use half blind dovetails on the front sides at least, and then a little less work is going with a housing joint instead of dovetails for the back edge and use plywood for the bottom of it and groove it all the way around into the side pieces and front,with a screw into the back edge from underneath, for a the kind of thing you're making that's more than good enough imo.
 
Plywood bottoms glued all round into groove will add a lot of strength to the drawer. If you feel that your drawer sides are too thin for a groove then add grooved slips on both sides and glue into these, It is OK to glue a ply base in all round but not with a solid cedar base
If your drawer is going to run on the bottom surface of the sides, this is the best way to do it. The extra thickness of teh drawer slips gives a better (wider) running surface
Ian
 
I wouldn't glue a panel in place, all you need is it being a tight fit and screw it in at the back, plywood can actually move a bit and if it does it'll crack.
 
thetyreman":2vdmj6tr said:
I wouldn't glue a panel in place, all you need is it being a tight fit and screw it in at the back, plywood can actually move a bit and if it does it'll crack.
Gluing the base in all round is perfectly standard. It also means that you can plough the grooves slightly shallower
Gluing in is no different from gluing a lipping onto ply which again is standard, I would generally suggest a pva or similar glue
 
I think there's a danger of forgetting the size of these drawers. They're somewhere between small and tiny, if I am following along properly. If a coping saw won't fit, I don't think we need be worrying about some movement in ply, and I revert to my earlier suggestion of gluing the bottoms into rebates rather than grooves. Not something you'd do with furniture-sized drawers, but if these are roughly the size of an A4 sheet of paper (my guess), then it's perfectly good enough.

Can you give us a rough size, Al?
 
Mike G":1e5rjjti said:
I think there's a danger of forgetting the size of these drawers. They're somewhere between small and tiny, if I am following along properly. If a coping saw won't fit, I don't think we need be worrying about some movement in ply, and I revert to my earlier suggestion of gluing the bottoms into rebates rather than grooves. Not something you'd do with furniture-sized drawers, but if these are roughly the size of an A4 sheet of paper (my guess), then it's perfectly good enough.

Can you give us a rough size, Al?

A4's about right. The bigger ones are (from memory) inside dimensions 304×265 mm, smaller ones about 150×265.
 
Just saw something that made me think about the drawers on this box.
Nothing to stop you making small open topped boxes instead of drawers, I know the difference is minimal but it may open up another way of thinking about this and working day to day, I’m thinking they would lift out as one block? and it would be more economical on space.
Just a thought, Ian
 
Back
Top