• Hi all and welcome to TheWoodHaven2 brought into the 21st Century, kicking and screaming! We all have Alasdair to thank for the vast bulk of the heavy lifting to get us here, no more so than me because he's taken away a huge burden of responsibility from my shoulders and brought us to this new shiny home, with all your previous content (hopefully) still intact! Please peruse and feed back. There is still plenty to do, like changing the colour scheme, adding the banner graphic, tweaking the odd setting here and there so I have added a new thread in the 'Technical Issues, Bugs and Feature Requests' forum for you to add any issues you find, any missing settings or just anything you'd like to see added/removed from the feature set that Xenforo offers. We will get to everything over the coming weeks so please be patient, but add anything at all to the thread I mention above and we promise to get to them over the next few days/weeks/months. In the meantime, please enjoy!

Quite Flat Steel

Trevanion

Old Oak
Joined
Apr 27, 2019
Messages
2,598
Reaction score
479
Location
Pembrokeshire
So I'm after a couple of pieces of steel with a clean machined finish and critically they need to be pretty flat, not like within a thousands of an inch flat but just flat enough. Dimensions are 150mm x 12mm x 500mm x two of number.

I'm not sure what the best way to go about it is, I could buy a couple of lumps of ground flat stock/gauge plate for about £100 which I am familiar with but I don't actually know whether they're dead-flat or if they may have a slight bow to them.

Alternatively, I could get some rough flat bar and have it machined flat by a local engineer, but that's probably not far off the same price if not more expensive.

Is there any other options I'm not aware of that may be worth cosnidering? It might be a little over the top for spindle moulder fences but I can see myself getting annoyed with the existing unflat and bowed aluminium plate fences fairly quickly :lol:
 
Trevanion":1zs324nb said:
So I'm after a couple of pieces of steel with a clean machined finish and critically they need to be pretty flat, not like within a thousands of an inch flat but just flat enough. Dimensions are 150mm x 12mm x 500mm x two of number.

I'm not sure what the best way to go about it is, I could buy a couple of lumps of ground flat stock/gauge plate for about £100 which I am familiar with but I don't actually know whether they're dead-flat or if they may have a slight bow to them.

Alternatively, I could get some rough flat bar and have it machined flat by a local engineer, but that's probably not far off the same price if not more expensive.

Is there any other options I'm not aware of that may be worth cosnidering? It might be a little over the top for spindle moulder fences but I can see myself getting annoyed with the existing unflat and bowed aluminium plate fences fairly quickly :lol:

Why not fit a decent false fence out of MDF ? A lot less hassle IMO. And TBH, my spindle moulder fences aren't that great but the amount of bow etc makes damn all difference.
 
RogerS":1txqn52m said:
Why not fit a decent false fence out of MDF ? A lot less hassle IMO. And TBH, my spindle moulder fences aren't that great but the amount of bow etc makes damn all difference.

There will be timber sub-fences attached to the front of the plates. The main sticking point is how the fences travel along the fence casting and clamp to it, I want there to be absolutely zero play (IE, rocking back and forth on a high spot) and both fences to be absolutely parallel to each other, otherwise trying to do accurate work is just a nightmare.
 
Trevanion":2n6lpr8w said:
RogerS":2n6lpr8w said:
Why not fit a decent false fence out of MDF ? A lot less hassle IMO. And TBH, my spindle moulder fences aren't that great but the amount of bow etc makes damn all difference.

There will be timber sub-fences attached to the front of the plates. The main sticking point is how the fences travel along the fence casting and clamp to it, I want there to be absolutely zero play (IE, rocking back and forth on a high spot) and both fences to be absolutely parallel to each other, otherwise trying to do accurate work is just a nightmare.

Mmm...not knowing how your fence is fitted, it's hard to make any accurate comparisons. The fences on my Hammer combi have set screws behind them which means I can get the fences lined up and co-planar to each other. I never move them. So that eliminates most of your concerns. As for any bowing or cupping then that's taken care of by the timber sub-fence bolted to the front. I never move those fences. I have a stack of pre-drilled, pre-cut sub-fence blanks and just screw them on when the old ones get nadgered.
 
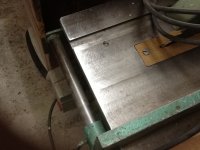
image.jpeg
This is a machine bed made of 20 mm mild steel surfaced with a thing called a fly cutter. I think that may be a more sensibly priced process. Unfortunately I had it machined more than thirty years ago so if I could remember the price it would be meaningless. As already suggested jacking screws with lock nuts will sort any discrepancies between the plates and supports.
 
Mike Jordan":5zn7yq4k said:
This is a machine bed made of 20 mm mild steel surfaced with a thing called a fly cutter. I think that may be a more sensibly priced process. Unfortunately I had it machined more than thirty years ago so if I could remember the price it would be meaningless. As already suggested jacking screws with lock nuts will sort any discrepancies between the plates and supports.

That’s what I was think about buying a rough piece of steel and having it machined, but most guys with the kit to do it that I know of want £50 a hour and it must be a couple of hours work to set it all up to machine it nicely on all four faces.

RogerS":5zn7yq4k said:
Mmm...not knowing how your fence is fitted, it's hard to make any accurate comparisons. The fences on my Hammer combi have set screws behind them which means I can get the fences lined up and co-planar to each other. I never move them. So that eliminates most of your concerns. As for any bowing or cupping then that's taken care of by the timber sub-fence bolted to the front. I never move those fences. I have a stack of pre-drilled, pre-cut sub-fence blanks and just screw them on when the old ones get nadgered.

I’ll take a couple of photos later but there’s no provision for adjustment like that on the Sedgwick machines. The Aluminum fences aren’t original and are made from extruded plate and are just not straight enough for accurate work. I want to do it properly ONCE and never have to worry about it again.
 
I will be interested to see the photos, I've seen pictures of spindle moulders with alloy sections used as fences, they seem to rely on running the workpiece past the central appature where the cutters protrude to make the cut. It's always been my practice to use a sacrificial " spelch board" pushed back onto the rotating cutters. My understanding is that this arrangement is now part of the requirements for workshops where persons are employed. I can't see how a board can be easily fixed to the face of the alloy fences.
 
Mike Jordan":m65eoxqa said:
.... I can't see how a board can be easily fixed to the face of the alloy fences.

Drill and tap screw holes. You just have to remember not to over-tighten the bolts ! DAMHIKT
 
As you seem to imply, not a very satisfactory method when compared to screwing the spelch board through the front face into a permanent wooden face fixed to the steel fence.
 
Mike Jordan":3gxa74bs said:
I will be interested to see the photos, I've seen pictures of spindle moulders with alloy sections used as fences, they seem to rely on running the workpiece past the central appature where the cutters protrude to make the cut. It's always been my practice to use a sacrificial " spelch board" pushed back onto the rotating cutters. My understanding is that this arrangement is now part of the requirements for workshops where persons are employed. I can't see how a board can be easily fixed to the face of the alloy fences.

Mine are literally 10mm extruded flat plates, not the profiled stuff you’re thinking of. I almost never use false fences, I’d definitely never make any money if I had to do that for every cut. The SCM moulders have Tufnol inserts at the cutter ends of the fences which can be swapped out for a piece of timber to break through, with digital fence control this is quite a relaxed operation compared to doing it manually. The SCM fence plates do cost more per fence than I paid for the Sedgwick moulder though :lol:
 
Trevanion":3soba0v6 said:
Mike Jordan":3soba0v6 said:
I will be interested to see the photos, I've seen pictures of spindle moulders with alloy sections used as fences, they seem to rely on running the workpiece past the central appature where the cutters protrude to make the cut. It's always been my practice to use a sacrificial " spelch board" pushed back onto the rotating cutters. My understanding is that this arrangement is now part of the requirements for workshops where persons are employed. I can't see how a board can be easily fixed to the face of the alloy fences.

Mine are literally 10mm extruded flat plates, not the profiled stuff you’re thinking of. I almost never use false fences, I’d definitely never make any money if I had to do that for every cut. The SCM moulders have Tufnol inserts at the cutter ends of the fences which can be swapped out for a piece of timber to break through, with digital fence control this is quite a relaxed operation compared to doing it manually. The SCM fence plates do cost more per fence than I paid for the Sedgwick moulder though :lol:

Dan..you're missing my point. Keep the two fences in the same position..wide enough to let your widest cutter come through. Make lots of blank fences to span the two fences and cutter gap. All the same size. I use 9mm ply. All drilled with the same countersunk holes that correspond with the tapped holes you made in your fences. So it's a no-brainer to screw on a new false-fence if you need it...then gently break through against the cutter. I nudge the cutter up and down a tad just to clear the cutter from rubbing on the false-fence. Job done.

If the job is likely to repeat then I keep the false-fence hanging ready for next time.
 
RogerS":19h5wbsy said:
Dan..you're missing my point. Keep the two fences in the same position..wide enough to let your widest cutter come through. Make lots of blank fences to span the two fences and cutter gap. All the same size. I use 9mm ply. All drilled with the same countersunk holes that correspond with the tapped holes you made in your fences. So it's a no-brainer to screw on a new false-fence if you need it...then gently break through against the cutter. I nudge the cutter up and down a tad just to clear the cutter from rubbing on the false-fence. Job done.

If the job is likely to repeat then I keep the false-fence hanging ready for next time.

I'm not missing the point and understand the technique, but that simply won't work for the way I personally like to run a moulder.

Malc2098":19h5wbsy said:
Would this be of any help?

Quite impressive to make one out of wood, I've wondered if those Aigner Style fences are a bit of a pain though if the particular part of your moulded work decides to drop into the open slots in the fences.
 
Trevanion":2j7zdioo said:
RogerS":2j7zdioo said:
Dan..you're missing my point. Keep the two fences in the same position..wide enough to let your widest cutter come through. Make lots of blank fences to span the two fences and cutter gap. All the same size. I use 9mm ply. All drilled with the same countersunk holes that correspond with the tapped holes you made in your fences. So it's a no-brainer to screw on a new false-fence if you need it...then gently break through against the cutter. I nudge the cutter up and down a tad just to clear the cutter from rubbing on the false-fence. Job done.

If the job is likely to repeat then I keep the false-fence hanging ready for next time.

I'm not missing the point and understand the technique, but that simply won't work for the way I personally like to run a moulder.

Fairy nuff. I'm interested to know how you do things as I like to learn different ways of doing things.
 
RogerS":10ipraxl said:
Fairy nuff. I'm interested to know how you do things as I like to learn different ways of doing things.

There isn't much to it really!

What I'm comfortable with isn't necessarily what anyone else would be comfortable with but 99% of the time I run the moulder without a false fence, the times I do use one are usually when moulding very short or fragile pieces (such as narrow glazing bars) or doing a moulding on the outside of a curve by way of just referencing off the centre point of the cutter and bearing against the fence above it.

Generally, I will set the fences within 5mm of the cutting circle of the block which is usually enough support for most cuts without the workpiece "dropping" into the cutter block on the start and exit of cuts. The nice thing about having nothing above the cutter block is that you can take the block out, swap another block in or change knives to a particular moulding that requires the exact same fence depth and possibly height setting without upsetting any of the setup that you've already done, some tongue and groove cutters are set up like this and a lot of window and door tooling systems are designed to work off a moulder that's fixed in position.

With the fences independent of each other you can perform "offset" cutting by setting the outfeed fence to the lowest part of your cutter (the very tip of a bullnose tread, for example) and then adjust the infeed fence to however much you want to take off the material, with perfectly coplanar, square, and straight fences this works much like a surface planer would and you can achieve very straight mouldings. It's especially good if you need to take a little bit more off each time to make the workpiece fit into something as you just keep refeeding the workpiece and it takes however much off you like per pass.

Conversely, you can also work to an exact width measurement by setting up the outfeed fence correctly for the cut and then take the infeed fence out completely and ideally replacing it with a hold-down spring, and then clamp a piece of timber to your table the exact width you desire away from the outfeed fence. Run the workpiece along the piece of timber with the hold-down spring pushing against the impromptu fence to prevent the cutter from dragging the workpiece into it, ideally, you'd have a powerfeed on the outfeed side but you can do it manually just the same and you will end up with workpieces of the desired dimension without too much faffing about.
 
Thanks for these, Dan. Interesting reading..comments below in red.

Trevanion":2ea5zy1l said:
RogerS":2ea5zy1l said:
Fairy nuff. I'm interested to know how you do things as I like to learn different ways of doing things.

There isn't much to it really!

What I'm comfortable with isn't necessarily what anyone else would be comfortable with but 99% of the time I run the moulder without a false fence, the times I do use one are usually when moulding very short or fragile pieces (such as narrow glazing bars) or doing a moulding on the outside of a curve by way of just referencing off the centre point of the cutter and bearing against the fence above it.

Generally, I will set the fences within 5mm of the cutting circle of the block which is usually enough support for most cuts without the workpiece "dropping" into the cutter block on the start and exit of cuts. The nice thing about having nothing above the cutter block is that you can take the block out, swap another block in or change knives to a particular moulding that requires the exact same fence depth and possibly height setting without upsetting any of the setup that you've already done, some tongue and groove cutters are set up like this and a lot of window and door tooling systems are designed to work off a moulder that's fixed in position. Interesting to see how machine type/design drives work practices. Although I can remove my fence and hood as a unit and then replace in exactly the same position, I agree that changing blocks is difficult if the cutters are projecting through the fence. However, the odd times I've not had the false fence fitted and tried to change the block without moving the fence/hood assembly has often proved nigh impossible without moving the hood forward to allow the bock/cutters to clear. Your point re window/door tooling systems is a good one.

With the fences independent of each other you can perform "offset" cutting by setting the outfeed fence to the lowest part of your cutter (the very tip of a bullnose tread, for example) and then adjust the infeed fence to however much you want to take off the material, with perfectly coplanar, square, and straight fences this works much like a surface planer would and you can achieve very straight mouldings. It's especially good if you need to take a little bit more off each time to make the workpiece fit into something as you just keep refeeding the workpiece and it takes however much off you like per pass.Agreed. I'd have to take the fence off if I wanted to do this. Which is probably why I rarely do it !

Conversely, you can also work to an exact width measurement by setting up the outfeed fence correctly for the cut and then take the infeed fence out completely and ideally replacing it with a hold-down spring, and then clamp a piece of timber to your table the exact width you desire away from the outfeed fence. Run the workpiece along the piece of timber with the hold-down spring pushing against the impromptu fence to prevent the cutter from dragging the workpiece into it, ideally, you'd have a powerfeed on the outfeed side but you can do it manually just the same and you will end up with workpieces of the desired dimension without too much faffing about.I just can't get my head round this one :eusa-think: Tried sketching what I think you're saying but NBG.

Cheers, Roger
 
RogerS":11g1tlh9 said:
I just can't get my head round this one :eusa-think: Tried sketching what I think you're saying but NBG.

Hopefully this crude sketch illustrates what I'm trying to explain a bit better:

RKynJS2.png

The proper term would be "Back-Fencing".
 
I'm being dim here. In your post above you said

clamp a piece of timber to your table the exact width you desire away from the outfeed fence.

but I can't see that in your diagram.
 
RogerS":18o6xg0j said:
I'm being dim here. In your post above you said

clamp a piece of timber to your table the exact width you desire away from the outfeed fence.

but I can't see that in your diagram.

"Board Clamped" is the Clamped Board/Timber, The exact width is the distance between the clamped board and the outfeed fence. The timber being moulded runs between the clamped board and the outfeed fence, effectively thicknessing it down to size with a moulding.
 
So, I went a size up and bought a couple of pieces of 15mm x 150mm x 500mm O1 Gauge Plate from Coventry Grinders for £120 + postage.

Overkill? Yes.

:D
 
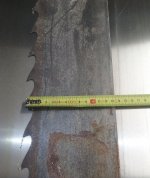
Be interested to know how this solution works out, its something I have in my mind to set up, I was at the mill last year, they make a lot of solid timber T & G flooring, they have a similar set up, but in this case they use some old bandsaw blade steel to act as a springs (without the teeth) either side of the cutter block pushing away against the backing fence, which is adjustable to give the required finished width of floor board.

I picked up some offcuts while I was there:

Blade.jpg
 
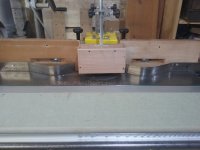
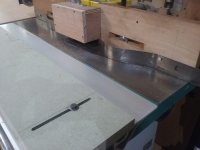
Follow up from me, needed some boards with tongues all round, so I set about cutting the old bandsaw saw blade and bending/shaping it, bolted to inboard fence and fixed an outboard fence down to moulder table.

spindle1.jpg
spindle2.jpg
In the past I've run the boards along the inboard fence having trimmed the boards close to finished width and allowing for a small margin to be trimmed along with forming the tongue, this solution proved to be far easier to set up, these boards were left over sized, with only one edge shot in, which is run along the outboard fence, and with the old pieces of blade pushing and springing kept the boards hard up to the outboard fence, the cutter trims to final width along with producing the tongue, and without any snipe which has also been an issue in the past (I also had the power drive on as well, not shown)
T boards.jpg
 
I know you are sorted now but just in case you or anyone had the need, Tom French recently had various sizes of ground 02? plate in the offing.
Cheers, Andy
 
toolsntat":hiorhg0h said:
I know you are sorted now but just in case you or anyone had the need, Tom French recently had various sizes of ground 02? plate in the offing.
Cheers, Andy

Yes I did see that, though I didn’t ask whether he had the size I needed because I didn’t want to cry :lol:

I haven’t got around to using it yet, but progress is being made!
 
Back
Top