

Over in the hand tools section, Rob (@Woodbloke) has been showing us his newly acquired Record 04 Stay Set plane.
Being a woodworker with higher standards than many, he immediately set about getting it into a fit state to remain in his workshop, with a complete clean, a new pair of handles and then a new iron. Along the way, he found that the replacement iron was actually thicker than first described, so there was a risk, helpfully pointed out by @Sheffield Tony, that the screw that holds it in place would be too short and so fail to engage properly with the frog. But where can one get a longer screw of the right thread and style of head?
The answer is simple if you happen to have a lathe about the place. Fancying the idea of a session in my playroom, I offered to make one.
So that I could be sure of the details, Rob posted me the original screw. I was able to confirm that it was either 9/32" BSF, or UNF (24 tpi). (At this scale I can't tell the difference and the two are interchangeable.) I could also measure the head and see that it is angled underneath so as to fit snugly against a recess in the cap iron, a feature that makes these screws definitely not an off the shelf fastener.
Here are a few photos and notes so that I can remember how I did it, and try and persuade anyone who is thinking of getting a lathe of their own to give in to temptation and do it.
First off, here's Rob's Record screw (centre) between a 1970s Stanley on the left and a 1920s one on the right, to show what I was aiming for. Neither of mine was an exact match, so it was worth getting the right one to copy.

The first step was to find a bit of suitable steel, get it central in the chuck and reduce the diameter of the head and body parts.
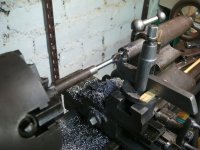
I took very light cuts as I sneaked up on something close to the right dimensions. Having the original to hand was a big help. I have a few BSF dies but not in this somewhat unusual size, but I knew I could do 24 tpi on any reasonable diameter with a single point tool.
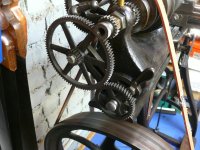
My lathe is designed to cut a wide range of threads, but there's no quick easy gearbox. You have to find the right size gears and put them in the right places, like this.
Then, the best method is to swing the cross-slide around by half of the thread angle. That means you can do most of the cutting with just one side of the tool, which gives a cleaner finish.

The tip of the cutting tool has to be at centre height. One way to achieve that is to expose the tailstock centre and line up with that:
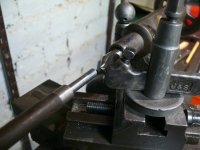
And here's the first trace of the point, confirming that it's properly set up for 24 threads per inch.

a bit more


and then part off
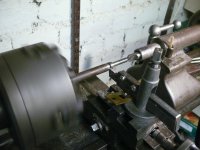
(Note that by this time I was relaxed enough to take an action shot!)
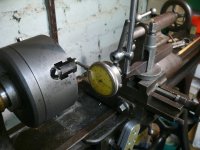
I then needed to put the screw into the chuck the other way round, so I could work on the head. I wrapped copper wire around to protect the thread and used a dial indicator to get it centralised.
To shape the head to a nice dome, I used files, freehand (sorry, no action shots of this as I ran out of hands) but to finish off I wanted to use a form tool made (not by me) from an old file.
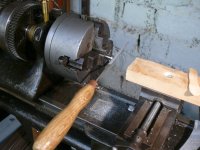
This needed a flat platform for the file to rest on. I decided on a bit of scrap softwood resting on the bottom part of the cross-slide, but it needed to be held safely so there was a quick side project to drill and tap a hole in a bit of thick brass. In a pragmatic concession to modernity, this was M6, to suit a ready-made screw.

I don't know if the previous owner tempered this file, so I was very careful to take only tiny cuts.

I've said so before, but my first choice of tool to cut a slot in a screw head is an Eclipse 4S tool, like this one.

I used it, carefully centralised with a special shim:


and opened it out a little with a needle file.
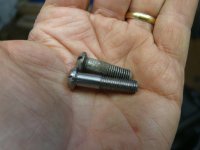
So here's the finished item, side by side with the original. I left it full length so Rob could trim it to the exact length to suit his plane.
And that was a thoroughly enjoyable session, playing with one of my favourite toys, listening to music but fully absorbed in the process throughout.
Thanks again, Rob, for giving me a chance to make something potentially useful - it's always better to make something somebody needs.
Being a woodworker with higher standards than many, he immediately set about getting it into a fit state to remain in his workshop, with a complete clean, a new pair of handles and then a new iron. Along the way, he found that the replacement iron was actually thicker than first described, so there was a risk, helpfully pointed out by @Sheffield Tony, that the screw that holds it in place would be too short and so fail to engage properly with the frog. But where can one get a longer screw of the right thread and style of head?
The answer is simple if you happen to have a lathe about the place. Fancying the idea of a session in my playroom, I offered to make one.
So that I could be sure of the details, Rob posted me the original screw. I was able to confirm that it was either 9/32" BSF, or UNF (24 tpi). (At this scale I can't tell the difference and the two are interchangeable.) I could also measure the head and see that it is angled underneath so as to fit snugly against a recess in the cap iron, a feature that makes these screws definitely not an off the shelf fastener.
Here are a few photos and notes so that I can remember how I did it, and try and persuade anyone who is thinking of getting a lathe of their own to give in to temptation and do it.
First off, here's Rob's Record screw (centre) between a 1970s Stanley on the left and a 1920s one on the right, to show what I was aiming for. Neither of mine was an exact match, so it was worth getting the right one to copy.
The first step was to find a bit of suitable steel, get it central in the chuck and reduce the diameter of the head and body parts.
I took very light cuts as I sneaked up on something close to the right dimensions. Having the original to hand was a big help. I have a few BSF dies but not in this somewhat unusual size, but I knew I could do 24 tpi on any reasonable diameter with a single point tool.
My lathe is designed to cut a wide range of threads, but there's no quick easy gearbox. You have to find the right size gears and put them in the right places, like this.
Then, the best method is to swing the cross-slide around by half of the thread angle. That means you can do most of the cutting with just one side of the tool, which gives a cleaner finish.
The tip of the cutting tool has to be at centre height. One way to achieve that is to expose the tailstock centre and line up with that:
And here's the first trace of the point, confirming that it's properly set up for 24 threads per inch.
a bit more
and then part off
(Note that by this time I was relaxed enough to take an action shot!)
I then needed to put the screw into the chuck the other way round, so I could work on the head. I wrapped copper wire around to protect the thread and used a dial indicator to get it centralised.
To shape the head to a nice dome, I used files, freehand (sorry, no action shots of this as I ran out of hands) but to finish off I wanted to use a form tool made (not by me) from an old file.
This needed a flat platform for the file to rest on. I decided on a bit of scrap softwood resting on the bottom part of the cross-slide, but it needed to be held safely so there was a quick side project to drill and tap a hole in a bit of thick brass. In a pragmatic concession to modernity, this was M6, to suit a ready-made screw.
I don't know if the previous owner tempered this file, so I was very careful to take only tiny cuts.
I've said so before, but my first choice of tool to cut a slot in a screw head is an Eclipse 4S tool, like this one.
I used it, carefully centralised with a special shim:
and opened it out a little with a needle file.
So here's the finished item, side by side with the original. I left it full length so Rob could trim it to the exact length to suit his plane.
And that was a thoroughly enjoyable session, playing with one of my favourite toys, listening to music but fully absorbed in the process throughout.
Thanks again, Rob, for giving me a chance to make something potentially useful - it's always better to make something somebody needs.


 ).
).