• Hi all and welcome to TheWoodHaven2 brought into the 21st Century, kicking and screaming! We all have Alasdair to thank for the vast bulk of the heavy lifting to get us here, no more so than me because he's taken away a huge burden of responsibility from my shoulders and brought us to this new shiny home, with all your previous content (hopefully) still intact! Please peruse and feed back. There is still plenty to do, like changing the colour scheme, adding the banner graphic, tweaking the odd setting here and there so I have added a new thread in the 'Technical Issues, Bugs and Feature Requests' forum for you to add any issues you find, any missing settings or just anything you'd like to see added/removed from the feature set that Xenforo offers. We will get to everything over the coming weeks so please be patient, but add anything at all to the thread I mention above and we promise to get to them over the next few days/weeks/months. In the meantime, please enjoy!

Resizing Wadkin trenching head

Guineafowl21

Nordic Pine
Joined
Dec 15, 2020
Messages
551
Reaction score
158
Location
Nairn
This one is designed to fit a large CD crosscut saw:
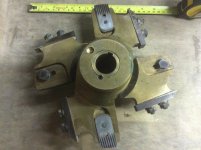
CC4B5413-0A29-4169-84DF-8AC9EB2D076B.jpeg
468D7046-A674-45F0-8CF3-887457AC2EF5.jpeg

There isn’t enough arbour length on my BRA 14, but is there anything to stop me from machining down those huge bosses so it will fit?

It’s already bushed down from 1 5/8” to 30mm, but would need adapting down to 1”.
 
Worth a go I'd have thought but note that balancing dimple so you might have to re-balance it to save it walking round the shop.
Obvious caveat about locking it onto the spindle adequately so it does not unwind during braking. Quite a bit of inertia there.

Bob
 
I can't see why not provided you can remove enough that it will fit on the shaft of the BRA comfortably and it doesn't foul the guard at all. I'll be a bugger to mount but It should just about fit on your lathe? I'd possibly take advantage of the bolt holes in the cutter for the knickers and bolt it to a face place carefully ensuring that the shoulder is running true and then part/hacksaw the majority of the shoulders off (bronze is expensive, keep every little bit! :lol:) and then turn it down.

9fingers":35cd82dk said:
Worth a go I'd have thought but note that balancing dimple so you might have to re-balance it to save it walking round the shop.

Being that close to the centre of the spindle I would assume it's a drive pin hole, probably to match the one on the CD which is 3/8" located 1 3/8" off the centre of the spindle.
 
I am making progress thanks to both of your advice, and have taken pictures, but the picture uploads are playing silly buggers at the moment. I’ll report back.
 
I’ll try it post by post.

I knocked off the high spots on the boss on a diamond plate, then reversed the cutter, mounted in the 3 jaw, and skimmed the reference surface:

5A165A9C-3DC8-4FB6-856F-B01286FA8C52.jpeg
 
Then mounted that surface on the faceplate, getting it roughly centred with the tailstock chuck, then spent ages tapping and cursing it until it ran true:

794F1C4B-04C6-4503-ADFC-A4B722E2817F.jpeg
 
Machined down and chamfered:

EAF75719-ACC6-4B5A-A0E9-C3B7C655EC28.jpeg

To bush it down from 30mm to 1”, I had some 30mm bar that was too easy a fit in the existing bore. I gave it a light knurl before parting off and boring out two bushes. Heating up the cutter allowed the bushes to be pressed in not far enough, to jam, and then to be hammered home in a frantic manner. Sorry, no pics.
 
A trenching head for a Wadkin CD & CC is quite a bit bigger than a head designed for a BRA. Admittedly both sizes,spin at the same speed - 2800 rpm, but the CD/CC has 5hp and a 1.25" shaft, vrs 2 or 3 hp and 1" shaft on your BRA.

I'd be very cautious starting it up for the first time, and doing anything other than light cuts.

I hope I'm just being unnecessarily cautious.

Cheers, Vann.
 
Thanks Vann. I’ve machined off quite a bit of weight (and some more since the last pics), and have made sure the cutters can’t loosen. First off, a spacer to clear the guard, locked to the shaft with a grub screw, and a roll pin to engage the first cutter:

7C87F327-171A-401C-8076-2E8FC1E4E1B7.jpeg
 
Then a floating pin to engage the second cutter...:
AC665149-EF55-4C88-A17A-A1F8DBABFCDE.jpeg


...which is held in place by the securing nut:
653E4600-A756-4ACD-80DB-87D9AC1B8C90.jpeg


First cut wasn’t brilliant...:
2B36A9C4-6F1C-445F-9294-7EBF0A05BDD4.jpeg


Despite grinding the knives on the tormek, stoning and setting the spurs:
C16633D1-E845-4ACC-8835-8833B3241924.jpeg
 
But I realised that the knives/spurs on the right were cutting the left-hand edge - for some reason it seems to need a spacer installed. Cut was very good after adding one:
9FF820CA-B14D-4FC0-96AA-F7C3FDDF6C7F.jpeg

The knives produce a nice clean cut, and little shavings instead of a room full of dust. Much more civilised than a TCT sawblade.
 
Yes pretty good. No particular bias when spinning slowly by hand, and fairly smooth.

I can’t yet explain why the cutter halves are offset without a spacer in between, unless I’m missing a part. No mention in any of the manuals.
 
Nice work, I had a few sets of these but sold them on a recent clear out. I kept a set off a BRA which had spacers to use on my CK. I have one set left that is a bit strange, the bore on each half is different.
 
wallace":1pv34n4k said:
Nice work, I had a few sets of these but sold them on a recent clear out. I kept a set off a BRA which had spacers to use on my CK. I have one set left that is a bit strange, the bore on each half is different.
I could do with a cutter for grooves narrower than about 3/4”, which is the minimum on mine. What is the size range of your odd one?
 
Totally forgot, weird really because I moved the set recently. Will try again to remember
 
Back
Top