• Hi all and welcome to TheWoodHaven2 brought into the 21st Century, kicking and screaming! We all have Alasdair to thank for the vast bulk of the heavy lifting to get us here, no more so than me because he's taken away a huge burden of responsibility from my shoulders and brought us to this new shiny home, with all your previous content (hopefully) still intact! Please peruse and feed back. There is still plenty to do, like changing the colour scheme, adding the banner graphic, tweaking the odd setting here and there so I have added a new thread in the 'Technical Issues, Bugs and Feature Requests' forum for you to add any issues you find, any missing settings or just anything you'd like to see added/removed from the feature set that Xenforo offers. We will get to everything over the coming weeks so please be patient, but add anything at all to the thread I mention above and we promise to get to them over the next few days/weeks/months. In the meantime, please enjoy!

Rockwell Contractors Saw fence problems

Phil

Old Oak
Joined
Jul 23, 2014
Messages
4,206
Reaction score
436
Location
Southern Africa 0054
Rockwell Contractors Saw fence problems

I have a 1980’s Rockwell 9” Contractors Saw model No. 34-621

The fence has three home made bolt on options:
High 200mm
Long 1000mm
Very long 1500mm – this one lets me get very close to the blade.

The saw is only used for rip cutting. All cross cutting are on my RAS.

The fence has a small problem.
It hooks ok on the rails and slides easily.
When setting the fence I first get the operators side at the correct position, tighten it down (clamping block), and then turn the small adjusting knob for the rear clamping block.

I have been ripping a lot of Pine for bee hive boxes and found the one length all of a sudden went from 50mm wide to 47mm wide.
Not on, it must be 50mm.
I double checked my settings and then discovered that the rear clamping block is not tightening, hence the movement.

I did unbolt the unit looked for any obstruction. Everything looks OK.
While it was on the workbench I turned the adjusting knob – nothing happens.

The Rockwell manual has zippo in it.

Anybody here have a saw like this? I appreciate it is ±40 years old but has been looked after (will discuss the Fuffed-up pulley some other day)

Thanks
Phil

FrontClampBlock.jpg

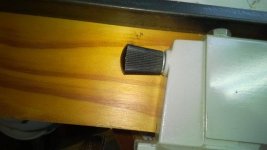
Rear Clamping Block.jpg

Adjusting Knob.jpg
 
The chance of anyone having that saw in UK is fairly slim.
Study how the mechanism is meant to work and see if anything is missing. I'd assume some sort of rod inside the fence to operate the grip on the far end.
Looking at youtube videos of the same saw might be helpful.
I have a chinese clone of Norm's New yankee Saw but that only clamps at one end and is rock solid and repeatable. I set it to toe out fractionally away from the blade and it works perfectly.

Good Luck
Bob
 
9fingers":1htqcjcr said:
The chance of anyone having that saw in UK is fairly slim.
Study how the mechanism is meant to work and see if anything is missing. I'd assume some sort of rod inside the fence to operate the grip on the far end.
Looking at youtube videos of the same saw might be helpful.
I have a chinese clone of Norm's New yankee Saw but that only clamps at one end and is rock solid and repeatable. I set it to toe out fractionally away from the blade and it works perfectly.

Good Luck
Bob

Thanks Bob

I posted on a Canadian/USA site as well, will see what comes up.
There is a rod which is supposed to pull the clamping block in.
UT has a video of rehabilitating the saw, nothing on the fence.
I can buy a fence like that for about $380 which is a heap of money :o
I will strip it down again tomorrow.

Phil
 
I'd be looking for stripped threads, or cracked plastic knob not gripping on the spindle.
On the assumption that it did work properly, then any wear/damage should be fairly easy to see.
When you find anything let us know, we might be able to suggest solutions.

Bod1
 
This is a fundamental design problem of having a fence which clamps both fore and aft. My first TS was like that.

You are much better off building a 3-point fence. It fastens only on the front rail, but is rigid enough not to need a rear clamp. It is adjustable in all three axes.

The brand name for the original is Beismeyer, but there are lots of clones out there. I published plans for such a fence years ago (not on YouTube, sadly), but there are lots of other, similar, plans out there (although mine is the best, obvs, :lol: ). Such a fence is not difficult to make, no welding necessary, just sawing, filing, drilling and tapping. All the materials are standard, off-the-shelf, bits and pieces.

It won't cost the earth and it is a nice little project in its own right. Going from what you have to such a fence will transform your saw.
 
Bod1":27c0qfr0 said:
I'd be looking for stripped threads, or cracked plastic knob not gripping on the spindle.
On the assumption that it did work properly, then any wear/damage should be fairly easy to see.
When you find anything let us know, we might be able to suggest solutions.

Bod1


Thanks, I will strip it again.
 
Steve Maskery":2zvu46po said:
This is a fundamental design problem of having a fence which clamps both fore and aft. My first TS was like that.

You are much better off building a 3-point fence. It fastens only on the front rail, but is rigid enough not to need a rear clamp. It is adjustable in all three axes.

The brand name for the original is Beismeyer, but there are lots of clones out there. I published plans for such a fence years ago (not on YouTube, sadly), but there are lots of other, similar, plans out there (although mine is the best, obvs, :lol: ). Such a fence is not difficult to make, no welding necessary, just sawing, filing, drilling and tapping. All the materials are standard, off-the-shelf, bits and pieces.

It won't cost the earth and it is a nice little project in its own right. Going from what you have to such a fence will transform your saw.

Steve, I will have a look. If I am unable to get this one sorted out I will think of replacing.
 
Ok, fixed

The adjusting knob is a metal thread, so could not wear out.

AdjustingKnobMetalInsert.jpg

The unit before stripping

BeforeStripping.jpg

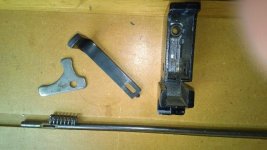
The components, 4 pieces excluding the holder, so simple.

Components.jpg

The small spring which just does not compress

Spring.jpg

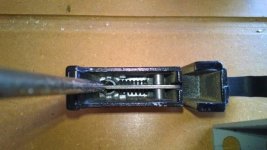
This is how the spring fits ………

SpringFits.jpg

To assemble and get everything fitting like it should, I had to clamp it in the Record vice to be able to get the pin back in.

Done and dusted.

Assembled.jpg

Fitting into the fence housing is easy, this bit goes in first and then the operator side clamp.

These are the 2 end bolt holes, nice tight fit, non-adjustment

BoltHolesNonAdjustment.jpg

These are the 2 bolt holes on the operator clamp side, screw in by hand not too tight, they will be tightened once the fence is aligned 90 degree to the blade on the saw.

BoltHolesToAdjust.jpg

The fence is fitted to the table and the large engineer square is used.
The bolts are then tightened.
The fence is set 50mm from the blade, check front and back. A scrap piece is pushed through and measured – 50mm spot on.

I then ripped some 50mm wide planks for the hives.
The plank is 3,600mm long, so the wife was commandeered to man the offtake side.
I made 2 new stands for the offtake so that I could handle longer stock on my own. (3600mm is a bit long!)

OffTakeOne.jpg

I removed the roller balls from a previous infeed stand and then mounted then on a piece of pine. It is then just clamped onto the trestle. The height exactly level with the saw.

OffTakeTwo.jpg

I needed a second one, so I used a 20mm piece of conduit running on a dowel.

The 3600mm by 50mm wide was spot on all the way through.
 
Well done for sorting it out Phil.
There are others around here far more knowledgeable than I but I abandoned the full length fence on my Kity TS many years ago. I now only ever rip using a half fence clamped at one end and reaching only just past half way past the centre of the blade.
 
Andyp":22v9wo0j said:
Well done for sorting it out Phil.
There are others around here far more knowledgeable than I but I abandoned the full length fence on my Kity TS many years ago. I now only ever rip using a half fence clamped at one end and reaching only just past half way past the centre of the blade.
:text-goodpost:

Much safer for ripping timber.
 
Here's the set up of the half fence ripping a thick piece of chestnut a few years back. As you can see I did not have the heart to cut the original fence in half, I just moved the clamping device half way along the fence.

DSCN7691.jpg
 
Andyp":bxxoci81 said:
Well done for sorting it out Phil.
There are others around here far more knowledgeable than I but I abandoned the full length fence on my Kity TS many years ago. I now only ever rip using a half fence clamped at one end and reaching only just past half way past the centre of the blade.

Andy, thanks for posting.
I will look into it.
 
Steve Maskery":2yvwuzj8 said:
And if you want to know why that is a good idea, here is a very youthful, handsome chap explaining it.
[youtubessl]d7QXIN2X8-w[/youtubessl]

https://youtu.be/d7QXIN2X8-w


Thanks Steve, good video.
(did not know that minors were allowed to operate equipment :lol: )

I will look into it, especially the narrow cuts.
The blade guard on y saw is in the way when trying to cut very narrow timber, shitty design.

I have not experienced any kick back on this saw, the kick back teeth are excellent.
I also stand to the left side when sawing. On the RAS I had a kick back because I forgot to lower the kick-back-fingers. It sent the piece 3m down the workshop and another nearly 8m (over the microbus roof) and hit the garage door.

(I presume you had ear protection plugged in :D )
 
Phil":35pmck97 said:
Thanks Steve, good video.
(did not know that minors were allowed to operate equipment :lol: )
Yeah, yeah, yeah, very funny :)

Phil":35pmck97 said:
I will look into it, especially the narrow cuts.
The blade guard on my saw is in the way when trying to cut very narrow timber, * design.

Ah yes, well now. There are two issues there. These days I use a later model of that short fence with an L-shaped lip on it, which can pass underneath the fence. I can't take a picture of it at the mo, I'm a long way away from my workshop, but here is a pic from an old project. It's set up for grooving in this picture, rather than ripping, but it does show the principle.

groove.JPG

The other way I use for the issue of the guard being in the way is to replace the crown guard, either with my SUVA style guard (shown swung out of the way in the above photo), or with a magnetic stand-alone one shown here:

[youtubessl]ixR0J_vDli0[/youtubessl]

https://youtu.be/ixR0J_vDli0

although I grant you that's not a lot of use if you have aluminium tables.

And finally, for ripping thin stock, I do it outboard, like Andy does, and I ensure repeatable sizing with this little gadget:

[youtubessl]JcQ6oC2I2ao[/youtubessl]

https://youtu.be/JcQ6oC2I2ao

Phil":35pmck97 said:
I have not experienced any kick back on this saw, the kick back teeth are excellent.
I also stand to the left side when sawing. On the RAS I had a kick back because I forgot to lower the kick-back-fingers. It sent the piece 3m down the workshop and another nearly 8m (over the microbus roof) and hit the garage door.

I had to read that a few times before I understood. Do I take it that you were ripping with the RAS turned through 90 degrees? If so, what you experienced is the reason why that practice is no longer sanctioned, at least over here. The teeth are travelling upwards during the cut, lifting the workpiece up off the table rather than pressing it downwards.

Phil":35pmck97 said:
(I presume you had ear protection plugged in :D )

That shows how old it is! I'd never do that now.
 
Back
Top