• Hi all and welcome to TheWoodHaven2 brought into the 21st Century, kicking and screaming! We all have Alasdair to thank for the vast bulk of the heavy lifting to get us here, no more so than me because he's taken away a huge burden of responsibility from my shoulders and brought us to this new shiny home, with all your previous content (hopefully) still intact! Please peruse and feed back. There is still plenty to do, like changing the colour scheme, adding the banner graphic, tweaking the odd setting here and there so I have added a new thread in the 'Technical Issues, Bugs and Feature Requests' forum for you to add any issues you find, any missing settings or just anything you'd like to see added/removed from the feature set that Xenforo offers. We will get to everything over the coming weeks so please be patient, but add anything at all to the thread I mention above and we promise to get to them over the next few days/weeks/months. In the meantime, please enjoy!

Router jigs & accessories

Windows

Old Oak
Joined
Jan 25, 2022
Messages
1,433
Reaction score
433
Location
Cumbria & West Kent
If anyone has any comments about router jigs and accessories you find particularly useful, I’d love to hear about them. Particularly interested in thoughts on dust control, stuff related to the Makita DRT50 trim router, links to videos, and whatever else you think interesting.

A bit of a vague question I suppose, but I’m just starting to try to get a sense of where to use a router to speed things up a bit. I’m researching capabilities rather than a specific project.

I think Steve has a nice router jig video, he could probably link here. Anyone else using similar?
 
For my chosen path, luthiery, I have ended up making my own jigs, mostly from wood and mdf, not being a metal person. Then I found that the like of Temu sell better versions of the ones I made. The best one I got is for cutting cutting circles and routing circular grooves. As the size of the cut is so small, and the waste therefrom is small, too, I found I could control the router better without a DX tube attached.
 
I have too many router jigs, they certainly do speed up production and repeatability, but take up space so every year or so I have a clean out
I make them if possible to incorporate dust extraction.
For me I get great pleasure out of making them and perfecting them.
Mr Maskery is the King of jigs, I’m sure he will see this and give you top advice
 
Mr Maskery is the King of jigs, I’m sure he will see this and give you top advice
LOL! I'm very flattered, thank you.
I first discovered jigs when I read Bob Wearing's work. Here were gadgets that I could use to improve my limited skills. They were faster, more precise, more repeatble and consistent. And after a while I started to make my own and so it went on.
Storage is a bit of an issue, I admit, but it's worth it.
As for dust control, the secret is to collect the dust as closely as possibe to the point at which it is generated. This accesory is for a bandsaw rather than a router, but it illustrates the point very well.


Good luck in your jig journey!
S
 
IMG_1572.jpegIMG_1573.jpeg

Like most contributors I have to many jigs and need to do an occasional cull.
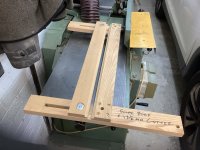
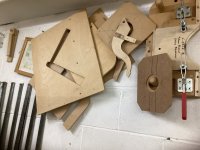
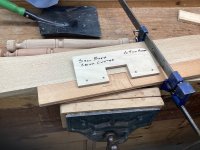
The photos show an adjustable jig for cutting housings (dado to Americans) and one of my staircase trenching jigs.

Both are easy to make and vital for swift accurate work. The stair trenching jigs can be purchased but costs over £100 they only take about an hour to make. You tube shows how to make them. When you have made the jig it’s a good idea to write on bush and cutter sizes for use.
 
Last edited:
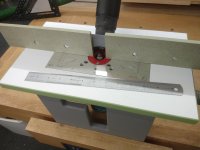
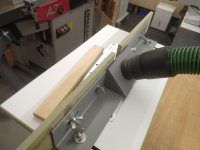
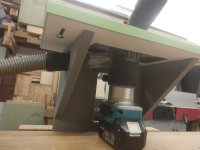
Best thing I made for my Makita trim router was a mini router table

IMG_20240117_145109446.jpeg

I bought a plate & second base from Katsu for very little money & it fits the Makita very well.

IMG_20240117_153038336.jpeg

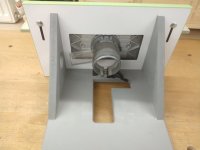
The fence is just a piece of angle iron with some holes & slots cut in it & MDF sliding fences, a wood port allows for dust collection from behind the cutter & a second hose connects to the base port. In use the dust collection is the best of any router table I’ve had.

IMG_20240117_145023699.jpeg


IMG_20240117_144954836.jpeg

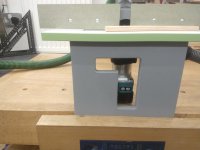
The whole thing sits on its battery & is then clamped in the bench vice, adjustment & switching on & off is via a slot in the front.

IMG_20240117_144942568.jpeg

It gets a surprising amount of use in part because it is so quick to set up, ideal when putting chamfers or pencil rounds on edges of timber, in fact that’s exactly what I did with it this morning.

The next thing I plan to sort with the router is to adjust the original base to fit a set of Trend router bushes I picked up recently, this will make it so useful for using the trim router with jigs.
 
All very good. Thanks everyone.

So far I’ve just made a T with holes so that it can be clamped to the bench or workpiece and so that quick clamps can hold small pieces to it. The launchpad for the router indicates the size and position of the kerf for a specific bit for both the fixed base and (the round edge of) the plunge base of the router.

Today, I plan to make a couple of simple hinge jigs for bearing-guided bits.

One thing I noticed people doing is using a jubilee clip to act as a depth stop for the fixed base which seems useful so that you can set your depth and go down in increments without having to use the plunge base.
 
So the thing I’m sure everyone knows, but that I only realised today - and also true of Robin’s jigs - is that bearing-guided hinge jigs require a short cutter. If you’re only cutting 3 or 4 mm deep, your bearing cutter can’t be much longer than that or your template would have to be comically tall and you’d have a lot of exposed blade. Robin sells a 6 mm cutter to go with his jig (similar also available from other suppliers).

I’ve got quite a number of cutters from a large Bosch set, a small Trend set, and various straight cutters from Wealden, but I don’t have any short cutters, so as a result I didn't do a bearing-guided hinge template.

I probably should have created a template for a bushing, but instead I just decided to fence off my area based on the edge of the router base. This worked OK, but I had to be conscious of the fact that the round base of the DRT50 has a flat bit on the back and make sure I was only pushing the actual round edge against the template.

I also experimented with sticking the edge pieces of the template with double-sided “NEC” tape (carpet tape that can be detached and doesn’t leave a residue). The tape held and released just fine, but it’s worth knowing that even if the tape still seems sticky, it’s not sticky enough to be reused. One and done with that stuff.

I’ll probably make a more permanent hinge template at some point, but some scrap taped into position did the job too.
 
The latest JSK-koubou router jig is kind of interesting. You can see how it operates at around 16 minutes into the video.


It’s a tracing jig, so kind of like a rotated pantorouter, but I think the panto is designed so that there’s no distortion in the templates (not sure - haven’t looked that closely at panto). The JSK-koubou one will put distortion into the template when tracing an existing shape then reverse the distortion when tracing the template back to a workpiece for routing.
 
Last edited:
Quick question: what’s the solution to fuzzy edges? It’s like reverse tear out - wispy bits left behind on the top edge of the cut (using a new double edged straight cutter). I’ve just cut it off with a knife after routing, but maybe there’s a way to avoid it completely?
 
Quick question: what’s the solution to fuzzy edges? It’s like reverse tear out - wispy bits left behind on the top edge of the cut (using a new double edged straight cutter). I’ve just cut it off with a knife after routing, but maybe there’s a way to avoid it completely?
It is easy to inadvertently make a climb cut when using a template which could be the cause?

 
Having looked at some of these adds for ready made templates, they all seem to be a way of spending on something which any of us could knock out in minutes. As to furry edges, that’s not some thing I’ve experienced. Is the cutter sharp?
 
I wondered about sharpness, but it’s a new Bosch cutter so ought to be sharp. I should try another cutter and see if that makes a difference. Cutting a dado, there’s wispies on both sides of the cut, so if related to climb cutting, I’d only expect wispies on one side I suppose. Depth of cut (2 mm vs 5 mm) didn’t make a difference.
 
In the case of the jig shown in my photo the edge of the cut is touching the template so I wouldn’t expect any fuzzy edges.
Does this occur with cross grain cuts or all directions of grain.

If you have any high speed steel cutters why not try one and see if they produce the furry edges.
 
Here’s an example of wispy edges on hardwood plywood cut with a new bearing-guided Trend pro cutter (so the template was right over that edge with the wisps). Total depth of the ply is 12 mm, but it was cut in four passes at least two of which would have had the cutter pass that edge.

IMG_3747.jpeg
 
It’s possible dust extraction was clogged when I did that. I imagine that suction could help pull the strands towards the cutter? I’m not seeing the issue on every cut, so maybe suction is the difference.
 
Here’s an example of wispy edges on hardwood plywood cut with a new bearing-guided Trend pro cutter (so the template was right over that edge with the wisps). Total depth of the ply is 12 mm, but it was cut in four passes at least two of which would have had the cutter pass that edge.

View attachment 35875

One of these will cut that without any risk of those wispy edges. 😜 :ROFLMAO: 😁

scared.gif
 
There appears to be some strange effects with that cut. One side has the whispy edge and yet the other end grain cut looks spot on. The ere is also some evidence of scorching which is usually a sign of blunt cutters.
I have little confidence in trend as a supplier since a very poor performance from them following a purchase.of a duff item.
I tend to agree that a sharp cutter should give a better finish than that.
Do you have the means to sharpen the TCT cutter?
 
It’s possible I had already trimmed the other side of the cut with a knife before I took the picture - not sure, but think it’s likely. The scorching may be signs of bluntness, but perhaps could be user error: I think I’m still in the first 20 router cuts I have ever made - maybe I wasn’t moving the router fast enough? (The DRT50 router is variable speed and I haven’t changed it. It’s at 5)

I have not yet considered how to sharpen a router cutter. I’ve been expecting cutters to come sharp and my use to be low enough that sharpening won’t be an issue.
 
Scorching is not only a sign of bluntness, but also of clogged dust/chippings and slow feed speed (on a cnc router anyway).
 
Your local saw sharpening service are normally able to sharpen TCT cutters.
Large diameter cutters can be sharpened by hand on a diamond plate providing you buy the ones with a flat front face to the TCT
 
Back
Top