• Hi all and welcome to TheWoodHaven2 brought into the 21st Century, kicking and screaming! We all have Alasdair to thank for the vast bulk of the heavy lifting to get us here, no more so than me because he's taken away a huge burden of responsibility from my shoulders and brought us to this new shiny home, with all your previous content (hopefully) still intact! Please peruse and feed back. There is still plenty to do, like changing the colour scheme, adding the banner graphic, tweaking the odd setting here and there so I have added a new thread in the 'Technical Issues, Bugs and Feature Requests' forum for you to add any issues you find, any missing settings or just anything you'd like to see added/removed from the feature set that Xenforo offers. We will get to everything over the coming weeks so please be patient, but add anything at all to the thread I mention above and we promise to get to them over the next few days/weeks/months. In the meantime, please enjoy!

Shaker table

Steve Maskery

Old Oak
Joined
Jul 27, 2014
Messages
2,435
Reaction score
1,406
Location
87290 Laplagne, France
It's been a few years since I've made one of these.
I have a friend, Elaine, who used to carve in wood and stone. She also had a gallery for many years. So she understands wood and craftsmanship. She is the sort of client one wants!
Yes, this is a client. Someone actually wants to part with hard cash for my skills. Wonders will never cease.
She saw my little Shaker table and asked if I could make her one. So I took off to see Andy T (not the same as AndyT, you should know) and she bought a board of locally-grown pippy oak. Plus a short bit of thicker stuff.
The official term for this wood is "quercus characterfulus". Beautiful, yes, but that beauty comes at the price of un-cooperative grain, fissures, voids and all sorts of other flaws which make the piece look fantastic but which also make our work more difficult than it would be otherwise.
To cut a long story short, here is the end result.
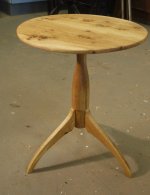
finished small.JPG
top small.JPG

There are WIPS and some video footage, but I am WAY behind on my editing and I'm running out of disk space on my computer. I have a 1T disk, just for data, and it is 99% full. How did that happen? And what on earth do I do about it?
Sigh.
 
Nicely done Steve.........both the furniture and in finding a client! I'm looking forward to seeing the photos of the leg joints. Of the furniture, you understand, not your client.
 
cant u just buy another 1T thingy and add to that.....?

i'm asking as I really dont know.....

I hate to throw out stuff even electronic stuff......

I suppose the answer is leave to the kids for when ur gone......hahaha.....
 
Very nice Steve, love the top.

2 x 4 tb in my computer one for files and one for backup.

Pete
 
Very nice Steve.
As for the Leg joint there are two methods a hand cut sliding dovetail or by router and jig. Which will it be?
 
Pete Maddex":20vkm17p said:
Very nice Steve, love the top.

2 x 4 tb in my computer one for files and one for backup.

Pete

Answer staring you in the face, Steve.
Pay Pete to soup up your PC.
 
It certainly needs doing.I actually have another brand new 1T disk sitting on my desk. It's only been there a couple of years...
I've been trying to network my W10PC to my Linux box using Samba. I have watched hours and hours of YT and spent hours and hours on the machines. Mine simply do not behave in the same way that I see on the videos. If I can network them properly I can archive a load of old stuff out of the way, have some automated backup system going on and free up a load of disk space on my PC.
I don't know if I can add another HDD to my PC, it already has a 250SSD for the OS and the 1T which is nearly full.
I haven't got much of a clue really. And to think I used to do this type of stuff (or at least, the equivalent of the day), for a living, 20-odd years ago, it is extremely embarrassing.

Anyway, back to Mr. Shaker...
 
Well I've eventually got round to finishing this.
I took my friend Elaine to see my friend Andy and between us we found a nice piece of English oak with lots of character. Now "character" is lovely to see and a PITA to work with :)
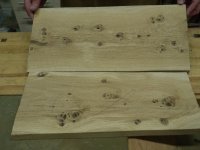
I found two areas of the board which balanced nicely:
top boards (Medium).JPG

Glued together and made nice and flat and round.
making round(Medium).JPG

Sadly the Flat didn't last very long, but we'll come to that later...

A table's stability comes from its centre of gravity compared to the limits of its footprint. I have a table like this in my lounge. The height is about the same, but it is a bit smaller in diameter and I regularly knock it over. The centre of gravity needs to be kept as low as practicable, so the top should be made as thin as possible. Well you need thickness in the middle for fixing, but the edges can be thinned out. I started by tring to use a raised panel cutter:
raised panel (Medium).JPG

but to be honest, it was more trouble than it was worth, so I turned to my spokeshave instead.
spokeshave (Medium).JPG

i screwed a brace to the underside, but that didn't stop the outer edges from curling down :(. I've re-flattened it as best I can, but I daren't go too far as there are screws not far under the surface. Heigh ho.
bandsawing brace (Medium).JPG
under top (Medium).png
I've been playing around with green screens and alpha channels. It's harder than it looks!

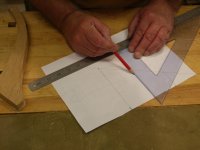
I expected to have to make the column from two pieces glued together, but Andy had a short board that was a generous thickness to finish at 55mm, so that was a bonus. I turned it to a cylinder with a shoulder for the bas and wrapped piece of paper around it to find the circumference:
circumference (Medium).JPG

Then divided that circumference into three and transferred the positions back onto the column:
View attachment 9

marking feet positions (Medium).JPG

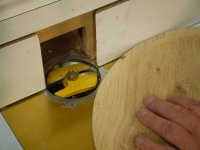
The sockets are routed out in three steps - roughing out, dovetail socket, flat for the shoulder. It's really handy to have three routers set up for this, but you can do it with two - do all the roughing first, then set up for dovetail and flat. If you have only one router then there is an awful lot of cutter changing to do, because the socket and the flat have to be cut without moving the workpiece at all.

So the column is held in V-jaws and the socket roughed out with a straight cutter. This give the dovetail cutter less of a stressful cut. It might be a big cutter, but it still has a fairly small, and therefore vulnerable, neck. Finally, without moving the workpiece, the flat is routed. I thought I had photos of each stage, but apparently not. Sorry about that. But this is the end result:

sockets (Medium).JPG

I then cut and shaped the three feet. Actually it was five of them in order to get three I was happy with. This characterful oak is full of interesting shakes, but when they are in the wrong place, they turn into firewood. The dovetail was formed on the router table, but I can't find any photos of that either. If this becomes a magazine article I can see I'm going to have some faking to do.

The column went back on the lathe to finish the shaping, then on to the bandsaw for a slot for a wedge.
bandsaw wedge (Medium).JPG

wedge slot (Medium).JPG

So when it's all glued together and given half a dozen coats of a rubbing varnish, it looks like this:

top blue sky.png

under post.png

tripod (Medium).png

finished blue sky.png

I'm just finishing off a burr elm table for the same lady, so there should be some more pics in due course.
S
 

Attachments

  • dividing circumference (Medium).JPG
    dividing circumference (Medium).JPG
    137.6 KB · Views: 2,347
Nice table Steve. I remember making my side table with the aid of your jig. Without 3 routers it would have been decidedly difficult to get everything to register off the same place. I wouldn't fancy doing it with 2.
 
Back
Top