• Hi all and welcome to TheWoodHaven2 brought into the 21st Century, kicking and screaming! We all have Alasdair to thank for the vast bulk of the heavy lifting to get us here, no more so than me because he's taken away a huge burden of responsibility from my shoulders and brought us to this new shiny home, with all your previous content (hopefully) still intact! Please peruse and feed back. There is still plenty to do, like changing the colour scheme, adding the banner graphic, tweaking the odd setting here and there so I have added a new thread in the 'Technical Issues, Bugs and Feature Requests' forum for you to add any issues you find, any missing settings or just anything you'd like to see added/removed from the feature set that Xenforo offers. We will get to everything over the coming weeks so please be patient, but add anything at all to the thread I mention above and we promise to get to them over the next few days/weeks/months. In the meantime, please enjoy!

Slowest workshop build in the history of mankind

Hobbo

Seedling
Joined
Apr 3, 2019
Messages
13
Reaction score
0
I'm looking for a bit of advice on the best order to close up a workshop- am I best to get the roof on first, then enclose the sides, do I need to enclose everything to prevent the roof blowing off?

I've just finished 3 courses of bricks on a reinforced concrete base for a 7m x 3.5m workshop, 2.5m high. I'm mostly following the Workshop Bible (Mike G's plans, albeit just single width of bricks, no internal blocks, I know, I know, I'll have an unsightly cladding overhang!) of OSB inner on the insulated studwork, membrane on the exterior, clad in F/E oak or larch. The roof will be box profile metal sheets.

Between work, family, life and naps I don't have much time, so this is probably the slowest construction project in the history of mankind (2nd if you count HS2 obviously) which means I'll have chunks of time where sections of the build are only part done.

Long winded I know, but bearing this in mind am I best to get the side framework up, get the roof on but keep the sides open for a bit? Or should I get the sides up, OSB the inner and then get the lid on? I'm not sure what's best to prevent wind or rain damage.

I've found reading other people's posts really useful, so will post some photos of my dodgy brickwork for general amusement soon!
 
Welcome Hobbo,
An interesting question and I desperately trying to avoid saying "it depends" :lol:
When I built mine I had concrete block walls so far less of an issue of them blowing over.

If there are going to be gaps of more than a few days especially in winter, I think I'd make the walls as panels with the interior face osb and frames and stack those up horizontally off the ground covered in a tarp.

Grab a couple of mates and a clear fine weekend and get all the walls up in one go and then the lid on as quickly after that with the tarp over the whole lot. If you are exposed to winds on site, then a temporary door/windows will help keep the roof on.
Next step, waterproof the roof on the next free weekend. After that you can insulate from the outside keeping that dry until the cladding goes on in relatively slow time if you have to.
Plan your materials procurement so stuff does not get wet.

When I was shopping round for materials I decided on a BM, Jewsons, and gave them the whole bill of materials and agreed discounted prices with their sales rep (not counter staff!), then I called off what I wanted for delivery a day before the weekend using their free delivery service based on the value of each drop. This worked quite well over a period of about a year. However I did not tell them it would be that slow :lol:
Bob
hth
 
I think it’s a bit half and half. The wall frames need bracing with the inner skin of the walls.

Once they’re braced, you can fit the rafters and ridge and cover the top leaving you dry to finish the walls.

I think. :eusa-think:
 
Malc2098":11eur3ac said:
I think it’s a bit half and half. The wall frames need bracing with the inner skin of the walls.

I think. :eusa-think:

Not necessarily as you can brace them with a bit of roofing batten as a temporary measure - applied diagonally.
 
I built mine during a very rainy summer.

Having got the timber frames and rafters up I surrounded the walls with building paper then did the roof with OSB and EDPM.
That way I kept the rain out and I could work in the dry to finish.

Rod
 
Once you have the membrane on it is essentially waterproof.

It is UV that will break the wrap down.

I think Mike had just membrane on the roof of his for a year or so.

The osb stiffens the frame significantly but the wobble isn't too great without.

If you tarp the roof then lash it down really well then double the amount of lashing, wind finds all the little gaps then friction on corners will destroy the tarp if on for too long.

So if time's tight, I'd wrap, roof, insulate, line, clad.
 
Thanks all, that's really good advice. I'm much more clear in my mind about what I need to do.

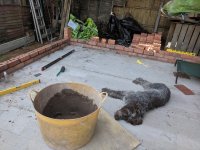
A work in progress pic before I completed the brickwork. One of my helpers generally getting in the way/eating concrete. Under no circumstance should you zoom in to view my dodgy pointing or concrete :eusa-doh:
 

Attachments

  • IMG_20190826_152443_893.jpg
    IMG_20190826_152443_893.jpg
    483 KB · Views: 11,953
I'm looking to use either larch or oak f/e boards. A supplier localish to me stocks different grades of oak- green, air dried, kiln dried. My preference is for oak without painting so it weathers to a natural grey- does anyone have an opinion on which option I should go for, and if bare naked (let's see if that gets through moderation!) oak is a good idea?

If I'm going for 24/6mm f/e boards is my estimate of about 35mm total thickness for the boards once overlapped about right?

thank you.
 
Hobbo":9uffk9mu said:
I'm looking to use either larch or oak f/e boards. A supplier localish to me stocks different grades of oak- green, air dried, kiln dried. My preference is for oak without painting so it weathers to a natural grey- does anyone have an opinion on which option I should go for, and if bare naked (let's see if that gets through moderation!) oak is a good idea?

If I'm going for 24/6mm f/e boards is my estimate of about 35mm total thickness for the boards once overlapped about right?

thank you.

Those thicknesses sound about right for 8" boards but perhaps a bit chunky for 6" IMHO.

Usually FE board is specified by the size of the board that is re-sawn at an angle to make two boards.

eg FE board Ex 200x32 which after the saw cut kerf would give you about the thick and thin dimensions that you mention.

hth
Bob

PS if once you have uploaded your photos, you then use the "place inline" feature, then you get rid of the dotted line round the photo and if you have more than one in a post, you can put them logically within the text. otherwise they will just stack up at the bottom of the post.
 
A bit more done- slowly of course!

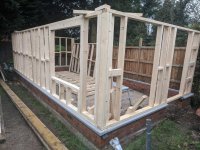
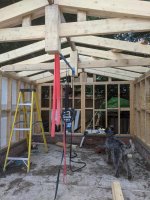
3 course brick wall with wall framing complete. The long section next to the fence had to be clad before lifting into place as I can't access it. It was also clad in wriggly tin (Rhino roofing near Tamworth, really helpful people), this is so it's low maintenance and part of the 'substantially non-combustible' part of building regs.
IMG_20200107_072400_483.jpg

They wide grey wood plinth is planed at an angle except for corners, this is so I have a neat join for corner posts but still allows water to flow off the rest. Lesson in buying cheap buying twice here where I used Ronseal all weather paint, several coats and a few dry days before rain washed it all off- actually washed it off! Definitely didn't do what it said on the tin, so used Sadolin instead which I've used before and is really good. Difference of paying £16 or £60 I suppose.

IMG_20200203_150118_026.jpg

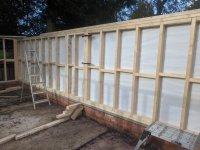
Last section of the wall going up.

IMG_20200201_134404.jpg

Ridgebeam and rafters next.
 
I would be interested in anyone's opinion-

I'm planning to have open ended rafters instead of soffit and facias, apart from aesthetics and some more protection for that part of the roof, do they add anything more? I'm following Mike G's guide to slight air gap/insect mesh and then cladding with feather edge if that makes any difference.

The roof will be OSB3, membrane and then I'm planning on vertical battens to allow for downward flow of water, counter battens to mount the box profile metal sheets. Do you agree- or is this overkill? I've seen some people screw metal sheets directly onto the membrane covered OSB, and I've read about not having OSB and using the 'sag' method under horizontal battens- I'm not sure if I am keen on either of these other methods but was interested in what anyone else thought?
 
I've not used the metal sheet but have synthetic slates screwed direct onto membrane covered OSB and it has been fine since 2006/7 built.

As for open rafters, the ventilation should lead to the cold side of the roof insulation otherwise you will lose a lot of heat when the wind blows if it vents into the work area itself.

I've got flat ceiling 6mm mdf, vapout barrier (belt and braces) retaining 100mm fibreglass over and 1" soffit gap venting into the roof void. I did not know about insect mesh at the time so none used.

Bob
 
Hobbo":2mkxg4s0 said:
I would be interested in anyone's opinion-

I'm planning to have open ended rafters instead of soffit and facias, apart from aesthetics and some more protection for that part of the roof, do they add anything more? I'm following Mike G's guide to slight air gap/insect mesh and then cladding with feather edge if that makes any difference.

The roof will be OSB3, membrane and then I'm planning on vertical battens to allow for downward flow of water, counter battens to mount the box profile metal sheets. Do you agree- or is this overkill? I've seen some people screw metal sheets directly onto the membrane covered OSB, and I've read about not having OSB and using the 'sag' method under horizontal battens- I'm not sure if I am keen on either of these other methods but was interested in what anyone else thought?
How are you getting on?

Not sure I'd bother with the vertical battens. What water are you worried about? I used box profile on my back wall and on my roof just like you are - saves hours, is super-easy to install and does the job. Mine was only in place for a year before I dismantled it again, and when I took the roof sheeting off there was no evidence at all of any water getting through. I had 11mm OSB; membrane; horizontal battens with a few breaks to allow airflow (not sure why, felt sensible); and then the box profile cladding. I assume you are using a ridge piece as well? the foam fillers fit really well, and the tek screws did a solid job. Having said that: as long as you have the capacity for the marginally higher roof, it's not really a lot of extra bother or cost to cross-batten like you are suggesting and I don't really see any down-sides. It may make life easier when it comes to insect meshing at the eaves too: you can just put a foam filler between the roof sheets and the last horizontal batten, and then cover over the rectangular sections between the vertical and horizontal battens with mesh. What are your plans for keeping insects out of the space behind the cladding on your wall that faces the fence?

Looks great btw.
 
Thanks Nick and 9fingers for the advice.

A bit more progress-

IMG_20200314_154858.jpg
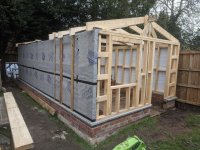
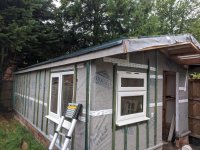
I could only get Gorrilla tape, its not great I may have to retape again before cladding properly. I might also drape a tarp over to protect from UV damage as I dont know when I will be able to get the timber cladding.

IMG_20200403_153632.jpg
Rafters are all in now, I've also clad the back wall in the same wriggly tin as the wall along the fence- partly for ease, cost and no one will see it! I have foam inserts top and bottom plus it will be covered by the eaves.

IMG_20200407_184708_147.jpg
Nap zone complete.

I was considering changing my plans about the roof as I cant get hold of much in the way of building supplies. I know I can get the box profile roofing sheets, so my plan is to clad the roof with the waterproof membrane (I have enough of that) and then to screw the box profile sheets straight onto that, onto the rafters without OSB boarding or battens. This will allow me to get the roof watertight quickly.

So the roof from the inside out will (eventually) consist of OSB internal sheets, insulation sitting on top of that in between the rafters, air gap of 10mm, the waterproof breathable membrane on top of that, the metal sheets as the outer layer- with a ridge piece and foam inserts.

Does that sound feasible, or am I looking at a shortcut that I will regret?
 
You can't do that with pressed metal sheets. They require horizontal support, so at the very minimum you'll need battens. You should have OSB or ply up there too, both for sound (nightmare in the rain, otherwise), and for safety during construction. What are your rafters spacings?
 
Mike G":205fo0rn said:
You can't do that with pressed metal sheets. They require horizontal support, so at the very minimum you'll need battens. You should have OSB or ply up there too, both for sound (nightmare in the rain, otherwise), and for safety during construction. What are your rafters spacings?

I thought that would be the case but hoped otherwise, makes perfect sense really when you consider how flexible the sheets are horizontally. I might go for battens and let the membrane to sag slightly to allow for water flow, but if I can get ply or OSB go for that instead.

Rafter spacing is 600mm on centre.
 
If the sheets are nailed then you might have to use 50x50 battens, because trying to nail into a 1" batten in the middle of a 600 gap between rafters is going to be a test (the battens just bounce, and the nails bend). If you are screwing the sheets on (I don't know if this is possible), then the problem goes away.
 
A little bit of progress and issues with leaks..

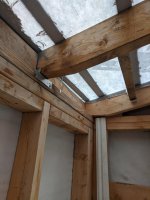
Managed to get the roof membrane and lath on, just waiting for the box profile sheets. There was a delay to the sheets so had roofing membrane exposed to weather and uv for longer than I wanted. You'll see I went for horizontal battens which will support the long vertical metal sheets. Screws are same depth as the lath, so I won't have any danger of screws poking through the membrane and creating holes for (more!) leaks.

IMG_20200827_133445.jpg

The membrane was completely watertight for a few weeks, with this latest weather it's started leaking. A few drips in some places and a fair amount in 2.

IMG_20200827_133412.jpg

IMG_20200827_133430.jpg

I covered the rafters with the membrane, then nailed on the lath to the rafters. It's through some of these nails that it's leaking. No cuts or tears in the membrane, and it's still got its water resistance, weirdly it's like its wicking down the nail, then along the top of the rafter. It might be that with the recent high winds it's created a bit of a gap between lath and rafter as the wind flexes the lath. I have hammered a couple of sections down again, there was no obvious gap to speak of but it definitely made a difference to the leak.
I must admit to being surprised the roof was still on after some of the wind we had, I expected to see it making its way across neighbours gardens!

I'm not completely sure if this is a problem, this is my thinking-

Once the metal roof is on (assuming I do a decent job), leaking membrane isn't really a problem as its just there as a safety net in case the real roof leaks.

Is that just wishful thinking on my part because I dont want the utter b@ll @ache of stripping off the lath and replacing the whole thing?

Anyway, sheets arrive soon so I'm hoping for some calmer weather before monkeying about on the roof!
 
Can't advise on your issue, but when I had my roof re-done a few years ago, I had some professional felt roofers come and do it. It was interesting to see the guys nipping up and down a ladder with jugs of molten pitch in their hands; even more interesting to see the state of their forearms where they'd been splashed by the stuff! :shock: Cost a smidge over 2K£ to have it done but it was dosh very well spent and guaranteed watertight for approx 30 years - Rob
 
Don't worry about it too much Hobbo. Wind driven rain will quickly find any weakness, and when there is a tin roof over it any leaks through that will be minor, and not wind-driven. For now, tap all your battens down where they cross rafters.
 
Mike G":1tzqc0a4 said:
Don't worry about it too much Hobbo. Wind driven rain will quickly find any weakness, and when there is a tin roof over it any leaks through that will be minor, and not wind-driven. For now, tap all your battens down where they cross rafters.

Thanks Mike, that's a weight off my mind!

@woodbloke- gone are the days of felting and tar burns, it's all pvc and glue nowadays!
 
Hobbo":14pchohz said:
@woodbloke- gone are the days of felting and tar burns, it's all pvc and glue nowadays!
It may be 'old skool' but it works and good for 30 odd years which will see me out :lol: I'm just glad I wasn't the one juggling the pots of pitch up the ladder :shock: - Rob
 
From a non-workshop builder your progress looks bang on schedule to be faster than our existing slowest workshop build by at least 3 years. :)
 
Andyp":3iqopay5 said:
From a non-workshop builder your progress looks bang on schedule to be faster than our existing slowest workshop build by at least 3 years. :)

Oi! Mine's 'built', just not finished... :eusa-whistle:
 
A bit of progress on the build- managed to get the roof on, door in and start insulation. Definitely on track to finish by Christmas (2023).

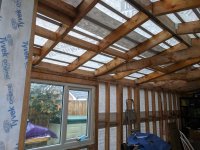
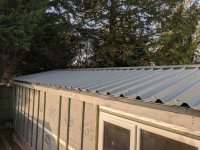
Metal roofing sheets were screwed onto the lath, each sheet siliconed onto the next and fixed with stitcher screws, foam inserts in the gaps. I didn't want to walk on the sheets once in place as I was worried my coronachub would dent it or I'd slide off- so I completed one side, attached the ridge pieces screwing down just on the completed side, then added each panel on the other side, sliding under the ridge pieces and fixing as I went along.

It was a bit of a faff trying to slide each piece under the ridge, but as with all these things it got easier as I went along. I also got away with going onto the completed sheets occasionally kneeling on a wooden frame that spread my weight out, so I maybe made life hard for myself avoiding walking on it at all, but it's on now at least.

IMG_20201107_144603.jpg

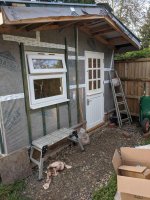
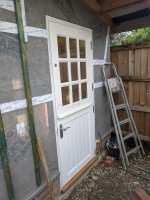
Roof going on sorted out the water problems, no more leaks. I reused an old stable door which after a bit of trimming went in surprisingly well, starts to make it feel more finished. The back has a metal barge board same colour as the roof, the front will have oak barge board to match the f/e cladding.

IMG_20201107_144535.jpg
IMG_20201107_144523.jpg

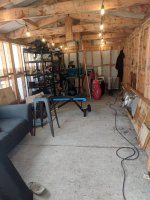
I've started insulating with 75mm board (100mm doesn't fit the 2x4 framing) on the 2 sides that to be timber clad, the other 2 being metal clad because I can't access the long side on the boundary- so is low maintenance and more fire resistant for regs, and at the back because no one can see it- the other 2 visible sides will be feather edge (eventually...). Boarding the 2 wooden sides because I'm not sure when I'll get round to cladding it, the boards give a more solid feel than rockwool but is much more expensive. The rest will be insulated with rockwool though.

IMG_20201107_144507.jpg

Still to do is the rest of the insulation, boarding inside and once I'm sure the floor and brickwork is completely dry I'll move on to the flooring. I want to both level (my uneven plinth :oops: ) and seal the concrete so I'm thinking possibly a latex levelling compound- but that's a project for another time!

Oh, and cladding the outside, framing the window boxes etc. Looks like I'm on track for 2023!
 
A workshop? With a settee? you'll be putting a bar in there next :)

really like the stable door. Great idea
 
Andyp":3knv869y said:
A workshop? With a settee? you'll be putting a bar in there next :)

really like the stable door. Great idea

Cheers Andy. The sofa has been claimed by the dogs, they sit on it watching their human swear while cut bits of wood badly. A bar, now that's an idea..
 
That roof structure looks as though it might just be strong enough! :)
 
Back
Top