• Hi all and welcome to TheWoodHaven2 brought into the 21st Century, kicking and screaming! We all have Alasdair to thank for the vast bulk of the heavy lifting to get us here, no more so than me because he's taken away a huge burden of responsibility from my shoulders and brought us to this new shiny home, with all your previous content (hopefully) still intact! Please peruse and feed back. There is still plenty to do, like changing the colour scheme, adding the banner graphic, tweaking the odd setting here and there so I have added a new thread in the 'Technical Issues, Bugs and Feature Requests' forum for you to add any issues you find, any missing settings or just anything you'd like to see added/removed from the feature set that Xenforo offers. We will get to everything over the coming weeks so please be patient, but add anything at all to the thread I mention above and we promise to get to them over the next few days/weeks/months. In the meantime, please enjoy!

Small workshop

The lowest point around the perimeter of the shed, in theory. That's pretty flat from what I recall of your site preparation photos. These things are only ever measured if there is a dispute, so if you get on with your neighbour there will be no issue.
 
Thanks Mike I have previously levelled that area it used to be much higher going up the slope the decking behind is covering. The land behind is at least 300mm higher.
I will take pictures tomorrow I don’t mind undoing what I have done if it gives a better looking result.
If I went up by 150mm at the ridge could I adapt the existing rafters.
 
Yes, no problem remaking the rafters to a different pitch. You've enough length.
 
That sounds like a good plan

Can you tell me how the OSB3 will react if it gets wet do I have to board insulate and wrap in the same day?
 
It swells a bit after a few days. Maybe goes from 9 to 9.5 or 10mm thick particularly at the ends.
 
I am so pleased I used screws and not nails it took 2.5 hours to take the roof down and all I need to do now is find an angle I can live with and then re cut everything then put it all back together
 
Thanks Bob that made me smile not much to else smile about on the project.
It started when I was cutting some 150 x 45 on the mitre saw the blade caught in the wood and picked it up naturally I stepped away letting go of everything.
No injury other than to the saw I thought I had bent the blade fortunately when I bought the saw 15 years ago it came with a spare blade. And I knew where it was in the cupboard in the garage behind the 13 sheets of OSB. Not wanting to move all of the OSB I decided to carry on with the cordless circular saw.. BIG MISTAKE as I appear to be very good at cutting a slight curve in any piece of timber.

Clearly I need a new compound mitre saw it must be able to cut 150 x 45mm I am going to post in the relevant section for reccomendations.

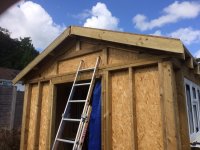
So I ended yesterday with a roof that fitted together nicely but looked awful now it looks like a roof but the rafters neither fit to the ridge or to the top plates.

2019-02-17_05-01-22 by my0771, on Flickr
 
Michael, if you don't want to rush out and buy a saw, I have an old Bosch you're very welcome to borrow. Not sure on the capacity but if you're interested I can check tomorrow.
 
RogerS":s69l9f8p said:
Michael, if you don't want to rush out and buy a saw, I have an old Bosch you're very welcome to borrow. Not sure on the capacity but if you're interested I can check tomorrow.

Thanks Roger for your very kind offer I do appreciate it but I think I need to buy a replacement on Monday and try to get this job back on track.
 
Having slept on it I am going to try using a piece of timber as a guide for the circular saw clamped in place I should have done this much earlier.

I am going to start by checking all of the measurements to ensure nothing has moved then check the front pair that I have been using as a template.
 
My low tech approach has worked out quite well circular saw piece of wood clamp tape measure.

2019-02-18_02-22-44 by my0771, on Flickr

And we have a much better looking roof I am really pleased with todays progress even the overhangs line up.

2019-02-18_02-39-39 by my0771, on Flickr

It is very windy here today so getting sheet materials out is not a good idea so I am going to apply the glue to the edges of the flooring as per the manufacturers instructions. And fit the insect mesh.
 
That looks so much better Michael. I think that well worth the extra effort.
 
Thank you Malcolm and Mike I really appreciate the advice and support everyone has given me.
I am so happy with how it is turning out it does indeed look like a proper building.

I am not worried about the internal lining that seems straight forward enough.
I am worried about the roof are there any panels similar to the floor that I can use for the roof by that I mean smaller rather than material. 2440mm x 1220mm at 22mm might be too heavy to get up there I measured the sides from the outer end of the rafter to the centre of the ridge beam is 1470mm each side and yes they are equal. I was so impressed :D the length is 3600mm.
I could have the yard cut the large sheets in to pieces for me but was hoping there maybe a T&G type option.
 
9fingers":1rxku1p6 said:
Why on earth do you want 22mm roof decking?
11 or even 9 at a pinch should do surely.
Bob

Sorry Bob my error my drawing actually says 18mm OSB for the outer roof even 13mm OSB is quite heavy and difficult to handle even with two people. Although I could carry it on to the decking behind and slide it on from there as it is a metre higher. I would still prefer something slightly easier to handle if it is available.
 
9fingers":3iezzqj6 said:
Why on earth do you want 22mm roof decking?
11 or even 9 at a pinch should do surely.
Bob

No, 18mm would be what I would expect on a roof.

I'll have a think, Michael.
 
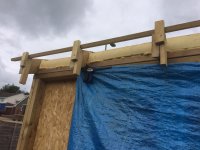
I used a little trick to slide the sheets up on to the roof structure without them sliding back down.

IMG_1197.JPG
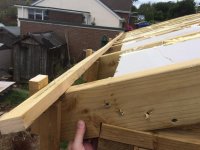
I fixed some short lengths of 50x25 into the side of the rafters and then some more onto them which stood proud of the rafter by about 50mm.

Then battened the roof.

IMG_1198.JPG
With two of you, this allowed you both to push and slide the sheet up and over the pegs which held it up there till you got up to get it precisely in place.

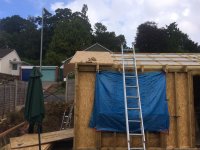
IMG_1229.JPG
Not sure if your roof is the same, but the battens on mine facilitated the ventilation of the roof materials.
 
If you haven't read through Malcolm's build, Michael, then you should. It was a cracking little project.

I think you can use 18mm chipboard flooring sheets for the roof, so long as you use the ones rated "moisture resistant". They're used as sarking boards on the continent, and would make a perfectly good substrate for rubber (I presume this is still your choice of roofing material?). I would warn you that they are slippery, and I think you should have help when doing the roof. Malcolm's idea is a really good one, which will prevent the boards trying to slide off the roof. Even with 2 people, you should be extremely careful. I suggest that you fix temporary battens down on top of the boards, because the chipboard flooring, especially if there is a little dust around, is not just slippery on the roof, but also slippery underfoot. A batten to stand on will give you a lot more confidence.

If this proves too expensive, then you can rip your OSB sheet in half.
 
Thanks for posting those pictures Malcolm I could not view them on you original post which I have read more than once.
I will copy your batten idea thanks for that.
Safety is my first priority my brother has just returned from 2 weeks cruising in the Caribbean so I will also enlist his help so there will be three people.
I take it there is no overlap on the sides but there must be an allowance for the cladding that will be added to the front and rear. I will see what the timber merchant has available tomorrow.

When the boards meet at the top there will be a "V" shape should this be removed by cutting an angle on the end of the sheet or filled with a quarter round beading. I understand that the rubber roofing does not like sharp edges.
 
Like yours, my roofing came down approx 150mm beyond the side walls.

I also extended mine 150mm beyond the end walls.
 
MY63":229dz33t said:
When the boards meet at the top there will be a "V" shape should this be removed by cutting an angle on the end of the sheet or filled with a quarter round beading. I understand that the rubber roofing does not like sharp edges.

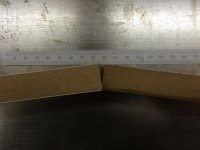
The size of your gap along the ridge will be tiny given the low pitch and certainly a 1/4 round won't fit nicely at all (it would need a 45 degree pitch to fit properly. Just offer up a couple of pieces of scrap at the ridge and see how small the gap will be.
I'd knock off any sharp edges with a rasp or block plane. Maybe even run a bead of glue into the vee and let the shavings drop in to make a "glue and dust" filler if you are that concerned.

The epdm adhesive will also tend to fill the gap when you come to fit it.

Bob
 
Malc2098":2u2pas4q said:
Like yours, my roofing came down approx 150mm beyond the side walls.

I also extended mine 150mm beyond the end walls.

Thanks Malcolm did you make any supports for the overhang on the end walls. Can I ask if you have any tricks for fitting the inside boards with their 2.5mm gap or did you butt them together.

Bob I see what you mean, Do you think is it possible to overlap the edge of one the boards over the end of the other doing away with the gap altogether
 
MY63":27fw1p39 said:
Malc2098":27fw1p39 said:
Bob I see what you mean, Do you think is it possible to overlap the edge of one the boards over the end of the other doing away with the gap altogether
That's going to be awful

In the photo I've used 16mm offcuts placed at a similar angle to your roof and the gap is 5 mm ishimage.jpeg
Just not worth worrying about
Bob
 
MY63":2vzw72hz said:
Malc2098":2vzw72hz said:
Like yours, my roofing came down approx 150mm beyond the side walls.

I also extended mine 150mm beyond the end walls.

Thanks Malcolm did you make any supports for the overhang on the end walls. Can I ask if you have any tricks for fitting the inside boards with their 2.5mm gap or did you butt them together.

I only made a sort of ladder by using some rafter timber 150mm long and fitted it between end rafter the gable end (half a thickness of rafter ripped through the table saw). It sort of made a bit of a box section. I had to cover all the gaps with insect mesh.
IMG_1243.JPG
 
Thanks Malcolm they look pretty straight forward to make.
I am also interested in the interior boarding and the gap between the boards especially the roof boards, does every joined a gap all round. That may sound like a silly question but the flooring only requires a gap around the edges as it is glued all round.
 
My ceiling and interior wall sheathing were all in 11mm OSB and so were butt jointed.

You'd be surprised to know that not much was square when I offered it all up. :D
But in any case I used Mike G's tip of using a wire nail to create a consistent gap, and some gaps were not parallel, so, so far as I could the narrowest gap was the width of the nail.

So, when the time came to paint the interior, I went round everywhere and filled every gap, walls and ceiling.

Big gaps I filled with expanding foam and narrower gaps I used some form a sealant, whatever was on offer at that time.
 
Sorry Malcolm I don’t want to appear thick but did you leave a gap between each board or just top bottom and sides.
 
To be really honest, Michael, the interior really didn't end up square. So I tried to make sure the side edges were as parallel as I could make them using the nail tip, but then the tops and bottoms could well be out.

I tried to be clever and bevel the ceiling sheets to mate with the walls and the ridge, but nothing was ever any where near a good fit.

I also maintained a gap at the floor.

In the end, I stopped being paranoid about it, even though there were gaps larger than I'd preferred, and gaps not parallel, the act of fitting the sheathing to the building frame stiffened the whole building up so much that I decided at that point that I'd just fill gaps and paint over them. It is a workshop after all, and not a domestic sitting room.
 
I understand nothing is going to be perfectly square I am not worried by the slight wobble in the frame as I have read from your post and others that the sheathing will tie everything together. I will get some caulk when I order the roof sheets I did not get there today. Light intermittent showers tomorrow then two fine days back to back. So it’s pain meds on standby and I am going to go for it :D
 
:D

Just pain meds?!

I had lumbar support belt, hot baths and homedics shiatsu chair therapy!

And days off between days of work. Didn't think that would be needed, but it was.
 
As with all my working Malcolm I work for a couple of hours and then rest I am not able to work a full day.
My medicine cabinet is a cornucopia of pain medications everything from Paracetamol to Ketamine and some really cool patches that can be cut to size and basically turn the area numb in around five minutes and last for hours.
Nerve damage is such a joyous thing.
 
We have had some rain overnight so I am waiting for it to dry up before I do anything involving large sheets of OSB.
As an aside our garden is usually full of birds from pigeons to smaller ones on the bird feeders this morning nothing nada not a twitch even when myself or the dogs are out there, there are still birds flying around.
Then I noticed this sitting on the back fence.

2019-02-20_10-48-53 by my0771, on Flickr

Sorry its a bad picture the phone was at max zoom and seems to have focused on the shed. I could see with my mk1 eyeball it had big yellow feet :D anyone know what it is
 
Well I am not sure quite what it is but that's why there are no other birds in the garden, its looking for a meal!
 
Female Sparrowhawk

6d9da6dc17c1f536ed2eae2ba1c18926.jpg


That ones a male, more brown, eating a Collard Dove

Rod
 
Back
Top