• Hi all and welcome to TheWoodHaven2 brought into the 21st Century, kicking and screaming! We all have Alasdair to thank for the vast bulk of the heavy lifting to get us here, no more so than me because he's taken away a huge burden of responsibility from my shoulders and brought us to this new shiny home, with all your previous content (hopefully) still intact! Please peruse and feed back. There is still plenty to do, like changing the colour scheme, adding the banner graphic, tweaking the odd setting here and there so I have added a new thread in the 'Technical Issues, Bugs and Feature Requests' forum for you to add any issues you find, any missing settings or just anything you'd like to see added/removed from the feature set that Xenforo offers. We will get to everything over the coming weeks so please be patient, but add anything at all to the thread I mention above and we promise to get to them over the next few days/weeks/months. In the meantime, please enjoy!

Small workshop

Before I seal this roof forever (as far as I am concerned) I have filled the 50mm void above the hard insulation with soft insulation. If I then run my battens parallel to the rafters and lay the OSB3 over that. How does the air flow freely are the front and rear ends the source of air flow.
 
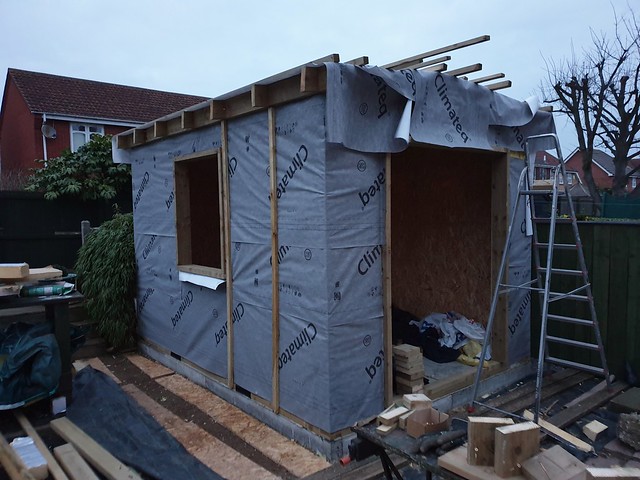
Way too much information in previous posts time foe a picture.
First job was to fill the ends of the rafters then I started fixing the battens to the roof and sorting the roof membrane as I went. As I had to buy another 50 m roll I added an extra length so I have 5 strips in all.

2019-03-01_07-37-55 by my0771, on Flickr

When it got too dark to work up the ladders I started putting the side battens on.
 
Michael, all I can say is :eusa-clap: :eusa-clap: :eusa-clap: :eusa-clap: for all your hard work.

Truly impressive given that IIRC you've never done anything on this scale before.
 
Well done Michael, :eusa-clap:

although I don't post much I do look in daily on the forum to see what people are up to.

Steve
 
MY63":18ofb6lm said:
Before I seal this roof forever (as far as I am concerned) I have filled the 50mm void above the hard insulation with soft insulation. If I then run my battens parallel to the rafters and lay the OSB3 over that. How does the air flow freely are the front and rear ends the source of air flow.

You've just filled your air gap with your "soft" insulation. If you're following Mike's design, take it out.
 
greeno":elqmk9v2 said:
MY63":elqmk9v2 said:
Before I seal this roof forever (as far as I am concerned) I have filled the 50mm void above the hard insulation with soft insulation. If I then run my battens parallel to the rafters and lay the OSB3 over that. How does the air flow freely are the front and rear ends the source of air flow.

You've just filled your air gap with your "soft" insulation. If you're following Mike's design, take it out.

Don't worry as RogerS pointed out on page 21 the airflow was in fact blocked by the ridge beam so with the advice from MikeG also page 21 I have filled that void and placed 50mm battens on top of the membrane to give the air gap.

I have been crawling around on the roof this morning as we are forecast for strong winds starting tomorrow so if it is not fastened down by then it will likely be gone by Monday morning.

Question
I have made 150 mm pieces to fit to the first and last rafters to give a small overhang what spacing should they have. My battens were spaced to accommodate the 1220 mm size of the OSB3 so it is a little irregular.
 
I'm not sure what forecast you've been looking at, Michael, but we were being forecast high winds from 3pm onwards...ie not tomorrow. And they were right ! Hope you managed to batten the hatches down in time.
 
RogerS":323ajbzh said:
I'm not sure what forecast you've been looking at, Michael, but we were being forecast high winds from 3pm onwards...ie not tomorrow. And they were right ! Hope you managed to batten the hatches down in time.

Ah that explains why it has been so windy this afternoon I must have misheard the forecast.
Anyway I did manage to fasten everything down before it got really windy.
The 50mm battens have been added ontop of the membrane covered rafters. I also realised that I had placed the end batten above the top plates rather than at the end of the rafter so I moved both of them.

2019-03-02_06-05-30 by my0771, on Flickr

2019-03-02_06-04-24 by my0771, on Flickr

As you can see I also fitted more side battens which I hope will prevent any membrane blowing off the sides.
While I am in the confessional mood I should mention I also considered fitting the window only to find out that the hole had shrunk clearly the wood has expanded by exactly 50mm which coincidentally is the same thickness as the frame.
I seemed to remember Mike posting that I had an some extra pieces in the frame so I hope the top one was one of them as it is no longer there :D
At least the window fits now

I now have two questions
1. How do I space the end pieces from the front and rear rafters.

2. How do I fit the window :D
 
Hope all is well with you, Michael. It's not been great these last few days. Nor over this way for the next ten bleedin' days with nary a one without it raining at some time.
 
RogerS":30omie3c said:
Hope all is well with you, Michael. It's not been great these last few days. Nor over this way for the next ten bleedin' days with nary a one without it raining at some time.

Hi Roger
Fortunately we have escaped the worst of the weather, I have just watched the local forecast and your area is definitely getting all of the rain.

I have a lot of commitments this week so it will be Thursday before I can do anything on my build.
As I cant decide what to do with the roof I am going to make some doors to make it watertight once I have worked out how I am going to make them of course. It might be a good idea to fit the window as well.
Back to watching youtube videos and looking for relevant posts here.
 
UPVC windows are a doddle to fit. The frame itself is (on all but the very cheapest windows!) several box sections of UPVC to give rigidity and strength. On some there may also be a steel section inside for the same purpose. So if you were to drill a hole from the inside of the frame to the outside, you would drill through several layers of UPVC - the outer skin, the inner skin and one or more baffles internal to the frame that you cannot see.

Some windows have special clips that clip to the outside of the frame then bend round and you screw the loose end to the wall you are fixing the window to. The advantage of this is you are not drilling through the window itself - this is how I fitted vertical sliders in my last house - the windows came with the clips. These were then covered with trim etc to hide them. I presume you do not have these as you have not mentioned them.

Plan 2 is to use either long screws, or ideally frame fixings (readily available at sheds and screwfix etc). Effectively these are a long screw and long rawl plug in one. The plug is flanged at the top however to make it wider than the rest of the plug. Lets say you have an 8mm plug that has a 10mm flange. If you drill an 8mm hole all the way through your UPVC frame the plug will go in until the flange stops it. If it is long enough the plug will go into the wall of your shed, you screw the screw in until it fixes the frame to the wall and job done. However your screw head will show and it will generally look ugly. If you do this by taking the DG unit out and screwing in where the glass goes, then putting the glass back the screw head will be hidden. Not always possible, especially if you have a large opener but worth thinking about. The other option is to drill an 8mm hole all the way through, but a 12mm hole in the first skin of UPVC only. The whole frame fixing then tightens up on one of the internal baffles and not the outer skin. Pop plastic cap over the 12mm hole and again, job done.

Levelling the window to the hole is a good idea with plastic packers, make sure your drain holes do not void into your timber wall (ie add a window cill of UPVC too) and once firmly in place foam round the window to fill gaps, cover with trim and job done. Number of frame fixings depends on the size of your window and what you think is appropriate, but at least 2 per edge would be my minimum.

Loads of video's on youtube - for example

https://www.youtube.com/watch?v=XikWavpuBOU

Steve
 
Thanks StevieB I followed your advice and after measuring the frame bought some frame fixings and using them and some standard screws managed to get the window fitted into its frame.

2019-03-05_05-57-50 by my0771, on Flickr

Doors are next I am thinking of using some 95mm x 45mm I have left over with some OSB3 leftover from the inside lining filling it with left over insulation cladding the front as the rest of the building.
Unless anyone has any better ideas
 
Long term temporary doors out of leftover timber and OSB are popular down here! :D
 
Looking good!

The other option for doors is looking for seconds or a second hand UPVC unit on ebay etc - can be difficult to source if you want a wide opening or double/french doors, but will be much more draft proof than home made doors in the winter. If you are making consider adding a window panel in the door for additional light - can be a fixed pane rather than an opener if you are worried about security.
 
StevieB":3bd72n24 said:
....but will be much more draft proof than home made doors in the winter. ...

I'm not sure I agree 100% with that. A good design and well made should be draught free.
 
I have been looking for used doors whilst I have been building but although I have found a set near me they are 190 mm taller than I can fit.
So making doors looks to be the best option my floor has been exposed for a few weeks now and I don't want to push my luck.
It is forecast to rain all day today but I do have a workshop to work in :D :D

Can I use large pocket screws for the joints of the doors or do I need to make some proper joints. I realise these are going to be heavy doors but I have bought some large hinges.
 
RogerS":1x0vovg1 said:
StevieB":1x0vovg1 said:
....but will be much more draft proof than home made doors in the winter. ...

I'm not sure I agree 100% with that. A good design and well made should be draught free.

I am not sure how good my design is Roger and both of you have better skills than I.
 
Thinking about the corner joints would dowels be an option I have some 25mm dowel going spare might be easier for me than using traditional joints.
 
Are these going to be two doors filling the opening?

I really do advise making them with proper mortice and tenons. Could you get the longest pieces in your car ? If so then why not come over here and we'll make the up using my kit if you don't want to do it yourself ?

Or, if push came to shove, make them using the largest Domino's that I have...that would be very much the quickest way but not necessarily the longest lasting.

You'd get far more personal satisfaction, though, if you made them yourself.
 
I have not made a mortise and tenon joint since I left school but I want them to last so I guess it is the best way to go.

Thanks for the offer of help it is very much appreciated.
 
DaveL":1vyk2taf said:
Quick get your timber in the car and drive over to Rogers. [emoji3]


Yeah! But be careful manoeuvring up his drive! :D
 
It is very tempting to chuck everything in the car and drive to Rogers and use his workshop but I need to be close to home at the moment.

As my timber is 95 x45mm 15mm seems like a good size for the tenon,
 
Just make a pair of temporary doors out of osb to keep the weather out until you are in a position to make some proper ones.

Sent from my SM-G930F using Tapatalk
 
They look neat but I don't think that they are long enough, and a haunched tennon would be stronger. They need to be about 10mm longer than the width of the stiles and then you secure them with wedges driven in from the outside. Once the glue has cut the excess wedges and tenon off and plane flush.

Sent from my SM-G930F using Tapatalk
 
I did not know the tenons were supposed to stick out beyond the other side of the mortise I had not planned on using wedges either unless I had gaps which is entirely possible :D :)

Has anyone got any tricks for mortises I was thinking of drilling holes and chiseling the rest out.
 
MY63":on8pvcia said:
. . .Has anyone got any tricks for mortises I was thinking of drilling holes and chiseling the rest out.

Probably the easiest way without a morticer. For shallow mortices a router would work, but you are limited by the plunge depth.
 
Moteyi":3ajdymr1 said:
MY63":3ajdymr1 said:
. . .Has anyone got any tricks for mortises I was thinking of drilling holes and chiseling the rest out.

Probably the easiest way without a morticer. For shallow mortices a router would work, but you are limited by the plunge depth.

Unfortunately my router is one of the pieces of kit I really struggle with as I only have 8 to do I guess I will manage with the drill, hammer and chisel method.
 
I did not achieve much yesterday I think I cut four tenons as I only had a couple of hours. I made an early start this morning hoping to have the remaining seven cross rails cut and tenons cut.
It is strange but I found when I started I was leaving the timber long in case I made a mistake and I made mistakes when the timber was the correct size I did not make mistakes so I cut all of my timber to the correct size and stopped making mistakes.

2019-03-08_09-47-13 by my0771, on Flickr

Sun is up and the frost has gone so I am going to crack on with the side pieces and try cutting some mortices.
 
MY63":2kreh6hp said:
First four tenons cut not perfect but way better than my 1983 efforts :D :D

2019-03-06_02-14-12 by my0771, on Flickr

So much for the forecast we have not had a drop of rain all afternoon

Yup...we had your share of the rain as well.

Very, very tidy tenons. You should be dead chuffed.
 
Back
Top