Mike - I think Michael was struggling to comprehend how the crucifixes stayed in place to support the board and didn't realise they were supported (pinned to use your word) from the long arm at the top, and thought they were propped from below somehow...

-
Hi all and welcome to TheWoodHaven2 brought into the 21st Century, kicking and screaming! We all have Alasdair to thank for the vast bulk of the heavy lifting to get us here, no more so than me because he's taken away a huge burden of responsibility from my shoulders and brought us to this new shiny home, with all your previous content (hopefully) still intact! Please peruse and feed back. There is still plenty to do, like changing the colour scheme, adding the banner graphic, tweaking the odd setting here and there so I have added a new thread in the 'Technical Issues, Bugs and Feature Requests' forum for you to add any issues you find, any missing settings or just anything you'd like to see added/removed from the feature set that Xenforo offers. We will get to everything over the coming weeks so please be patient, but add anything at all to the thread I mention above and we promise to get to them over the next few days/weeks/months. In the meantime, please enjoy!
You are using an out of date browser. It may not display this or other websites correctly.
You should upgrade or use an alternative browser.
You should upgrade or use an alternative browser.
Small workshop
- Thread starter MY63
- Start date

Mike G
Petrified Pine
But there is no long arm at the top. It's 6 inches long.
Mike G":enwg4uao said:........
I got the first few boards on. Note the crucifixes for spacing the boards.
Make them accurately, and swap them from one end of the boards to the other every 4 or 5 rows, checking the bottom edge of boards with a spirit level every few rows (more often for short boards)...........

Mike - See the second last pic posted in the thread before yours. This is what I referred to as 'long'. The length is irrelevant in this context, just that it was this detail, where the crucifixes were held, which he didn't understand. Now he does.
MY63
Old Oak
Mike G":1oafe3it said:But there is no long arm at the top. It's 6 inches long.
Mike G":1oafe3it said:........
I got the first few boards on. Note the crucifixes for spacing the boards.
Make them accurately, and swap them from one end of the boards to the other every 4 or 5 rows, checking the bottom edge of boards with a spirit level every few rows (more often for short boards)...........

Ok I think I see it now.
In Mikes picture the next board sits on top of the vertical piece the length is dictated by the overlap.
If I have this right if the boards are 150mm with a 30mm overlap the vertical length from the cross piece is 120mm. The nail only needs to go in far enough to support the weight.

DaveL
Old Oak
Sorry Mike, I was commenting on using the one shown in the picture by Malc, his does have a long arm at the top.
MY63
Old Oak
Thanks for that Mike it is nice to know I was right about something 
Wedges made using the feather edge boards don't work at least not full length as the overlap is only 25 to 30 mm then the wedges only need to be that long unless I am wrong.
While I am thinking about wedges I am going to attempt to mark some lines with my laser although it may be too bright at the moment.
For now it is back to painting for me
Wedges made using the feather edge boards don't work at least not full length as the overlap is only 25 to 30 mm then the wedges only need to be that long unless I am wrong.
While I am thinking about wedges I am going to attempt to mark some lines with my laser although it may be too bright at the moment.
For now it is back to painting for me
MY63
Old Oak
I have not finished painting as yet but I thought it was time to start fitting some cladding. I dont like painting I may have mentioned that before
Starting by fixing the bottom piece on all four sides I decided to make the crucifixes as it was difficult to get them in place on my own.
 2019-03-23_06-12-47 by my0771, on Flickr
I managed to get 8 boards fitted and stepped back to admire my work unfortunately my lower back did not like this movement and I have had to stop for the day. I have some pretty impressive Lidocaine patches for my arm that will help.
My wife has helped by painting around the window and really likes the Bedec barn paint and is going to get some for the fences.
Starting by fixing the bottom piece on all four sides I decided to make the crucifixes as it was difficult to get them in place on my own.
2019-03-23_06-12-47 by my0771, on FlickrI managed to get 8 boards fitted and stepped back to admire my work unfortunately my lower back did not like this movement and I have had to stop for the day.
I have some pretty impressive Lidocaine patches for my arm that will help.My wife has helped by painting around the window and really likes the Bedec barn paint and is going to get some for the fences.
MY63
Old Oak
I had to have a rest day yesterday yes I know another rest day but that is the way it is
I got an early start this morning I wanted to finish the window side first but I forced myself to do the back and other side before starting the window side and the front.
Something went slightly wrong at the back it is 15mm higher on the right as you look at the picture I had to fight the bamboo all the way up. I should have dug the bamboo up but that is not an option.
 2019-03-25_05-32-33 by my0771, on Flickr
 2019-03-25_05-22-10 by my0771, on Flickr
It is not perfect but I am quite happy. There is a small chance that I will take the rear boards off and get them to match the window wall but only a small chance.
I got an early start this morning I wanted to finish the window side first but I forced myself to do the back and other side before starting the window side and the front.
Something went slightly wrong at the back it is 15mm higher on the right as you look at the picture I had to fight the bamboo all the way up. I should have dug the bamboo up but that is not an option.
2019-03-25_05-32-33 by my0771, on Flickr2019-03-25_05-22-10 by my0771, on FlickrIt is not perfect but I am quite happy. There is a small chance that I will take the rear boards off and get them to match the window wall but only a small chance.

You have much to be proud of there.
"perfection is the enemy of progress" Churchill.
"perfection is the enemy of progress" Churchill.
DaveL
Old Oak
MY63":k71wwqbu said:It is not perfect but I am quite happy.
So you should be, that is good progress.

- Joined
- Jul 21, 2014
- Messages
- 10,414
- Reaction score
- 164
Many years ago, I had my engineering workshop brick built onto the back of the house by a local brickie and I was to fit the cut roof.
Only when I came to set out the wall plates did I realise that the brick work sloped by 1 course around the three sides. i could not quite believe it and had to count the bricks to prove that was what really happened.
He must have had a sticky bubble in his level. :lol:
I thought it would annoy the hell out of me but I dont see it any more 30 plus years on. The resulting gaps in the interlocking tiles have filled with moss now and look just fine.
Once you are in and making leather goods in the new shop I'm sure you won't think about the slight angular error in your cladding.
Crack on and enjoy the facilities. That bamboo will soon hide the exterior.
Bob
Only when I came to set out the wall plates did I realise that the brick work sloped by 1 course around the three sides. i could not quite believe it and had to count the bricks to prove that was what really happened.
He must have had a sticky bubble in his level. :lol:
I thought it would annoy the hell out of me but I dont see it any more 30 plus years on. The resulting gaps in the interlocking tiles have filled with moss now and look just fine.
Once you are in and making leather goods in the new shop I'm sure you won't think about the slight angular error in your cladding.
Crack on and enjoy the facilities. That bamboo will soon hide the exterior.
Bob
Mike G
Petrified Pine
9fingers":2nyukl1l said:......... the brick work sloped by 1 course around the three sides.......
Around here that's known as a "pig course". I would have pushed the walls over and made him build it again properly, FOC.
Mike G
Petrified Pine
9fingers":12l7ul0v said:.........Once you are in and making leather goods in the new shop I'm sure you won't think about the slight angular error in your cladding.......
Focus on making sure the boards are right at eye level.......well, from say waist level upwards. Small corrections of 3 or 4mm per "course" can achieve quite a lot over 5 or 6 courses, and I would simply make sure that the corners were right from a metre or so upwards. Like the bottom shelves in supermarkets, no-one will see anything down low.
- Joined
- Jul 21, 2014
- Messages
- 10,414
- Reaction score
- 164
Mike G":16g8w8tv said:9fingers":16g8w8tv said:......... the brick work sloped by 1 course around the three sides.......
Around here that's known as a "pig course". I would have pushed the walls over and made him build it again properly, FOC.
I did not twig it for ages as there was several months before I could afford the roofing timber. It was only then when I tried to set out the wall plates that I discovered the problem. Too late then!
Bob
MY63
Old Oak
Thanks everyone I really appreciate the support Bob I am dying to get on with my leatherwork I am still making small stuff to keep the timber coming.
As I currently work off a piece of plywood 560mm x 400mm it is very difficult to make bigger items like this I made a couple of years ago.
 IMG_1506 by my0771, on Flickr
I love restoratoring leather case like this it was actually carried in the Second World War by a United States Army Air Force Ranger so I was a little nervous cutting it apart. Especially as it is owned by an Attourney.
Before dry and literally falling apart.
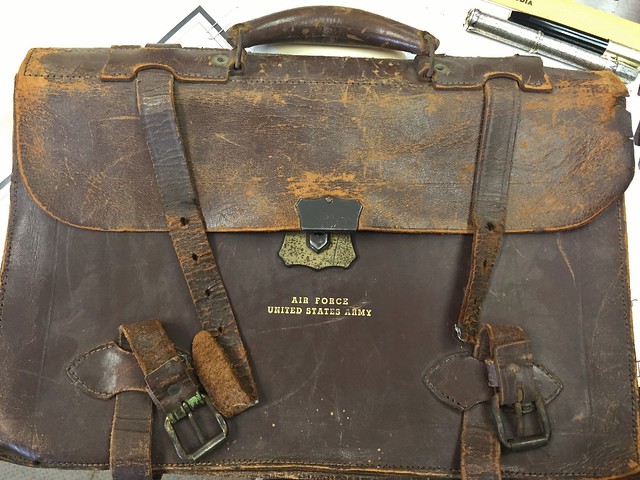 USAAF 1 case by my0771, on Flickr
After back in daily use good for another 70 years
 DSC_0286[1] by my0771, on Flickr
Lots of what I do is about the eye and if it looks right when I restore a case I don't do just cosmetic repairs I prefer to take it apart and see how it was made and return it to how it was when new but with patina.
It does not have to be perfect but it is two or three hours work to take it all off and refit it might take an hour or two to follow Mikes idea and even out the error. So I think I will take them off this afternoon and refit them correctly.
As I currently work off a piece of plywood 560mm x 400mm it is very difficult to make bigger items like this I made a couple of years ago.
IMG_1506 by my0771, on FlickrI love restoratoring leather case like this it was actually carried in the Second World War by a United States Army Air Force Ranger so I was a little nervous cutting it apart. Especially as it is owned by an Attourney.
Before dry and literally falling apart.
USAAF 1 case by my0771, on FlickrAfter back in daily use good for another 70 years
DSC_0286[1] by my0771, on FlickrLots of what I do is about the eye and if it looks right when I restore a case I don't do just cosmetic repairs I prefer to take it apart and see how it was made and return it to how it was when new but with patina.
It does not have to be perfect but it is two or three hours work to take it all off and refit it might take an hour or two to follow Mikes idea and even out the error. So I think I will take them off this afternoon and refit them correctly.
9fingers":186igppo said:Many years ago, I had my engineering workshop brick built onto the back of the house by a local brickie and I was to fit the cut roof.
Only when I came to set out the wall plates did I realise that the brick work sloped by 1 course around the three sides. i could not quite believe it and had to count the bricks to prove that was what really happened.
He must have had a sticky bubble in his level. :lol:
I thought it would annoy the hell out of me but I dont see it any more 30 plus years on. The resulting gaps in the interlocking tiles have filled with moss now and look just fine.
Once you are in and making leather goods in the new shop I'm sure you won't think about the slight angular error in your cladding.
Crack on and enjoy the facilities. That bamboo will soon hide the exterior.
Bob
I don't want to derail this thread, but I can't picture in my mind how this could happen, or what it would look like... Can you explain, either below or in another thread?
Cheers
Mark
- Joined
- Jul 21, 2014
- Messages
- 10,414
- Reaction score
- 164
Thats amazing restoration work :eusa-clap: :eusa-clap:
With luck you should be able to work with one board at a time remove all the screw but the end one and nudge it up or down by the requisite amount and pop in a screw at the free end.
Repeat for the other boards until you are happy with the results - readjusting as needed, then refit all the screws.
Using this method you wont have to take the weight of a complete board or mess about with crucifixes, cloves of garlic etc :lol:
Bob
With luck you should be able to work with one board at a time remove all the screw but the end one and nudge it up or down by the requisite amount and pop in a screw at the free end.
Repeat for the other boards until you are happy with the results - readjusting as needed, then refit all the screws.
Using this method you wont have to take the weight of a complete board or mess about with crucifixes, cloves of garlic etc :lol:
Bob
- Joined
- Jul 21, 2014
- Messages
- 10,414
- Reaction score
- 164
TrimTheKing":2il2ccum said:9fingers":2il2ccum said:Many years ago, I had my engineering workshop brick built onto the back of the house by a local brickie and I was to fit the cut roof.
Only when I came to set out the wall plates did I realise that the brick work sloped by 1 course around the three sides. i could not quite believe it and had to count the bricks to prove that was what really happened.
He must have had a sticky bubble in his level. :lol:
I thought it would annoy the hell out of me but I dont see it any more 30 plus years on. The resulting gaps in the interlocking tiles have filled with moss now and look just fine.
Once you are in and making leather goods in the new shop I'm sure you won't think about the slight angular error in your cladding.
Crack on and enjoy the facilities. That bamboo will soon hide the exterior.
Bob
I don't want to derail this thread, but I can't picture in my mind how this could happen, or what it would look like... Can you explain, either below or in another thread?
Cheers
Mark
The potted version is that there are an integral number of courses of brick in the three sides but when compare to the wall that it abuts, the top of the new brickwork on one side is level with course n and when it meets the other end of the wall it is level with course n+1 so the wall plates my roof rests on is a slow spiral rising by 75mm in 360 degrees.
This throws the roof out of whack and the interlocking tiles dont fit into each other in harmony but the moss has sorted it out visually now. I was a young whipper snapper back in 1982 and was learning as I went and employing tradesmen (or bodgers as it turns out) for as little of the job as possible. 37 years later I can lay bricks better than that but not quickly.
Bob
Ahhhh I understand now, I initially thought you meant that two of his adjoining walls differed and I couldn't see how that could happen without gradually thinning out bricks! :eusa-think: :lol:
MY63
Old Oak
all sorted I am much happier now
 2019-03-26_03-08-37 by my0771, on Flickr
I think I started around 2 ish I am really pleased they are screwed in place rather than nailed.
Electric cables my electrician (brother) has asked for a 20mm hole in the wall he is going to put a box inside and out feeding an individual consumer unit. He has given me a piece of pipe to put in the hole.
As far as the cable is concerned there is a very large piece of concrete between the house and the workshop I would rather not dig into that if I can avoid it.
The cable is heavily armoured ideally I would like to run it through the fence I have asked my neighbour and he is fine with it he is planning on running his outside lights in the same channel.
 2019-03-26_03-16-24 by my0771, on Flickr
When we built this fence we enclosed the old concrete posts inside the new fence so we have this handy shelf my neighbour was worried a bird may get stuck in the gap so I capped it off.
If this is a good route when I reach the workshop should I go up or down for entering the wall?
2019-03-26_03-08-37 by my0771, on FlickrI think I started around 2 ish I am really pleased they are screwed in place rather than nailed.
Electric cables my electrician (brother) has asked for a 20mm hole in the wall he is going to put a box inside and out feeding an individual consumer unit. He has given me a piece of pipe to put in the hole.
As far as the cable is concerned there is a very large piece of concrete between the house and the workshop I would rather not dig into that if I can avoid it.
The cable is heavily armoured ideally I would like to run it through the fence I have asked my neighbour and he is fine with it he is planning on running his outside lights in the same channel.
2019-03-26_03-16-24 by my0771, on Flickr When we built this fence we enclosed the old concrete posts inside the new fence so we have this handy shelf my neighbour was worried a bird may get stuck in the gap so I capped it off.
If this is a good route when I reach the workshop should I go up or down for entering the wall?
- Joined
- Jul 21, 2014
- Messages
- 10,414
- Reaction score
- 164
Enter a wall on the outside from below the hole and angle the hole upwards from outside to in.
Any water will run down the cable and minimise any tendency for water to enter the building at either end.
If you want to end up running the cable up the wall then make a U shape at the bottom so water will drip off that and the cable still travels up before entering the wall.
Bob
Any water will run down the cable and minimise any tendency for water to enter the building at either end.
If you want to end up running the cable up the wall then make a U shape at the bottom so water will drip off that and the cable still travels up before entering the wall.
Bob
MY63
Old Oak
Thanks Bob much appreciated The current plan is to go along the fence channel then down and underground to cross over the gap then up the side of the workshop before entering through the wall. I am assured there will be a sealed box on both the inside and the outside.
I wondered why I had so much cable it has its own wooden reel
While we are talking about electrics I was thinking of making wooden trunking as I had seen on another thread I have been advised plastic sockets may be best. I am not a big fan of white plastic trunking.
I wondered why I had so much cable it has its own wooden reel
While we are talking about electrics I was thinking of making wooden trunking as I had seen on another thread I have been advised plastic sockets may be best. I am not a big fan of white plastic trunking.
MY63
Old Oak
Mike G":36c5vc8q said:Bear in mind that wiring doesn't need to be in trunking. It can be surface mounted.
I don’t not much like the idea of bare wires on show I have this crazy idea of collecting a load of clamps and using the trunking to store them.
Then I want rows of French cleats for shelving.
If anyone has seen a good post on building a work bench please let me know.
I think I may order the rubber for the roof soon rubber4roofs is looking promising I think 4m x 3.5m should do it with a little left over

Malc2098
Sequoia
Cracking job you've done on the USAF briefcase, Michael!
I have to say, that the trunking I made has come in handy for more than one application; clamps clamp to it well, over the door, I have a roll of brown parcel paper on a dispenser (the paper keeps the TS top clean when I'm gluing, then there is another dispenser on the trunking this time with a roll of workshop blue paper for cleaning up messes and wiping stuff down. (Both brown paper and blue tissue paper come from the big red cash and carry that you need a trade card for~ I don't have the card, but I know someone who has! )
)
I am just starting work on my workbench, which will be traditional-ish and made from ash, but you may be interested in a plywood bench if you're going to get a tracksaw.
This one, by Paul sellers, is one of the many series of making plywood benches.
https://www.youtube.com/watch?v=53PrmkFpdI0
I have to say, that the trunking I made has come in handy for more than one application; clamps clamp to it well, over the door, I have a roll of brown parcel paper on a dispenser (the paper keeps the TS top clean when I'm gluing, then there is another dispenser on the trunking this time with a roll of workshop blue paper for cleaning up messes and wiping stuff down. (Both brown paper and blue tissue paper come from the big red cash and carry that you need a trade card for~ I don't have the card, but I know someone who has!
)I am just starting work on my workbench, which will be traditional-ish and made from ash, but you may be interested in a plywood bench if you're going to get a tracksaw.
This one, by Paul sellers, is one of the many series of making plywood benches.
https://www.youtube.com/watch?v=53PrmkFpdI0
MY63
Old Oak
The USAAF briefcase was a huge project quite satisfying to bring it back to life.
I like your trunking Malcolm and am pretty sure that is what I will use not sure whether to use metal faced sockets or plastic?.
I use wallpaper lining paper for dying and gluing leather on rather than brown paper which is quite glossy.
As I have not worked out where everything is going the French cleats appeal to me as I will be able to swap things around as I work out the best place.
I have thought about work benches and done a little research I have a number of 100mm x 100mm posts for legs. I was thinking of some sort of torsion box under the MFT type section and I have the pre morticed pieces that did not work for the first door.
 2019-03-08_01-44-54 by my0771, on Flickr
I like your trunking Malcolm and am pretty sure that is what I will use not sure whether to use metal faced sockets or plastic?.
I use wallpaper lining paper for dying and gluing leather on rather than brown paper which is quite glossy.
As I have not worked out where everything is going the French cleats appeal to me as I will be able to swap things around as I work out the best place.
I have thought about work benches and done a little research I have a number of 100mm x 100mm posts for legs. I was thinking of some sort of torsion box under the MFT type section and I have the pre morticed pieces that did not work for the first door.
2019-03-08_01-44-54 by my0771, on FlickrMY63
Old Oak
Cladding is almost done there is a small issue I don't have enough cladding for the doors.
My wife thinks I should put glass or Perspex in the doors to allow light in which is quite a good idea although veg tanned leather is photo sensitive. I do usually wrap leather so that wont be an issue.
I would really appreciate any suggestions on an outer covering or adding glass or Perspex.
 2019-03-28_07-11-00 by my0771, on Flickr
My wife thinks I should put glass or Perspex in the doors to allow light in which is quite a good idea although veg tanned leather is photo sensitive. I do usually wrap leather so that wont be an issue.
I would really appreciate any suggestions on an outer covering or adding glass or Perspex.
2019-03-28_07-11-00 by my0771, on Flickr
How much of a security risk would see through doors be? There are two ways of looking at that course. If someone can see in and see there is nothng worth nicking they will go away. Of course a determined thief will get in no matter wahat you do.
Personally I would prefer to see them clad.
Personally I would prefer to see them clad.
StevieB
Nordic Pine
You have a window and it is a smallish shed - adding windows to the doors will probably not mean you can work with the light off, but you can see who is at the door! If you want to be as secure as possible, then polycarbonate is better than perspex - go for 4mm or 6mm as a minimum. However, if it were me I would consider a double glazed unit - not the UPVC frame, just the glass into a wooden frame. you have spent time, effort and money insulating your shed to a high standard, why ruin that on the doors and introduce a cold spot?
- Joined
- Jul 21, 2014
- Messages
- 10,414
- Reaction score
- 164
It also depends on how tidy it will end up being in there?
A clear view into my workshop would be awful - hence I have no windows at all :lol:
Also, if you do glaze with plastic, dont use perspex, it will craze and potentially shatter with age. Polycarbonate is the stuff to use and you can get it with ultra violent coating too.
Are your doors rigid enough against droop with out osb sheet on the inside to brace them?
I'd go for cladding personally.
Bob
A clear view into my workshop would be awful - hence I have no windows at all :lol:
Also, if you do glaze with plastic, dont use perspex, it will craze and potentially shatter with age. Polycarbonate is the stuff to use and you can get it with ultra violent coating too.
Are your doors rigid enough against droop with out osb sheet on the inside to brace them?
I'd go for cladding personally.
Bob
MY63
Old Oak
I am not too worried about security I am going to fit good quality locks and maybe add it to the house alarm.
Although three spaniels soon alert me to anything in the garden day or night.
I think the doors would be strong enough to hold glass they are 95mm x 45mm mortice and tenon joints which are wedged and glued.
Hopefully my workshop will always be clean and tidy but somehow I doubt it
Oh the budget I know it has gone out of the window but I popped in on my way to get lunch and it was only £21.54 for enough to finish the doors so it is being cut and I can collect it later.
Although three spaniels soon alert me to anything in the garden day or night.
I think the doors would be strong enough to hold glass they are 95mm x 45mm mortice and tenon joints which are wedged and glued.
Hopefully my workshop will always be clean and tidy but somehow I doubt it
Oh the budget I know it has gone out of the window but I popped in on my way to get lunch and it was only £21.54 for enough to finish the doors so it is being cut and I can collect it later.
MY63
Old Oak
I forgot to thank everyone for their suggestions I decided to go with the cladding as it was the lowest cost option. Unfortunately they did not have time to cut it for me this afternoon so I will get it in the morning.
I used all of the F E board I had to start one door.
 2019-03-28_06-02-57 by my0771, on Flickr
I spent the rest of the afternoon painting the ends of the rafters and touching up other areas.
 2019-03-28_06-04-10 by my0771, on Flickr
I noticed that the Bedec Barn paint can be used for stone and concrete so I am going to paint the concrete lintels maybe tomorrow.
I used all of the F E board I had to start one door.
2019-03-28_06-02-57 by my0771, on FlickrI spent the rest of the afternoon painting the ends of the rafters and touching up other areas.
2019-03-28_06-04-10 by my0771, on FlickrI noticed that the Bedec Barn paint can be used for stone and concrete so I am going to paint the concrete lintels maybe tomorrow.
MY63
Old Oak
I am pleased to say that the cladding is finished I think I need one more piece along the bottom of the doors.
What do you think.
 2019-03-30_11-34-48 by my0771, on Flickr
What do you think.
2019-03-30_11-34-48 by my0771, on Flickr
- Joined
- Jul 21, 2014
- Messages
- 10,414
- Reaction score
- 164
Malc2098":1vxudvy6 said:I'd put a step at the foot of the doors, Michael.
Agreed and with a 50-75mm gap to the lintels and fill with pea shingle. The step should slope very slightly away from the building. Just 10mm say back to front on the step.
Belt and braces!
Bob