• Hi all and welcome to TheWoodHaven2 brought into the 21st Century, kicking and screaming! We all have Alasdair to thank for the vast bulk of the heavy lifting to get us here, no more so than me because he's taken away a huge burden of responsibility from my shoulders and brought us to this new shiny home, with all your previous content (hopefully) still intact! Please peruse and feed back. There is still plenty to do, like changing the colour scheme, adding the banner graphic, tweaking the odd setting here and there so I have added a new thread in the 'Technical Issues, Bugs and Feature Requests' forum for you to add any issues you find, any missing settings or just anything you'd like to see added/removed from the feature set that Xenforo offers. We will get to everything over the coming weeks so please be patient, but add anything at all to the thread I mention above and we promise to get to them over the next few days/weeks/months. In the meantime, please enjoy!

Small workshop

Roof is now sorted thanks Bob and Mike I was planning on ordering the rubber tomorrow but I found out this afternoon I am having a procedure at hospital tomorrow. So there will be a delay in that. There is no rain forecast for the next few day so fingers crossed.

I had always planned on using the scraps of interior OSB for the trunking unfortunately the long pieces were forming my tempoary work bench. So I unwrapped my mdf mft style top the dos are so useful.

I have cut and fitted the trunking.

2019-04-11_05-09-04 by my0771, on Flickr

Sorry about the mess. I need to cut some holes for the backing boxes so I have made a template for the router cutter to follow but I dont know if this is correct.

2019-04-11_05-09-42 by my0771, on Flickr


Thanks
 
As the interior is almost ready for painting I decided to put the foam around the window I had cleaned the gun out after the last use.
I attached the can to the gun and nothing happened the little ball in the end moves but nothing came out.
Any ideas?
 
Michael,

Have you got a can of the cleaner, you know the one that screws on to the gun. If you have, you could try triggering some cleaner through the gun. If that works, then it's the top of the foam canister that's blocked.

BTW, have you wound the pressure knob back to zero on the gun?
 
I have cleaner but unless I have misunderstood the instructions you can’t remove the can once it has been attached to the gun. The instructions actually tell you not to remove it until it is empty.
There is liquid in the can it moves when I shake it.
The window is quite a good fit can I use another type of sealant or does the foam do a particular job.
 
Well, if the knob is at the correct pressure setting and there's still nothing happening, I would screw the knob back to fully closed, then unscrew the foam tin, screw on the cleaner tin, make sure the gun is clean, and retry the foam tin, or a new foam tin.
 
RogerS":38p2wa31 said:
Most important rule - Don't forget to turn the valve off fully at the end of every session.

Slight dampness on the surfaces doesn't matter. In fact, it makes it cure better. If the temperature is really cold then placing the gun/foam container in front of a light bulb to gently warm the can/gun/contents up helps.

Wear gloves and goggles. If you do get some on your hands then you can clean it off with a bit of cleaner on a rag or paper towel(unless you have sensitive skin in which case don't).

Don't fret too much about it building up around the nozzle. You can let the stuff dry and then cut bits off roughly with a knife. Don't fret about getting it pristine. You will know if it needs cutting off a bit more as it won't flow out very easily.

Throw away that little bit of plastic tubing they might have included. It will pop off anyway and when you least expect or want it to.

Make sure the can is completely empty before undoing it. Clean the gun after each can. You only need a bit of a squirt out the front.

Be VERY VERY careful screwing either the can or cleaner on the gun as it can get cross-threaded if you're not careful. On the other hand you need to be determined to screw the can on as part way through the screwing in process,you're starting to break the seal and so if you're not brave and courageous you can end up getting a lot of foam all over the place.

Each time you remove either can or cleaner, double check that none of the plastic from the can/cleaner connector has snapped off and is still inside the thread of the gun. If you don't then be prepared for foam EVERYWHERE :twisted:

Remember Rule 1 - always turn the gun off fully at the end of using it. I tend to turn mine off even if I know I'm going to be using it again in a couple of minutes.

Malcolm are you sure the can is open how do I stop the foam coming out when I remove it from the gun? I had some dire warnings from Roger and Mike.
 
As I recall, the foam tin self seals if you unscrew quick and confidently.

Can any other members suggest that I may have got that wrong, please.

I had blockages from time to time, but never had a disaster.
 
Michael

If you have completely unwound the control knob and still nothing is coming out then I'm afraid you have either to throw both gun and can away and start again OR goggle and glove up, take it out into the garden and remove the can quickly. Don't think about using it again.

Then go through the cleaning regime.

Was your gun connected to a can or left unconnected ? I never do that...always have a can of foam or cleaner connected.

I was down your way this afternoon trying to find some architectural salvage places.
 
The last thing I did was to run the cleaning fluid through the gun but I removed the can.
When I fitted the new can this afternoon I opened the valve and pulled the trigger there was a short blast of gas then nothing.

I think it is going in the bin I don't want to be messing about with that stuff.

I did not know there was any architectural salvage yards down this way I did see that the Festool roadshow is coming to Aminster in June
 
That sounds like a faulty can to me, but if it isn't, cleaning the gun isn't difficult. Just take everything apart and clean off any dried foam. The critical area is the ball just under the bit where the can screws on (it's pushed up by a spring). Generally if you can get that clean and moving, then the gun will work.
 
MY63":qjl77lv3 said:
I had some dire warnings from Roger and Mike.

Surely you've realised by now that our Roger is a massive drama queen! :eusa-whistle:

I have removed cans before now, on more than one occasion, when I hadn't properly cleaned the gun before, and so long as you are confident and swift then you can remove it with minimal foam escaping, then just go in the garden and spray both can and gun down with cleaner then crack on!

It's really not that big a deal, unless you have a faulty can which doesn't self seal, which I did have once, then it all pours out. At that point you make sure you're outside on the grass when you take the can off and if it does happen then just drop it on the floor, let it do its thing, then leave it for a few hours until dry before you touch it again.

You're kind of stuck because if the foam won't come out of the gun then you need to remove it anyway, or bin the lot and start again, but that seems a real waste compared to a pair of rubber gloves and giving it a go...
 
TrimTheKing":3q9bdbl8 said:
MY63":3q9bdbl8 said:
I had some dire warnings from Roger and Mike.

Surely you've realised by now that our Roger is a massive drama queen! :eusa-whistle:

....., then it all pours out. ....

Four times over the lifetime of this project ! Wonder if Jack has managed to get it all out of his hair yet ?
 
TrimTheKing":gsy7b8q3 said:

Jack was the young labourer on our building work. He managed to get the can cross-threaded while also having the valve open. Luckily he was wearing goggles.
 
My apologies to Malcolm I should not have doubted you.
The can came off with only a small amount of foam escape which I quickly cleaned off with some cleaner.
The inner ball was stuck solid so I used an awl with a small hammer to free it cleaner goes through no problem.
My Local anesthetic has worn off although I am not allowed to use power tools or knives I am sure I am allowed to use a foam gun.
 
Nothing to exciting happening before my hospital visit for what I think is best described as routine maintenance I fitted a tarpaulin over the OSB 3 to protect it from the rain forecast for Monday.

Foam gun worked a treat and the window is sealed.

I have added an extra piece of wood to my router template as I am thinking of cutting the socket holes while the trunking is in place. As long as there is not a good reason not too I will either clamp the top piece to the trunking or put a couple of screws in to keep the template in place while I am routing.

2019-04-13_06-59-44 by my0771, on Flickr

Edit There are no wires in the trunking yet.
 
I am not very mobile at the moment but I have managed to trim the foam and today I managed to fit some trim around the inside of the window.
Looks ok to me :) I had hoped to get on with clearing everything out and painting and trying out the router jig.
I think I may order the EDPM for the roof this afternoon.
 
Yes Andy it is nice and bright with the doors open I positioned it so it would get natural light during the day I plan to work with the doors open. The far end will be in shade most of the time where I will store my leather which is light sensitive.

I am starting to think about my working areas inside my plan is to have two side benches around 600mm to 800mm wide and across the back wall 1m deep and full width for marking and cutting larger pieces.

I have two pieces of 22mm OSB from the roof that will make up this large bench I would very much like to have this open up like tower bridge and allow an industrial sewing machine to be fitted in below. I have seen a video in which Peter Parfitt made a similar type of device at 0.54 seconds

[youtube]https://youtu.be/LD9HKPAL1ZU[/youtube]
[youtube]v=LD9HKPAL1ZU[/youtube]
https://www.youtube.com/watch?v=LD9HKPAL1ZU
I hope one of these links work.

This one should ;) [youtube]LD9HKPAL1ZU[/youtube]

For the work benches themselves I am better to have independent legs all around or should I fix a beam along the wall joists and legs on the inside only I have four 1.8m posts 100mm x 100mm and two 2.4m 100mm x 100mm so I don't think I will be short of legs :)
 
Doug":2v3jr8fe said:
He certainly got excited about the parf dog :lol: :lol:
You mean his Parf dog or am I mistaken in the thought that he is the designer. :)

Thanks for the help with the lin Andy
 
I have ordered the EDPM for the roof this afternoon they recommend the thinner of the two products and only one glue the water based deck glue. As it is a smaller building it does not need to be any heavier unless there are over hanging trees that may drop a branch. So it will be here tomorrow he did say not to install it if there was likely to be an overnight frost.
 
Yesterday I started off really well cutting the holes with the router and template for the sockets.
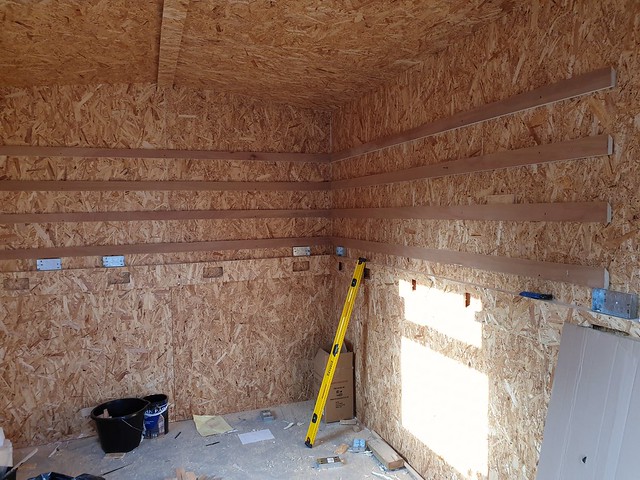
In the afternoon I wanted to paint however I had decided I liked the look of French cleats for shelving so I went off and bought a sheet of 18mm plywood to make some.

2019-04-17_07-45-16 by my0771, on Flickr

I had used my track saw for four cuts so far so this was going to be a big test it took a long time as the saw kept sticking eventually I realised that a small grub screw had worked loose on the bottom of the saw.

2019-04-18_08-24-46 by my0771, on Flickr

Everytime I tightened the screw it worked loose again so in the end I gave up.

On a positive note the EDPM arrived exactly as expected and it is not quite as heavy as I was expecting Saturday seems to be the best day to put it up.
In preperation when i was at the wood yard I bought some wood for the edging trim I think I made a mistake.
The rafters are 150mm and there is a 50mm piece on top of that to provide the air gap so I asked for something to fill that gap. When he said the only timber they had 200mm was 32mm wide I just said that will be fine.
When he had cut it and brought it out to my car I realised it was way too big like OMG that is way too big I now have some timber for my work bench :D :lol:
 
Final weather check for fitting the EDPM roof tomorrow warm day followed by w mild nights above 4 degrees any final tips or advice appreciated.
 
If you are using contact adhesive, remember contact means contact - this is NOT re-positionable at all!

It is heavier than it looks.

Let it sit on the roof for a while before gluing ie lay it out, let it rest for a while (an hour or so - it is rubber so it will expand slightly based on its weight) then roll back one half, apply glue and roll back. Let that take then do the same on the other side. Let it fully dry/glue before doing the edge trims/details.

Best of luck!
 
Thanks StevieB I did as you suggested and let the membrane settle for an hour or so before gluing it down.
When I spoke to the supplier they suggested as the roof was small contact adhesive was not required.
I have to be honest I thought the other glue was a type of PVA however when I opened it it was quite thick and smelled more like a latex glue.
This is my starting point after trimming all of the edges.

2019-04-20_06-39-12 by my0771, on Flickr

Letting the membrane settle in place.

2019-04-20_06-38-30 by my0771, on Flickr

The finished roof.

2019-04-20_06-36-43 by my0771, on Flickr

I am using stall clamps to secure the edges in place in case the wind picks up before I can fit the edging pieces.
 
Well done Michael. That's it, you're weathertight!!
 
Mike G":272sch8b said:
Well done Michael. That's it, you're weathertight!!
Thanks Mike and to everyone else who has supported me along the way I really do appreciate all of you.
I may have over done things today but thanks to sun cream at least I am not burned never though I would say that in April.
:D :D :D :D :D :D
 
Michael....that really is a cracking job :eusa-clap:

You should be justifiably proud with what you've achieved. :obscene-drinkingcheers:
 
Back
Top