• Hi all and welcome to TheWoodHaven2 brought into the 21st Century, kicking and screaming! We all have Alasdair to thank for the vast bulk of the heavy lifting to get us here, no more so than me because he's taken away a huge burden of responsibility from my shoulders and brought us to this new shiny home, with all your previous content (hopefully) still intact! Please peruse and feed back. There is still plenty to do, like changing the colour scheme, adding the banner graphic, tweaking the odd setting here and there so I have added a new thread in the 'Technical Issues, Bugs and Feature Requests' forum for you to add any issues you find, any missing settings or just anything you'd like to see added/removed from the feature set that Xenforo offers. We will get to everything over the coming weeks so please be patient, but add anything at all to the thread I mention above and we promise to get to them over the next few days/weeks/months. In the meantime, please enjoy!

Softwood bathroom cabinet w-i-p

Thanks guys.

The thing with the handles is that the rest of the bathroom has some factory made cabinets (not real wood) with similar handles. The design and proportions of this piece have to look ok next to them, as a complete room makeover ain't gonna happen. I know they're a bit kitcheny but Toolstation wouldn't sell rubbish would they, and they are practical :). And I would never have thought of the cunning magnet trick without them.

Painting will be careful diy grade with a brush, but rest assured, pics will follow on completion. This morning I am doing quite a bit of sanding and a little bit of filling in some gaps, but they're a secret, ok?
 
AndyT":3flf8pv9 said:
Thanks guys.

The thing with the handles is that the rest of the bathroom has some factory made cabinets (not real wood) with similar handles. The design and proportions of this piece have to look ok next to them, as a complete room makeover ain't gonna happen.

That makes sense then Andy. Should look very smart when it's painted and I never use filler either :eusa-liar: :D - Rob
 
SamQ aka Ah! Q!":3vtpo5u7 said:
Title shockingly badly translated from the horiginal: "G'wan, g'wan, g'wan..."

Yours, put out, Craggy Island resident.

And here I was thinking it was "Wangle" :eusa-think:
 
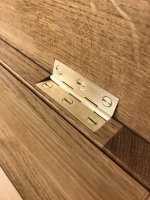
nice work Andy T, I'm making a pair of doors at the moment and found using a rod saved quite a bit of time with marking out, is there a reason you angle the hinges back like that on the doors?
 
thetyreman":1fky3nqq said:
nice work Andy T, I'm making a pair of doors at the moment and found using a rod saved quite a bit of time with marking out, is there a reason you angle the hinges back like that on the doors?
If I could chip in here. It's really quite a complex issue and depends on how you need the doors to seat relative to the frame. Andy's hinges look to have been set 'low' as I did for the lid on SWIMBO's linen chest:

IMG_4561.jpg

In this particular job, the lid had an overhang relative to the chest, so in order fit the hinges (three in this case) the top of the knuckle had to be level with the top of the side; thus it's been set in 'low'. You can see the lid overhang in the pic below so that as the lid is raised it's stopped just past vertical by the silicon rubber bumper buttons:

IMG_4563.jpg

Under normal circumstances, the dead centre of the knuckle pin is set level with the top. I loathe and detest fitting brassware at the best of times and had to make a pine mock-up of the hinging arrangement to ensure it worked - Rob

Andy; apologies for any 'stolen thunder' :D but it seemed a simple way of answering the hinging question. I hate hinges btw :D
 
The other part of the reason is to make sure there is good clearance for screw heads.
 
Mike G":r24l0sed said:
The other part of the reason is to make sure there is good clearance for screw heads.
I disagree Mike; it doesn't make any difference. Clearance for the screw heads is achieved automatically if you use the right sized screws that sit level with or just below the level of the hinge leaf. In my case (above) I had to buy a box of No.7 screws as No.8's would have been too big and fouled each other when the hinges closed - Rob
 
I set the hinges that way because I was following the step by step instructions in the excellent, often recommended Robert Wearing book, The Essential Woodworker. He says it gives a "more pleasing effect" to have the clearance gap visible as a continuous line, not interrupted by the hinges, and I think I agree.

I guess too that it's not a method much used when an electric router is used. (I think it would be possible, but you'd need some sort of ramped jig, which might only suit one size of hinge.) Even when cutting by hand, you set the back of the hinge by feel / trial rather than by measuring.

It's the first time I've used this method. I liked the way it gives you control over the amount of clearance, by making the distance that the edge of the hinge is set back. This is just a little bit (1mm) less than the distance from the edge to the centre of the pin.

Unlike Rob, I rather enjoy the careful paring etc to fit hinges. I'd hate to use my electric router for the job.

Oh and I am very happy for anyone to pitch in with comments and answers and examples. It's nice to discuss these details with people who notice them and think about them. Rob's chest is much like a cabinet turned round and getting minimum clearance is important there. I have allowed myself a bit more space for layers of paint and seasonal changes.
 
Sheffield Tony":gkx39xyd said:
Wouldn't it be easier just to adjust the countersinking a little than to hunt out obscure sized screws ?
Yes you could, but I prefer to buy the right sized screws that are recommended for the hinge. I get my brass butts from Marches and on the relevant hinge page there's a link to the correct screw size, so it becomes easy to then pop a box into the basket.

AndyT":gkx39xyd said:
Unlike Rob, I rather enjoy the careful paring etc to fit hinges. I'd hate to use my electric router for the job.

Same here Andy. I always fit my hinges using a nice sharp chisel and I suspect it's really quite awkward to make a tapered recess using a router jig so probably much quicker by hand - Rob
 
That's all well and good for quality hinges, but I use quite a lot of pressed metal hinges which don't have the thickness to properly lose the head of a screw. The ones I used yesterday on the flap of my TV cabinet couldn't be screwed in straight, because there was no access for a drill in the narrow slot. So angled screws and thin steel, and it is a fact of life that the screw heads stick out. Therefore, you've got to arrange the hinge such that the two wings are a sufficient distance apart when the door/ flap is closed that the screw heads (which are opposite each other), don't foul.
 
Mike G":2vyu6os5 said:
...I use quite a lot of pressed metal hinges which don't have the thickness to properly lose the head of a screw...
I never, ever use those horrible, nasty things on decent work. In my book they're only fit for lightweight 'cardboard' doors in new build houses :evil: and I've replaced a few of those doors as well :lol:

I recently had to replace some lightweight brass hinges on a heavy oak kitchen door I made about 15 years ago when...

fb06273a-c4af-47c9-a01a-dfff168359f1.JPG

...I couldn't work out why the door was grounding. Doh! - Rob
 
Now if you were really tight, you could get another 15 years out of those by just turning them over ha ha.
I have a box of brass countersink slot head number five's in the old style of measuring, they fit a treat on brass hinges which say screw size number six but isn’t Ian
 
Woodbloke":2a12ev42 said:
Mike G":2a12ev42 said:
...I use quite a lot of pressed metal hinges which don't have the thickness to properly lose the head of a screw...
I never, ever use those horrible, nasty things on decent work..........

I'll bear that in mind if I ever do some decent work. ;) :lol:
 
Nicely done AndyT.

And as for being able to buy it from IKEA for £30 quid... P'shaw. Yes, I've said it and I will stand by it. P'shaw.

Two comments, one wholly facetious, one only slightly so.

Brass hinges and chrome handles. There, that's over and done with.

Secondly, if you are painting the shelves, I have found with various painted bathrooms in the past that a lot of the stuff used in bathrooms doesn't react well with paint. Not that I am suggesting that you or your partner habitually bedizen yourselves with all the perfumes of Araby, but glass slips over the shelves might be an idea. Or some sort of paint that I don't know about. (There's a lot of things I don't know about, so that may be another one).
 
Tiresias":1c581qhk said:
Two comments, one wholly facetious, one only slightly so.

Brass hinges and chrome handles. There, that's over and done with.

Secondly, if you are painting the shelves, I have found with various painted bathrooms in the past that a lot of the stuff used in bathrooms doesn't react well with paint. Not that I am suggesting that you or your partner habitually bedizen yourselves with all the perfumes of Araby, but glass slips over the shelves might be an idea. Or some sort of paint that I don't know about. (There's a lot of things I don't know about, so that may be another one).

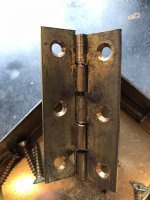
You're right of course about brass and chrome not going so well together, but I think I can live with it. There will only be a teeny bit of brass showing when the doors are closed. I was planning to clean up the hinges with emery paper but I haven't done so yet, so I could just leave them as black as they are now. That way they won't look too bad next to the bright zinc screws...

And I don't mind your warning about corrosive cosmetics, as you gave me a new word - bedizen - in return. Again, I'll take the risk! The doors have had a coat of shellac, a decent primer and a first coat of oil-based eggshell, so I think they can take it. It's going to be a while before the paint has cured enough for installation though, so you might well finish before me.
 
Lovely cabinet Andy!
Brass and silver mixed is the hight of fashion at the moment so looks like your up there with the interior designer echelon.


Sent from my Redmi Note 9S using Tapatalk
 
Tiresias":2fxdclda said:
....... "bedizen".........
......."Tiresias"

My Classic's nose is twitching. :) Not that bedizen is classic, but it's the sort of word a classic's scholar might know.
 
SamQ aka Ah! Q!":28s4dxud said:
For MikeG:

Discombobulated
Pabulum
Antidisestablishmentarianism

Culled from a mild interest in etymology...

Sam
"Are you copperbottoming my man or simply aluminiumining?" said the toff to the workman - Rob
 
AndyT":3g5umh9c said:
I set the hinges that way because I was following the step by step instructions in the excellent, often recommended Robert Wearing book, The Essential Woodworker. He says it gives a "more pleasing effect" to have the clearance gap visible as a continuous line, not interrupted by the hinges, and I think I agree.

I guess too that it's not a method much used when an electric router is used. (I think it would be possible, but you'd need some sort of ramped jig, which might only suit one size of hinge.) Even when cutting by hand, you set the back of the hinge by feel / trial rather than by measuring.

It's the first time I've used this method. I liked the way it gives you control over the amount of clearance, by making the distance that the edge of the hinge is set back. This is just a little bit (1mm) less than the distance from the edge to the centre of the pin.

Unlike Rob, I rather enjoy the careful paring etc to fit hinges. I'd hate to use my electric router for the job.

Oh and I am very happy for anyone to pitch in with comments and answers and examples. It's nice to discuss these details with people who notice them and think about them. Rob's chest is much like a cabinet turned round and getting minimum clearance is important there. I have allowed myself a bit more space for layers of paint and seasonal changes.

now that makes sense, I've been re-reading 'the essential woodworker' and forgot just how much useful info there is in there! knew I'd seen it before, I'm hanging some doors at the moment and am using the method for the first time today, I'll make a seperate post about it soon. It does look a bit classier in my opinion than the typical traditional hinging method.
 
Yes, the Wearing books are quite densely written, no waffle but plenty of step by step instructions.

I looked in the classic "Technique of Furniture Making" by Ernest Joyce yesterday and it's described in thete as the preferred method too.
 
AndyT":2xpffhkp said:
I looked in the classic "Technique of Furniture Making" by Ernest Joyce yesterday and it's described in thete as the preferred method too.
That's where I lifted my info from; there's a whole page showing how to set in a butt hinge for different applications - Rob
 
I really enjoyed and got good value out of both Joyce and Wearing, both helped me to considerably improve various techniques. Of the two I think Joyce stands out above the two Wearing books I have as the depth and breadth of content is just outstanding. If I could keep only one woodworking book that would be it.
 
memzey":306hvj9c said:
I really enjoyed and got good value out of both Joyce and Wearing, both helped me to considerably improve various techniques. Of the two I think Joyce stands out above the two Wearing books I have as the depth and breadth of content is just outstanding. If I could keep only one woodworking book that would be it.
I have a 'Lost Art Press' reprint of a Wearing book and an original, Mk1 and very battered copy of Joyce's TToFM, some bits of which (power tools etc) look very dated. The content though, remains extant (there's a good word for you Sam :D ) - Rob
 
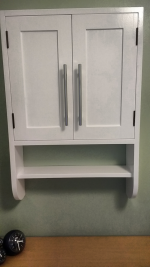
Ok, the waiting is over.
I've applied shellac, primer/undercoat and two coats of oil-based eggshell which is now hard enough to handle.
I propped it up, marked the screw positions and fitted it. The doors are on, with a full complement of screws. I had to countersink the hinges a touch more for a few of them - all on the right hand door which is much more awkward to fit than the left, for a right handed person. (Maybe a less lazy person would have fitted all the screws on all the hinges on the bench. I didn't so some of the screws must have been a degree or two off.)

But let's not dwell on the negatives, it's finished and good enough. On the handles I filed the heads of the upper screws a bit and they now grip the little magnets just enough.

Thanks to everyone here (and especially those who read part 1 as well) for all the help and advice.

I know it's nothing much for some of the experienced professionals on here but it's kept me pleasantly distracted for a while.

IMG_20201216_152143_DRO.png

IMG_20201216_153144_DRO.png
 
Don't do yourself a disservice. That is a fine piece of furniture, well made and obviously fit for purpose.
And most of us on here are not professionals. :)
 
Andyp":8on5y4vj said:
Don't do yourself a disservice. That is a fine piece of furniture, well made and obviously fit for purpose.
And most of us on here are not professionals. :)
I agree with Andy; that's a fine bit of furniture.

As an aside, a so called 'professional' gets paid for his work whereas an amateur or hobbyist (moi) don't; it has nothing whatsoever to do with the quality of work produced. This is quality work.

Here endeth the lesson :lol: - Rob
 
Proper piece of well constructed and useful furniture. Looks good, too (I'll forgive you the handles ;) :D ). Be positive about it Andy, because that's an excellent little project.
 
Thanks guys!

I'll try and find somewhere else in the house I can squeeze a project in. :)
 
If you've run out of space in your house and fancy trying a MK2, I have just the place for one like that in our downstairs loo :lol:

Good job, thanks for documenting the processes - all those photos must slow you down - and for sharing.
 
Excellent read as always Andy. Thanks for taking the time to post up. I always learn something new.
On the angled hinges... can I ask a dopey question or two?
I recently built a box with a hinged lid. I can't post any pictures but when fitting the lid I had to sink the wall side below depth of the flush lid if that makes sense. You can't see it closed but it's obvious when open that the hinges are not flush with the top of the wall/side. Seemed the only way to do it.
Before fitting the hinges I puzzled over this because they would not close parallel. ie:if you squeezed the hinge shut just the leading internal edges connected. I did look on the net but obviously not well enough!
I wish I had known about angling the hinges before finishing that project within a strict timeframe.
*Are there other ways to get around this issue (ie buy better hinges etc/better fitting methods etc)
*How do you guys fit the hinged lids perfectly? I struggled down my shed. I fitted the hinges to the lid first then tried to fit the lid to the box.
Some swearing might have been involved.
What I should have done was walk away and research a better method online first.

Double sided tape might have been an idea for this small box. I had that idea immediately after I had finished down the shed and was walking back to the house for a cider. Thanks for that brain. Ever thought of a really good answer 10 minutes too late? Yep. That.

Does anyone have any hints?
Sorry for the complexity of the phrasing but I can't post pics for a specific reason.
Longstanding WH2 guys will be able to tell that most of the newer members are pretty qualified guys. I'm the counter balance to them. Sorry. :oops:

Sorry to sabotage the thread Andy but hopefully it is relevant in a way.
Best as always
Chris
 
Chris, I'm struggling to visualise your hinge problem. A diagram (cross section) would be great. But I bet that if you can draw it, you'll be able to see what's not right.
The next step will be clear - taking more wood off, packing out below a leaf, countersinking screws a bit deeper or moving the pin position in or out.

Feel free to PM me if you can't post a picture, though you'd lose out on a bigger pool of advisers.

And for anyone here who doesn't know Chris's posts already, keep an eye open - you're bound to enjoy his sensible questions and distinctive wit.
 
If you're referring to the problem that when you close a cheap butt hinge the leaves aren't parallel, so you have to either sink one or both sides below flush with the wood or have a visible gap (which is fine on a cupboard, less so on a box lid), then the only real way to avoid it completely is to buy more expensive hinges.

The half-way mitigation would be to fit the box side of the hinge flush, and sink the lid side below, or vice versa, depending which you think will be less obtrusive.
 
Chris101":2ikmus2e said:
Before fitting the hinges I puzzled over this because they would not close parallel. ie:if you squeezed the hinge shut just the leading internal edges connected.
Chris

The leaves on the hinges should close parallel and this is the case with solid drawn brass butts. Fitting hinges is still awkward and one of the jobs I detest, but if you use good quality brassware it does make it a little easier. Not much, granted, but a little - Rob
 
AndyT":3svjbs07 said:
Chris, I'm struggling to visualise your hinge problem. A diagram (cross section) would be great. But I bet that if you can draw it, you'll be able to see what's not right.
The next step will be clear - taking more wood off, packing out below a leaf, countersinking screws a bit deeper or moving the pin position in or out.

Feel free to PM me if you can't post a picture, though you'd lose out on a bigger pool of advisers.

And for anyone here who doesn't know Chris's posts already, keep an eye open - you're bound to enjoy his sensible questions and distinctive wit.
Thanks Andy. Tbh I think Spb has it in the following answer if I'm honest. Not sure there was much I could have done. I was reasonably happy with the fitting all in all. 'Reasonably'. I'm at that stage where I'm beginning to expect more but it usually takes two goes to get it right. That's at least one go too much at the end of a project. I managed to try to hide it in plain sight reasonably well. Luckily the box wasn't the main point of the project but it would be nice to be much better at this lark!
 
spb":2jw6a6ox said:
If you're referring to the problem that when you close a cheap butt hinge the leaves aren't parallel, so you have to either sink one or both sides below flush with the wood or have a visible gap (which is fine on a cupboard, less so on a box lid), then the only real way to avoid it completely is to buy more expensive hinges.

The half-way mitigation would be to fit the box side of the hinge flush, and sink the lid side below, or vice versa, depending which you think will be less obtrusive.
Thank you. Good to know I wasn't lacking inventiveness. For this box the hinge width matched the width of the box wall so I'm fairly happy I dropped the hinge out of the wall and didn't try to equalise in the lid.
That's good. Happy with that!
 
Back
Top