• Hi all and welcome to TheWoodHaven2 brought into the 21st Century, kicking and screaming! We all have Alasdair to thank for the vast bulk of the heavy lifting to get us here, no more so than me because he's taken away a huge burden of responsibility from my shoulders and brought us to this new shiny home, with all your previous content (hopefully) still intact! Please peruse and feed back. There is still plenty to do, like changing the colour scheme, adding the banner graphic, tweaking the odd setting here and there so I have added a new thread in the 'Technical Issues, Bugs and Feature Requests' forum for you to add any issues you find, any missing settings or just anything you'd like to see added/removed from the feature set that Xenforo offers. We will get to everything over the coming weeks so please be patient, but add anything at all to the thread I mention above and we promise to get to them over the next few days/weeks/months. In the meantime, please enjoy!

Some photos of my latest metal mashing project

Dr.Al

Old Oak
Joined
Dec 31, 2020
Messages
4,011
Reaction score
2,955
Location
Dursley, Gloucestershire
Name
Al
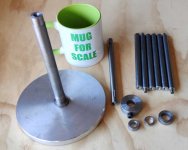
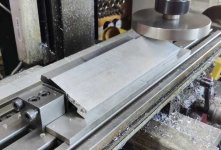
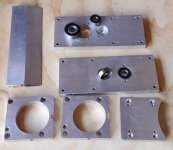
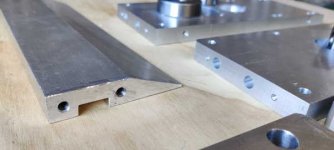
I started this last weekend and have made quite a lot of bits in the last week. I'm not going to do a build log for this one, but here's a few random photos in no particular order.

Can you guess what it is yet?

steel_gear_blank_600.jpg

round_objects_600.jpg

gear_options_600.jpg

aluminium_spacer_tubes_600.jpg

machining_ends_of_long_bars_600.jpg

machining_taper_600.jpg

aluminium_bar_bits_600.jpg

table_end_close_up_600.jpg
 
It's got a lot of gears. Probably not a clock. Some sort of CNC gizmo?
 
I can honestly say, I haven't a clue :eusa-think:

Obviously, those two brackety looking things with the curved slots bolt to the aluminium piece with the taper on it, but I can't see what it's for exactly, especially with the gears.
 
Got to admit, I've been looking at it for a bit and i still can't figure it out i see what looks like a pair of motor mounts. 2 parallel shafts and a slim taper that can move through 80 ish degrees. Half of its ali, so not stressed, therefore not a break of any kind. The two shafts suggest linear, precise movement, with Zero twist. But having said motor mount it appears theres a hand wheel.
I'm at a loss.
 
Interesting to see everyone's thinking!

I'll put you out of your "misery", but some more photos first. Here's most of the bits I've made so far put together:
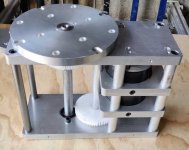
drive_assembly_standing_up_600.jpg

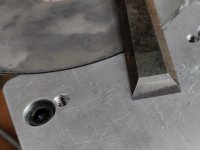
The large holes in the top plate are for magnets; the small holes either side of the central spigot (if that's the right word) are for drive dogs. The plain holes in the flat plate next to the cap screws and smaller threaded holes are for bits of steel as the aluminium in that area would wear too much.

Another view:

drive_assembly_on_side_600.jpg

This photo perhaps gives a better idea:

first_test_with_disc_fitted_600.jpg

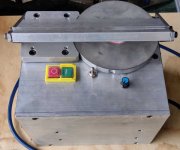
The motor runs at about 3600 rpm; the gearbox slows it down to about 400 rpm. Those discs are cheap (about £5.50 each) 152 mm diameter diamond coated steel discs (available in grits 80 to 3000), that get magnetised onto the top plate and driven by the little drive dogs (5 mm diameter steel pins in the holes I mentioned earlier in this post). It's based loosely on an idea from Stefan Gotteswinter, although using bigger discs than his and the whole thing has been designed from scratch by me

The plate with the curved side on the top is held in place with four cap screws and has four grub screws that bear on the steel inserts and, between the cap screws and the grub screws, the height and angle of the plate can be laboriously tweaked to get it level with the top of the diamond disc. The table (bottom of the last picture) will eventually be attached on the side (in one of two positions) to give a reference for grinding (slowly) at angles down to 20° (@novocaine: your assessment of the taper angle was spot on!)

The aim is that I can use it for reshaping second-hand plane blades and chisels to get an accurately square end on them. Running slowly will mean it takes a lot longer than a bench grinder, but the blade shouldn't get as hot. I hate putting plane blades and chisels on the bench grinder and I much prefer the idea of something that goes slowly and has a flat grinding surface. The groove in the table will be for a fence that helps keep everything lined up as it's plunged into the grinding disc.

The flat plate on the right of the photo, once set at the right height, is there to support a tool when you're flattening the back.

When all complete it should look something like this (although I haven't designed the bit at the bottom of this picture yet, so the whole thing is just floating above the brown-coloured power supply block at the moment):
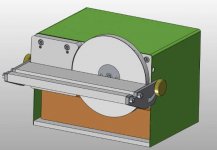
cad_model_without_bottom_detail_600.jpg

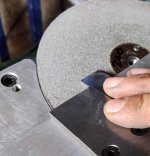
I used it to sharpen a penknife to 3000 grit last night and it worked remarkably well - a penknife doesn't need the table, so that's about as much as I can do until the table is attached. Having played with it a bit, I think it'll be most often used in the orientation shown in the first test photo above: with the disc horizontal at the top rather than vertical on the side like in the CAD model.

In theory I should also be able to use it with my Harold Hall grinding rest for accurate metalworky grindy things, although I'll probably stick to a bench grinder for anything that involves high-speed steel.
 
Brilliant! I can see you getting a few orders if you want them...
 
As soon as i saw the first picture i was kicking myself. Brilliant and nicely done Al.
 
Woodster":zrkc4ymm said:
Interesting project. I’m wondering though if a honing jig on a 12mm rod might be a better option than using a table?

https://www.axminstertools.com/axminste ... dge-105281

I’ve got a slotted table on my belt sander and it’s not bad for some jobs but I plan to make a jig like the Axminster one linked at some point for my chisels.

That's an interesting approach: I hadn't seen that before. I'm not sure what it adds over a table & fence (as long as the table can be set accurately), but I may change my mind once I've actually used my table! Still a while to go before I get to that point!

When I was designing mine I avoided the idea of basing it on a honing jig due to the potential speed it might remove metal. If it removes metal a lot quicker than hand sharpening (which I hope it will†, just a lot slower than a bench grinder), then the bevel angle changes as you sharpen if you're pivoting around a point. If you're sliding on a table it stays at the same angle as the table.

† I'm actually not that bothered if it is as slow as hand "sharpening" (shaping on a stone / w&d paper), although I suspect it'll be a lot quicker. What I really want is it to be a lot less effort than shaping by hand and a lot less heat-inducing / easy-to-mess-up than a bench grinder.
 
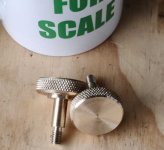
This evening I made a couple of knurled knobs:

knurled_knobs_600.jpg

They allow me to fit the table (with some washers to take the place of the cover that will eventually be between the aluminium body and the table bracket):

grinder_with_table_fitted_at_angle_600.jpg

grinder_with_table_fitted_at_90_degrees_600.jpg

I need to reduce the depth of the table, but that was expected. I'd erred on the side of too big on the premise it's a lot easier to make it smaller than bigger. At the moment it clears the disc, but only just. I'd like there to be enough room between the disc and the table to allow me to change discs (typically to a finer grit) without moving the table. It should be a very quick job at the weekend to skim a millimetre or two off the side closest to the disc.
 
Dr.Al":1th6wadr said:
That's an interesting approach: I hadn't seen that before. I'm not sure what it adds over a table & fence (as long as the table can be set accurately), but I may change my mind once I've actually used my table! Still a while to go before I get to that point!

I’m not that sure myself yet until I get round to making one. Tormek and Axminster use it though and it does seem to work very well looking at the videos I’ve seen.

[youtubessl]L4JgPh3FJng[/youtubessl]
 
It's been too hot in the workshop by the time I finished work for the last couple of weeks, but today we had some rain which brought some relief from the heat and I did a bit more on my slow speed grinder. A few bits for the base enclosure, again with dimensions chosen to fit the material I already had:

slow_speed_grinder_base_pieces_600.jpg

One of the smaller pieces will gain a lot more holes in due course as it's going to have some switches inset, but I decided to leave that for another time.
 
I admire your skills. Truly. It really puts me off doing metalwork.

When I was little I was very into guitar. Then I heard Mark Knopfler play Sultans of Swing, and realised that he was a guitarist and I was a pretender. Almost gave up.

Skilled metalwork like this has a similar effect!
 
Andyp":3ql440ia said:
Did you make detailed scaled drawings for this before you started?

I made a 3D model of it. For some of the more complicated bits (the two plates with bearings in & the motor brackets) I turned them into drawings. For the rest I just look at the size on the CAD model & work from that.

AJB Temple":3ql440ia said:
I admire your skills. Truly. It really puts me off doing metalwork.

Much as I admire all the skilled woodworkers on this forum where I feel thoroughly inept. Metalwork is mostly about trusting in the accuracy of the machines & figuring out how to hold stuff while working on it.
 
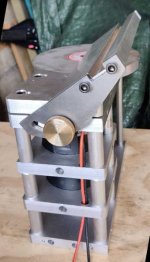
A bit more progress on the slow speed grinder today. I started by making the four pillars that hold the gearbox assembly above the electronics housing. That enabled a quick test fit:

base_pillars_fitted_600.jpg

I then put one of the plates on the mill and hogged out a load of metal to allow me to fit the switchgear.

holes_for_switch_gear_600.jpg

With hindsight, I should have thought about this a bit more (or modelled it in the CAD or something)...

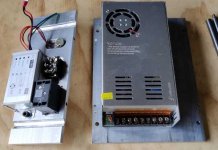
A quick test fit of the electrickery onto the plates:

initial_fit_of_electronics_600.jpg

If was at this point I remembered that the spinning disc hangs down over the bottom panel and hence would hit the potentiometer. :oops:

Back onto the mill and I drilled another hole so the pot could be fitted the other way up. I then made a little hole filler out of some aluminium round bar.

moved_hole_and_filler_piece_600.jpg

Et voila:

test_assembly_with_electronics_600.jpg

It's a bit cosy inside around the front panel, but it's not too bad:

inside_electronics_cover_600.jpg

I still haven't modified the table to give a bit more clearance and I need to make a cover before fitting the table. In the meantime, I couldn't resist a little play using the reference surface (which I'd previously adjusted to be level with the grinding disc) with a honing guide to reshape and sharpen an old chisel.

test_run_with_honing_guide_600.jpg

I had a play putting a secondary bevel on (I'm not sure why, I was just experimenting) by putting the honing guide on a steel rule. I should have picked a wider rule as I wobbled off the edge so the secondary bevel is a bit wonky, but it worked and that's the main thing:

result_of_test_run_with_honing_guide_600.jpg
 
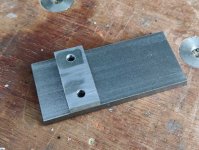
I made a simple fence out of two bits of steel.
fence_600.jpg

This runs in the groove on the table:

fence_in_place_600.jpg

Tools can be held up against the fence to make sure the end is square to the side. I recently got a chisel second hand and the end was decidedly wonky. Holding against the fence with the table set at an appropriate angle looks like this:

holding_chisel_against_fence_600.jpg

A minute or so with the grinder running and the tip doesn't even feel warm to the touch.

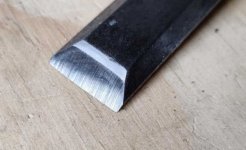
The end is square now (I've only ground it to 240 grit so far, hence all the scratch marks):

chisel_reshaped_240_grit_600.jpg

For wider tools (wider than about 50 mm), the table can be moved into the upper position to use a different part of the disc:

assembled_with_table_in_upper_position_600.jpg
 
9fingers":3aatg8y5 said:
Do you have a link for the discs please Dr Al

TIA
Bob

I got them from aliexpress. I can't remember which ones they were but I think they're all essentially the same thing, just some include postage in the base price and some are cheaper but add postage as an extra. I think I paid £5.50 each including postage, but most things on aliexpress seem to change price every few days, so you may get a better deal.

Search for "diamond grinding disc 150mm" on aliexpress and there are loads of results. A few examples:

https://www.aliexpress.com/item/1005001621486051.html

https://www.aliexpress.com/item/1005002028998281.html

https://www.aliexpress.com/item/4000160725213.html

https://www.aliexpress.com/item/1005001621486051.html

Also available on a popular auction site, e.g.

https://www.ebay.co.uk/itm/164848279971 ... SwBKxgkPKC

(There may be cheaper options on ebay - that was the first one that came up when I searched for the same thing as above).
 
9fingers":27s2hgxi said:
Thanks
I'm used to aliexpress "price of the day"

I did see some on sourcingmap but could not see the drive holes so presumed they were different.

I drilled the drive holes myself. The backing plate is just soft steel so it's very easy to drill.
 
right, so now we need your address so that the rest of us mere mortals can post our chisels to you to be sharpened...........
 
Blimey, what a project.

I wish I'd been shown a little engineering when I was a youngster, because stuff like this now seems so many miles out of reach that I don't even think about it. As always Dr Al, I applaud your skill and dedication.
 
Mike G":1yycunw5 said:
Blimey, what a project.

I wish I'd been shown a little engineering when I was a youngster, because stuff like this now seems so many miles out of reach that I don't even think about it. As always Dr Al, I applaud your skill and dedication.

Thanks Mike, much appreciated.
 
I echo those sentiments. I was sent to a grammar school so no woodwork nor metalwork classes to ignite creativity.
 
Andyp":dq9dg39e said:
I echo those sentiments. I was sent to a grammar school so no woodwork nor metalwork classes to ignite creativity.

Thanks Andy. I didn't do any metalwork of any sort until I was 33 and didn't have any tuition at all - I was just very interested in the idea and read every book on the subject and spent a lot of evenings and weekends playing around in the garage once I bought my first lathe. The situation was fairly similar with woodwork to be honest - I had done little bits and pieces of power-tool woodworkery and lots of DIY type jobs, but the first time I cut into any hardwood was last year. While I'm improving with practice, hand-tool joinery is still something that I find extremely difficult to do accurately and I'm in awe of pretty much every project anyone posts on this forum!
 
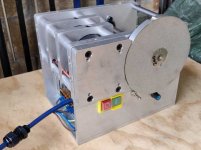
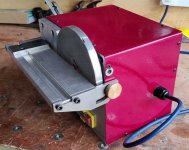
A few coats of Tractol primer & "Claret Red" paint applied with a roller over the evenings of this week and it's finished:

front_view_600.jpg

side_view_600.jpg

lying_on_back_600.jpg

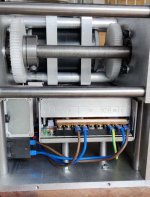
If you've been paying attention, you'll notice the switches have moved. I realised that if I put the power supply up on stilts, I could spin the front plate around and move the switches further away from the disc. That took a lot of rewiring and general mucking about, making me wish I'd thought of it before, but I got there in the end.

inside_with_raised_power_supply_600.jpg

I used it this morning to flatten the back of a 50 mm chisel and then grind the bevel square and it made the job really easy. It was a fair way off flat on the back so it would have taken a long time to sort it out by hand (this was one of the jobs that finally spurred me into making the grinder - something I'd been thinking about on-and-off for a long time). I followed that up with a #4 plane iron and again it was quick and easy (with the iron staying nice and cool). Both tools had a final touch-up on a waterstone, but that only took a few seconds given that everything was square and flat.

Now I just need to write it up for my website I guess.
 
Excellent mate, like other I wish I had the time and knowledge to work metal but alas that’s one thing that will have to wait down the long list...
 
Back
Top