
-
Hi all and welcome to TheWoodHaven2 brought into the 21st Century, kicking and screaming! We all have Alasdair to thank for the vast bulk of the heavy lifting to get us here, no more so than me because he's taken away a huge burden of responsibility from my shoulders and brought us to this new shiny home, with all your previous content (hopefully) still intact! Please peruse and feed back. There is still plenty to do, like changing the colour scheme, adding the banner graphic, tweaking the odd setting here and there so I have added a new thread in the 'Technical Issues, Bugs and Feature Requests' forum for you to add any issues you find, any missing settings or just anything you'd like to see added/removed from the feature set that Xenforo offers. We will get to everything over the coming weeks so please be patient, but add anything at all to the thread I mention above and we promise to get to them over the next few days/weeks/months. In the meantime, please enjoy!
You are using an out of date browser. It may not display this or other websites correctly.
You should upgrade or use an alternative browser.
You should upgrade or use an alternative browser.
Staircase upgrade - ...
- Thread starter RogerS
- Start date

Mike G
Petrified Pine
I've never understood how this was going to work. I think the neatest answer would be some curved (on plan) panelling down to the ground following the line of the rail, hiding the stringers in the corner. I just don't see any curved shelf, or brackets, working on straight stringers.
So panelling on the outside.......but that will still leave you an ugly problem on the inside, where you'll have straight stringers and the top of a newel post sticking inside the line of the handrail. The only thing I can think of there would be to build out a shelf from the bottom of the stairs to the top, projecting inwards from the balluster line enough to cover the corner. I think your stairs are wide enough to lose a few inches.
Hindsight and all that, but building a new staircase might have been a whole lot easier!
So panelling on the outside.......but that will still leave you an ugly problem on the inside, where you'll have straight stringers and the top of a newel post sticking inside the line of the handrail. The only thing I can think of there would be to build out a shelf from the bottom of the stairs to the top, projecting inwards from the balluster line enough to cover the corner. I think your stairs are wide enough to lose a few inches.
Hindsight and all that, but building a new staircase might have been a whole lot easier!
flying haggis
Sapling
- Joined
- Oct 1, 2019
- Messages
- 261
- Reaction score
- 2
Come on Roger you are dragging this out !....
these guys would done it in a day...
https://youtu.be/dhHhgAP4vPk
(yours is looking good though and well done for persevering and showing us all the bits that didnt go well as well as the ones that did)
I want to see more of the wall to the right of the stairs in the video as well.
these guys would done it in a day...
https://youtu.be/dhHhgAP4vPk
(yours is looking good though and well done for persevering and showing us all the bits that didnt go well as well as the ones that did)
I want to see more of the wall to the right of the stairs in the video as well.

flying haggis":2zr81qx7 said:...
I want to see more of the wall to the right of the stairs in the video as well.
Many thanks, FH. Do you mean his wall or my wall ....confused as you do mention video and I'm not sure that my wall has a lot to offer !
flying haggis
Sapling
- Joined
- Oct 1, 2019
- Messages
- 261
- Reaction score
- 2
the wall in the you tube video to the right of the staircase that we get fleeting glimpses of
flying haggis":b4c0kdm2 said:the wall in the you tube video to the right of the staircase that we get fleeting glimpses of
Ah, gotcha. Didn't think my wall had much going for it

The trouble with Stop-Go projects is that one can lose one's thought pattern and this is guaranteed to invite the CUF along 
I'd created the tangent handrailing drawing for the volute wreath....dead easy...just follow along the excellent ThisIsCarpentry feature (mentioned in earlier posts) and I'd even cut out a model from thick polystyrene foam together with a model foam volute. And it all looked good.
I've made the volute, as you know, so time to cut out the face-mould pattern and glue it to my chunk of ever-decreasing stock of walnut. So ....

I should have known better. Even the markings on the paper were screaming out to me 'This is NOT it' but I pressed on, and as soon as I'd cut it out of the lump of walnut and compared it to the polystyrene model, I could tell it was wrong.
So back to first prinicples. Rechecked my drawing and found the error (apart from not using the correct version in the first place). The centre-point for the two ellipses was in the wrong place. No wonder it didn't look right. Thing is I only now have enough walnut of that thickness to make one more wreath and if I cock up the next one then :eusa-naughty:
This is what I am aiming for

and this revised drawing looks the Dogs.

You may be wondering why and how it is up at that strange angle. Well that angle is the angle of the staircase. You cut a piece off the bottom of the timber along the line that is the bottom of the handrail. That angle on the block now gives you the right angle for the wreath to be cut to shape. The piece you cut off is glued temporarily to the underside to give it more support but I like to add a second piece further up because this is going through the bandsaw to have the sides cut along the top view of the mould and it I didn't adequately support that far end then chances are the bandsaw would snag it downwards.
So ....this extra block

I also need to fix a template to the end that will be bolted to a straight part of the handrail.
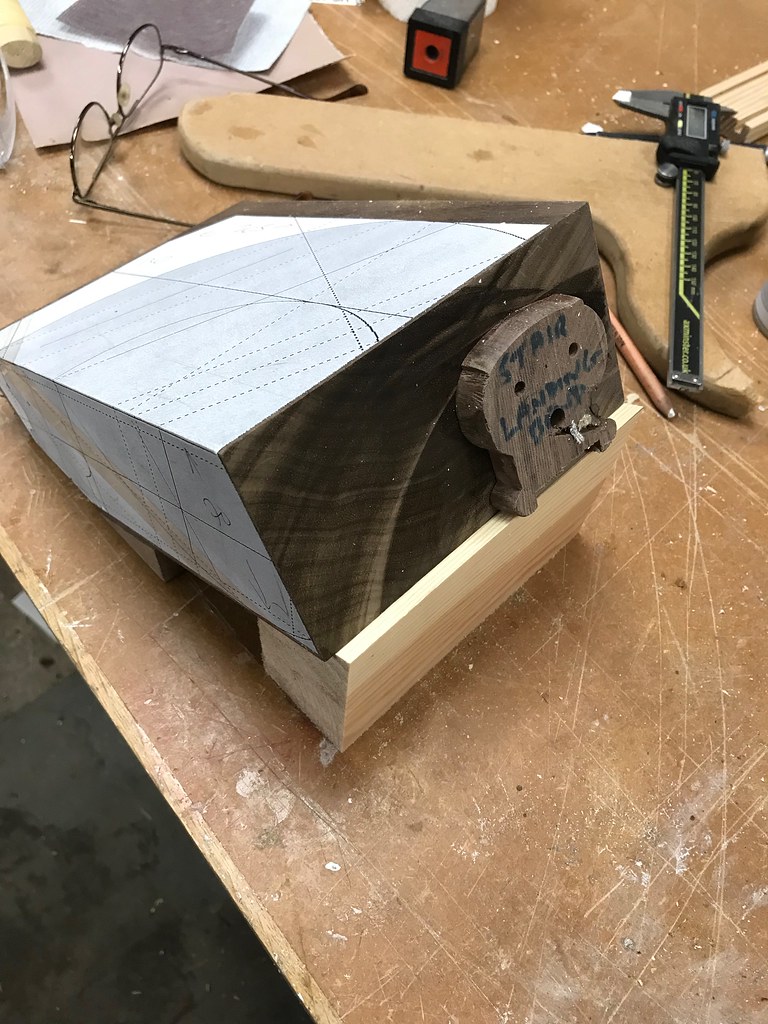
So very carefully cutting the outside line and checking it's vertical.

and the inside line
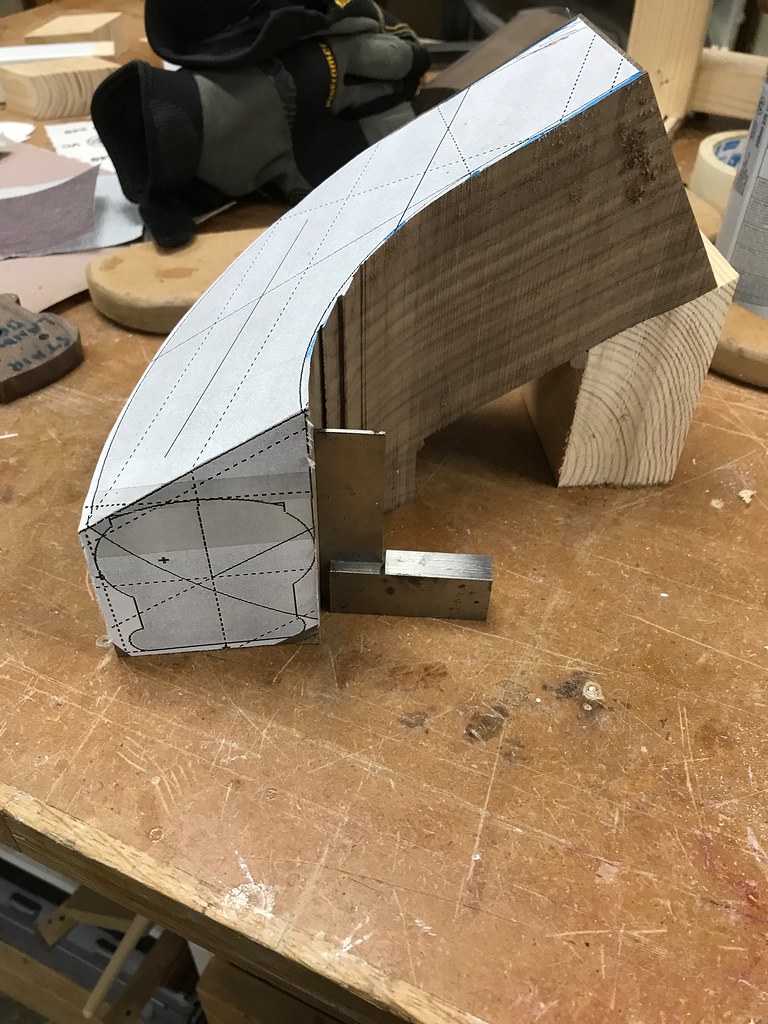
Yes, I was too lazy to put a thinner blade in the bandsaw
Offering it up to the volute....looks OK.
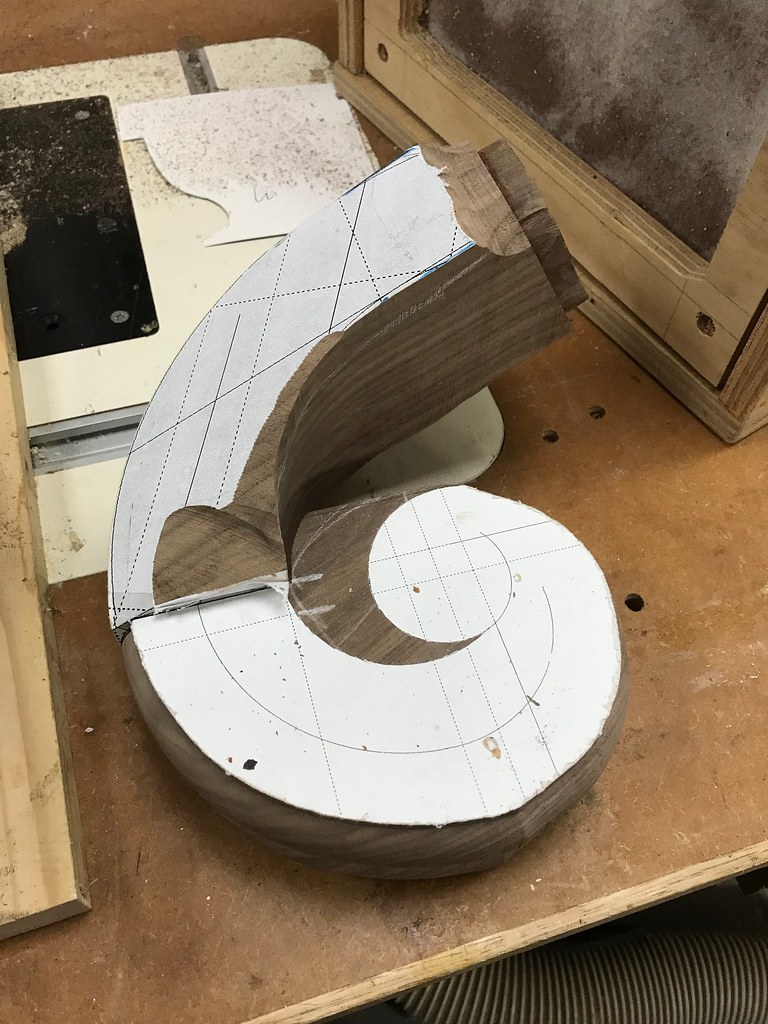
In the background of the photo, you can see my homemade Acme heavy-duty aircleaner. Just managed to buy the last pre-filter from Axminster. It's driven by a bloody great fan sucking the air through the front and is great for hoovering up all the dust from the mould when I use the Saburr Tooth burrs.
You can also see where I've started to hog off the excess on the top of the wreath.
Starting to create the actual moulding of the wreath - using a mixture of SaburrTooth burrs, Flexcut chisels in my elderly Bosch power chisel, Auriou rasps and copious sandpaper.

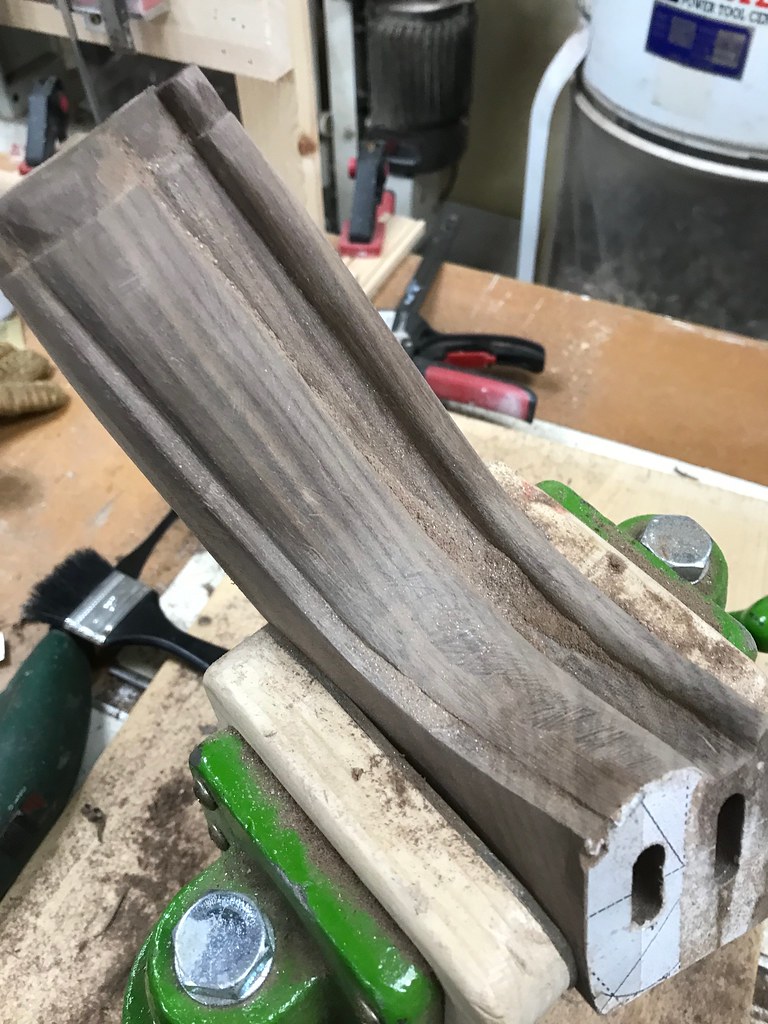
The key is to take things slowly and constantly take the wreath out of the vice, offer it up to the volute, look and feel to see if it's right.
I'm also still a beginner at cutting out the wreath in the first place. You find that parts are thicker than they should be and one of the best ways I've found to get the line is, once you've established the underside of the wreath, is to take the spindle cutter and use it to mark the line.


To be continued...
I'd created the tangent handrailing drawing for the volute wreath....dead easy...just follow along the excellent ThisIsCarpentry feature (mentioned in earlier posts) and I'd even cut out a model from thick polystyrene foam together with a model foam volute. And it all looked good.
I've made the volute, as you know, so time to cut out the face-mould pattern and glue it to my chunk of ever-decreasing stock of walnut. So ....
I should have known better. Even the markings on the paper were screaming out to me 'This is NOT it' but I pressed on, and as soon as I'd cut it out of the lump of walnut and compared it to the polystyrene model, I could tell it was wrong.
So back to first prinicples. Rechecked my drawing and found the error (apart from not using the correct version in the first place). The centre-point for the two ellipses was in the wrong place. No wonder it didn't look right. Thing is I only now have enough walnut of that thickness to make one more wreath and if I cock up the next one then :eusa-naughty:
This is what I am aiming for
and this revised drawing looks the Dogs.
You may be wondering why and how it is up at that strange angle. Well that angle is the angle of the staircase. You cut a piece off the bottom of the timber along the line that is the bottom of the handrail. That angle on the block now gives you the right angle for the wreath to be cut to shape. The piece you cut off is glued temporarily to the underside to give it more support but I like to add a second piece further up because this is going through the bandsaw to have the sides cut along the top view of the mould and it I didn't adequately support that far end then chances are the bandsaw would snag it downwards.
So ....this extra block
I also need to fix a template to the end that will be bolted to a straight part of the handrail.
So very carefully cutting the outside line and checking it's vertical.
and the inside line
Yes, I was too lazy to put a thinner blade in the bandsaw
Offering it up to the volute....looks OK.
In the background of the photo, you can see my homemade Acme heavy-duty aircleaner. Just managed to buy the last pre-filter from Axminster. It's driven by a bloody great fan sucking the air through the front and is great for hoovering up all the dust from the mould when I use the Saburr Tooth burrs.
You can also see where I've started to hog off the excess on the top of the wreath.
Starting to create the actual moulding of the wreath - using a mixture of SaburrTooth burrs, Flexcut chisels in my elderly Bosch power chisel, Auriou rasps and copious sandpaper.
The key is to take things slowly and constantly take the wreath out of the vice, offer it up to the volute, look and feel to see if it's right.
I'm also still a beginner at cutting out the wreath in the first place. You find that parts are thicker than they should be and one of the best ways I've found to get the line is, once you've established the underside of the wreath, is to take the spindle cutter and use it to mark the line.
To be continued...
Cabinetman
Sequoia
- Joined
- Oct 11, 2020
- Messages
- 5,698
- Reaction score
- 1,386
- Location
- Lincolnshire Wolds + Massachusetts
- Name
- Ian
I’m sorry to have to say it Roger but those little blocks just tell me that you started the curve too soon, and not following the line of the stringers, I seem to remember saying about two months ago to get the straight bits held in place at the right heights and then you’d be able to see what you’d need to infill between at the corners. Not sure if I didn’t say to use polystyrene to mock it up with. Ian
Ian, it's not a question of 'stating the turn too early'. Early on in the project when I was struggling with tangent handrailing drawing, I tried your approach. It failed miserably and the end result looked clunky and awkward and definitely didn't 'flow' as a proper wreath would.
The flow of the wreath is the be-all-and-end-all. Sacrosanct and we can live with a few corbels.
The flow of the wreath is the be-all-and-end-all. Sacrosanct and we can live with a few corbels.
Cabinetman
Sequoia
- Joined
- Oct 11, 2020
- Messages
- 5,698
- Reaction score
- 1,386
- Location
- Lincolnshire Wolds + Massachusetts
- Name
- Ian
Oh well, you obviously know best, but I couldn’t live with those blocks, I’ll leave you to it.


- Joined
- Jul 21, 2014
- Messages
- 10,414
- Reaction score
- 165
And there was I expecting to see you or LOYL sliding down the banister as a finale..... :lol:
Excellent result.
Bob
Excellent result.
Bob

A long time ago in a house far far away...
Well done Roger.
Well done Roger.

Phil
Old Oak
Agree with the previous posts, nice job Rog, you must be very chuffed :eusa-clap: 
So what will you now be doing with all that spare time? :lol:
So what will you now be doing with all that spare time? :lol:
Phil":1s0ntu7b said:Agree with the previous posts, nice job Rog, you must be very chuffed :eusa-clap:
So what will you now be doing with all that spare time? :lol:
What is this thing called "spare time " ? :eusa-think:
Next up ...

I thought next up was the bridge.
Doug71":3dnxpz52 said:Only just seen the finished handrail video, well done for seeing it through, great job :eusa-clap:
Much appreciated, Doug. Thank you and also to everyone else who's supported me throughout the endeavour.

Malc2098
Sequoia
RogerS":2wndraxi said:[youtubessl]xOuDKlRcaMM[/youtubessl]
Being on a Mac, I eventually found it by putting xOuDKlRcaMM into the YT search function.
Nice, Roger. Good for you, and you did all yourself!