• Hi all and welcome to TheWoodHaven2 brought into the 21st Century, kicking and screaming! We all have Alasdair to thank for the vast bulk of the heavy lifting to get us here, no more so than me because he's taken away a huge burden of responsibility from my shoulders and brought us to this new shiny home, with all your previous content (hopefully) still intact! Please peruse and feed back. There is still plenty to do, like changing the colour scheme, adding the banner graphic, tweaking the odd setting here and there so I have added a new thread in the 'Technical Issues, Bugs and Feature Requests' forum for you to add any issues you find, any missing settings or just anything you'd like to see added/removed from the feature set that Xenforo offers. We will get to everything over the coming weeks so please be patient, but add anything at all to the thread I mention above and we promise to get to them over the next few days/weeks/months. In the meantime, please enjoy!

Standing desk

woodstalker

Nordic Pine
Joined
Apr 16, 2016
Messages
629
Reaction score
33
Location
Amesbury, Wiltshire
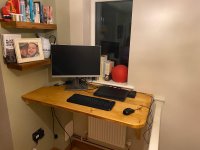
Whilst in lockdown both Mrs Woodstalker and I are working from home, i have been at a desk in the spare room and she has been working at the dining table.

Now i have evicted her to finish surfacing it i needed to sort out an office space for her. She wanted a standing desk and selected a little knock at the top of the stairs to the basement which is an unused space with a little window giving a view down the garden.

I don't have much decent working material to hand but i did have some scaffold boards i had left from a different project in the garden. They had dried right out but two thirds were really badly twisted and i had three that were quite cupped to work with.

the brief from the "client" was not too lose too much of the character of the boards so i took the worst of the cup out to use on the top surface with my new planer/thicknesser and then flattened the bottom completely.

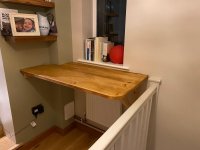
I joined the edges coming together and used a new biscuit joiner to help with the alignment before sanding it to 120 grit and getting after the joins with a cabinet scraper. I finished the top with the same Fiddes Antique Brown wax. Unfortunately the wood was very white to start with so the finish was quite yellow and there was no way to go back and add a stain (if i had one) to darken the wood first. So in the end i used some dark brown boot polish mixed with some thinners and more of the Fiddes wax as the next coat and this seemed to darken it enough for the client and buffed up quite nicely i think.

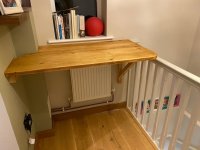
I was a bit worried about the radiator underneath causing the timber to move too much so i have added a couple of cross braces underneath and will see how it holds up.

I fixed it to the wall with a couple of horizontal timbers on the two walls and made a bracket for the hanging end rather than fashion some sort of spindly leg. So far it has not fallen off the wall and the client seems happy with it but she is threatening to get her paint brush out on the supports underneath. Certainly not a masterpiece but at the end of the day the client is happy which makes me happy.
IMG_1289.JPG
IMG_1290.JPG
IMG_1291.JPG
 
Looks great, and the client likes it. What more can you ask?

Glad you got away with it on your new planer thicknesser, but old scaffold boards can be lethal for them. I'd be cautious about doing that again, personally. It's not just the big stones and nails.....it's the grit that gets walked into the surface on building sites, as well as metal and stuff from angle grinder work.
 
Mike G":2y23z3zz said:
Looks great, and the client likes it. What more can you ask?

Glad you got away with it on your new planer thicknesser, but old scaffold boards can be lethal for them. I'd be cautious about doing that again, personally. It's not just the big stones and nails.....it's the grit that gets walked into the surface on building sites, as well as metal and stuff from angle grinder work.

Cheers Mike, the boards were bought new for a project so were in good shape with no metal bits and the like. It was the old railway sleeper I ran over the surface planer that knackered the blades. It looked really clear but there was tiny bits of grit in the cracks. That’s what you get for rushing to get something finished without thinking it through quickly. Luckily the blades were reversible and worked fine in these boards plus I got to practise how to change and set them.
 
Nice, you would never have guessed it started out as something as cheap and nasty as scaffolding boards, and the client gets to keep warm, a radiator under the desk, not daft your Mrs!
 
I would suggest a row of 1" holes along the back edge to allow the radiator heat to escape. the underside of that shelf is going to get so hot the finish will suffer, while that window is going to get so cold that it will be covered in condensation. Add a little upstand around the row of holes so that books and equipment dont get left over the holes. 8-)
 
sunnybob":3pdotfl5 said:
I would suggest a row of 1" holes along the back edge to allow the radiator heat to escape. the underside of that shelf is going to get so hot the finish will suffer, while that window is going to get so cold that it will be covered in condensation. Add a little upstand around the row of holes so that books and equipment dont get left over the holes. 8-)

Thanks Bob that’s a good idea.
 
sunnybob":2w108kgj said:
I would suggest a row of 1" holes along the back edge to allow the radiator heat to escape. the underside of that shelf is going to get so hot the finish will suffer, while that window is going to get so cold that it will be covered in condensation. Add a little upstand around the row of holes so that books and equipment dont get left over the holes. 8-)
I'd even go further than SB's excellent idea; I would machine out a long, wide slot at least the width of the rad; say 500 x 75mm and then insert mesh of some sort so that it's flush with the surface of the desk. Virtually all the heat produced by the rad is going to be absorbed by the desk with very little being received by the window. This is an example...

https://www.ebay.co.uk/itm/Stainless-St ... SwabhUU2Bg

...from EvilBay but there are plenty more - Rob
 
Woodbloke":3c7675dg said:
sunnybob":3c7675dg said:
I would suggest a row of 1" holes along the back edge to allow the radiator heat to escape. the underside of that shelf is going to get so hot the finish will suffer, while that window is going to get so cold that it will be covered in condensation. Add a little upstand around the row of holes so that books and equipment dont get left over the holes. 8-)
I'd even go further than SB's excellent idea; I would machine out a long, wide slot at least the width of the rad; say 500 x 75mm and then insert mesh of some sort so that it's flush with the surface of the desk. Virtually all the heat produced by the rad is going to be absorbed by the desk with very little being received by the window. This is an example...

https://www.ebay.co.uk/itm/Stainless-St ... SwabhUU2Bg

...from EvilBay but there are plenty more - Rob

Ah yes that’s a good idea too. Have some fine stainless mesh from another project. Any suggestions how to finish the edge of the mesh to make it look neat and hold it in place? I thought to rebate the edge of the slot to accept the mesh but can’t think of the best way to fix it in place; maybe some small battens flush with the surface?
 
If you put holes or mesh flush with the surface, the desk top clutter WILL be pushed back over them and block the vents, rendering them useless.
If you dont install an upstand, you will be wasting your time.
 
woodstalker":380d2cgk said:
Ah yes that’s a good idea too. Have some fine stainless mesh from another project. Any suggestions how to finish the edge of the mesh to make it look neat and hold it in place? I thought to rebate the edge of the slot to accept the mesh but can’t think of the best way to fix it in place; maybe some small battens flush with the surface?
I would drop the mesh into a shallow, say 10 or 12mm wide rebate and then screw in four mitred 'glazing' bars on top to hold it in place. These don't need to be very thick, say 3 or 4mm so the mesh wouldn't quite be level with the desk top, but if you were to use some nice, c/s screws with polished heads that were 'clocked' as they were driven in and finished off, the effect would be quite pleasing.

sunnybob":380d2cgk said:
If you dont install an upstand, you will be wasting your time.

SB is again spot on, you need to fit an 'upstand' (doesn't need to be very high, say 15mm) to stop 'stuff' from falling on top of the mesh and blocking it - Rob
 
That's just the sort of practical project to show the positive benefits from having the tools, materials and skills available. There must be so many people stuck in a helpless state where they couldn't do that for themselves or find or afford someone to do it for them. Well done.
 
Cheers Rob, I’ll have a look at what I have and factor in an upstand (thanks Sunnybob).

Thank you for the kind comment AndyT, it’s the reason I started hacking bits of wood apart and nailing them together. Loads of little projects (and some big ones) that I want to do round the house. These little projects are teaching me lots plus all the great advice I get on here.
 
Another option, depending on your aesthetic preferences, would be to integrate the two together - have Rob's glazing bars themselves stand proud of the surface to provide the function of the upstand at the same time.
 
spb":2tawwcew said:
Another option, depending on your aesthetic preferences, would be to integrate the two together - have Rob's glazing bars themselves stand proud of the surface to provide the function of the upstand at the same time.
Yep, that could be done as well if there were a small, very shallow rebate machined on the inside to accommodate the thickness of the mesh - Rob
 
Nico Adie":kgiz43n0 said:
Looks great, I actually really like the finish.

Thanks Nico, it’s come out to the satisfaction of the client so that’s a relief! She starts using it tomorrow; cue it coming off the wall and the finish staining her hands! :D
 
Back
Top