
Woodbloke
Sequoia
Cheek to cheek comparison? :lol: :lol: - RobMalc2098":22knef2b said:This is only an estimate guess, Rob, but I reckon the model's bum is smaller than yours. :?

Cheek to cheek comparison? :lol: :lol: - RobMalc2098":22knef2b said:This is only an estimate guess, Rob, but I reckon the model's bum is smaller than yours. :?
Front to back depth of the seat is 350mm which in old money equates to about 14'', but to the point on the seat rest where it touches the small of the back it's about 340mm. Width is 370mm but the profile is tapered, so that's across the middle; big enough for my ar$e and that skinny model's :lol: :lol: (but not at the same time :lol: )Malc2098":7l5w8aak said:I can remember a time in my former job where the official minimum European bum size for fitting seats in the back of a van was 14".

Jonathan":7l5w8aak said:Rob (woodbloke).....nice chair.....would I of met you at a Festool roadshow in Malaga?....if its not you.....you look like the guy I met.
Jonathan
Sent from my SM-J530F using Tapatalk
 it might have been me, but again doubtful- Rob
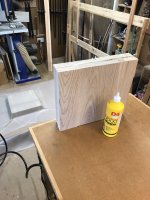

Are you the planing the outside edges of the ash (and especially "knocking" the outside corners off the “cube”) before putting it in the vacuum bag – to minimise the risk of damage to the "expensive" bag?Woodbloke":1ep87mo6 said:The first chunk of ash for a seat is out the bag...
No need as the job goes inside a large 125 micron thick ordinary plastic bag (prevents the base board being covered in 'squeeze out'), then there's a layer of 600 micron offcuts on top before the main bag itself (again 600 micron), so there's 725 microns of plastic protecting the main polyurethane (not vinyl) bag - RobSimon_M":1ovks1if said:Are you the planing the outside edges of the ash (and especially "knocking" the outside corners off the “cube”) before putting it in the vacuum bag – to minimise the risk of damage to the "expensive" bag?Woodbloke":1ovks1if said:The first chunk of ash for a seat is out the bag...
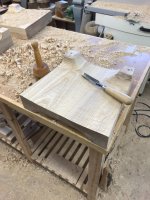 Even so, this ash is incredibly tough and difficult to sculpt; I'm going to use a selection of Saburr rotary burrs on the fiddly bits round the backrest as it's definitely the easiest way of doing the shaping.
Thanks Malc, but you wouldn't Adam n'Eve how tough that ash is to carve. Brilliant for all sorts of stuff but carving and sculpting ain't one (or two) of them - RobMalc2098":j65nbahv said:Loving how the grain shows on that ash.

Woodbloke":3rpmu4u6 said:Thanks Malc, but you wouldn't Adam n'Eve how tough that ash is to carve. Brilliant for all sorts of stuff but carving and sculpting ain't one (or two) of them - RobMalc2098":3rpmu4u6 said:Loving how the grain shows on that ash.


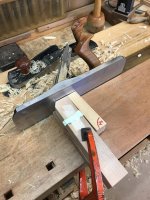
I've thought about that but those tubes are pretty robust and I've never broken one when it's been clonked with a big lump of wood as the whole assembly just moves out the way - RobMalc2098":2jjxzmst said:I'd swap that tube light for a couple of LED panels. Give you more headroom.
:eusa-whistle: 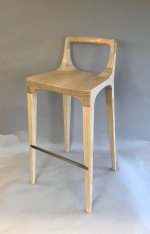
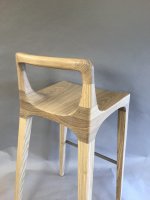
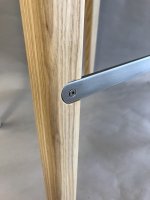


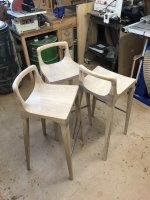


DaveL":3s05mmkr said:Very curvy!
I guess it was all hand sanded, makes for strong arms and thin fingerprints.
 Initial sanding was done with a 40g(!) flap wheel on the angle grinder, then 80g Abranet on the ROS. The interior curves on the legs were sanded with belts on a pump -up Kirjes sanding system from CHT and then it was progressively sanding down through the grits to 320. ) ash being a ring-porous timber was entirely the wrong choice! There are bands of alternate hard and softer grain where the paper tended to 'dig in' so forming a 'wavy' profile in places. It was extremely difficult to carve and even more difficult to sand. The original was made in tighter grained beech (diffuse porous) so it would have been much easier to produce and sand. Were I in the very unlikely event to make another, I'd probably go for a soft maple or sycamore. It's too wasteful to use something like Walnut as an awful lot ends up on the floor as chippings and the rest coats every conceivable 'crook and nanny' in the 'shop with dust when it's sanded.
Coley":1g7swui6 said:Woodwork is spot on, the metal as much as its trying to look part of the project looks an after thought tbh. Difficult job to fulfill and I think you're done the best you could.
Sent from my SM-G960F using Tapatalk
- Rob
Woodbloke":v2vag7ca said:I put a few pics on Instagram last night and almost instantly somebody wanted to buy them, which left me feeling chuffed

You can do the production run Bob as I've had enough of bloody sanding :lol: I suppose, yes, a wooden footrest could be designed in but it would still wear rapidly so it would need to capped on the bearing surface with something like a strip of stainless. At the time No.1 son requested footie rests the front legs had already been epoxied in place, so it was a bit late - Rob9fingers":1d85mk5z said:You could start up a small production run and design in a wooden foot rest? :lol:
Bob
Andyp":2fy2eeat said:Ah, I see and FB?

Andyp":1z7a1chn said:Ah, I see and FB?

 bscene-drinkingcheers:
RogerS":f5v9nvth said:Andyp":f5v9nvth said:Ah, I see and FB?

[emoji2960][emoji23]RogerS":3iedox16 said:Surely easier just to reduce the length of the legs ? :eusa-whistle:
RogerS":2va3i6bf said:Surely easier just to reduce the length of the legs ? :eusa-whistle:
Coley":3ngnnlpx said:Regarding the holes, I thought epoxy maintained its strength even if gappy? Would a slot in the joining dowel allowed the epoxy to escape? I wonder if the footrest may have looked better on the back of the legs or better still morticed inbetween?
Sent from my SM-G960F using Tapatalk
. If they were morticed in between, the assembly of the front legs would have been a nightmare; it was bad enough as it was.Mike G":3ngnnlpx said:Lovely, lovely stools.............except for that footrest, I'm afraid.
Fair enough, that's doable, but I chose to make some little 'oles. To be fair, once you see the stools 'in the wood" you don't really notice the holes as they appear to be highlighted by the pics - RobColey":bmphr1qc said:A grinder in threaded bar would have made light work of making a groove length ways. The sheer quality is obvious to anyone but I have to query the addition of 'woodworm' holes when an alternative was easy to achieve? They look fantastic regardless [emoji6]
Sent from my SM-G960F using Tapatalk
