
-
Hi all and welcome to TheWoodHaven2 brought into the 21st Century, kicking and screaming! We all have Alasdair to thank for the vast bulk of the heavy lifting to get us here, no more so than me because he's taken away a huge burden of responsibility from my shoulders and brought us to this new shiny home, with all your previous content (hopefully) still intact! Please peruse and feed back. There is still plenty to do, like changing the colour scheme, adding the banner graphic, tweaking the odd setting here and there so I have added a new thread in the 'Technical Issues, Bugs and Feature Requests' forum for you to add any issues you find, any missing settings or just anything you'd like to see added/removed from the feature set that Xenforo offers. We will get to everything over the coming weeks so please be patient, but add anything at all to the thread I mention above and we promise to get to them over the next few days/weeks/months. In the meantime, please enjoy!
You are using an out of date browser. It may not display this or other websites correctly.
You should upgrade or use an alternative browser.
You should upgrade or use an alternative browser.
Tez's Workshop Build
- Thread starter tabs
- Start date
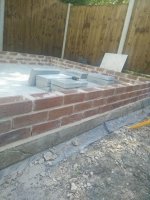

I've got the straps on now and will take and post some more pics tomorrow. I've measured up again and do need to do some fettling with the blocks to get totally accurate square.
My measurements on outside dimensions are 441 length(both came within a couple of mm of that) and 276 on the width, one width was slightly shorter at 274.5 mm though.
On my diagonals I have got a 45mm difference though and am wondering how much of this is due to the slight difference in the widths and how much to the bricks not being perfect and how much to it being slighty out of square?
I've done a quick calc using the Cos Rule and assuming it is all due to being slightly out of square and I get one of the 90 degree angles opposite a diagonal I've measured to actually come 90.3 degrees by calculation.
As I said I can use the blocks to improve this but how bad is this sort of error on a 4.4m by 2.8m ish building?
My measurements on outside dimensions are 441 length(both came within a couple of mm of that) and 276 on the width, one width was slightly shorter at 274.5 mm though.
On my diagonals I have got a 45mm difference though and am wondering how much of this is due to the slight difference in the widths and how much to the bricks not being perfect and how much to it being slighty out of square?
I've done a quick calc using the Cos Rule and assuming it is all due to being slightly out of square and I get one of the 90 degree angles opposite a diagonal I've measured to actually come 90.3 degrees by calculation.
As I said I can use the blocks to improve this but how bad is this sort of error on a 4.4m by 2.8m ish building?

Mike G
Petrified Pine
The difference in measurements between the short ends of the building is trivial, and contributes less than 1mm of the 45mm diagonal difference. I wouldn't even record that on a building survey, where I typically work to the nearest 5mm (ie +or- 2.5mm). Your 45mm difference shows a setting out error: you have a parallelogram.
I wouldn't correct it. If this was a kitchen or bathroom, where having right angle corners is important for fitting stuff in, then yeah, it'd be worth taking some action, but in a workshop? I really can't see what difference it is going to make. If you start trying to have different width plinth walls to correct it, you'll end up with ugly detail differences along those plinths externally, and that could turn into a real pain. Nothing about the superstructure is made more difficult by having non-square corners.
I wouldn't correct it. If this was a kitchen or bathroom, where having right angle corners is important for fitting stuff in, then yeah, it'd be worth taking some action, but in a workshop? I really can't see what difference it is going to make. If you start trying to have different width plinth walls to correct it, you'll end up with ugly detail differences along those plinths externally, and that could turn into a real pain. Nothing about the superstructure is made more difficult by having non-square corners.
Trying to work out a cutting list so I know how much wood to buy.
I'm going for a single pitched roof and have tried to find an online calculator but to no avail. I'm thinking 6 by 2s at 600mm centres would be ok? The width it would be covering is 2.4m. Are there any guides anywhere that show what the details are of building a single pitched roof? For example details at either end?
I'm also considering making it a green roof eventually ( apparently you start with a layer of EPDM anyway so green part of it does not need install straight away) so in that case there would be extra weight.The websites say around 60-80kg per sq m for the type I'm considering, in this case could someone point me to a website or document that would allow me to do the calculations.
I'm going for a single pitched roof and have tried to find an online calculator but to no avail. I'm thinking 6 by 2s at 600mm centres would be ok? The width it would be covering is 2.4m. Are there any guides anywhere that show what the details are of building a single pitched roof? For example details at either end?
I'm also considering making it a green roof eventually ( apparently you start with a layer of EPDM anyway so green part of it does not need install straight away) so in that case there would be extra weight.The websites say around 60-80kg per sq m for the type I'm considering, in this case could someone point me to a website or document that would allow me to do the calculations.

Malc2098
Sequoia
Not sure of this one helps, but it has slider bars to change the angle and the overhang.
https://www.blocklayer.com/roof/rafter.aspx
https://www.blocklayer.com/roof/rafter.aspx
Thanks Malcolm, will take a look. I've found a site that gives joist sizes for flat roofs which is near enough what I will be doing.It says 50x150mm at 600mm centres will do a span of upto 2.97m so will do my 2.4 span easily. Just need to find out now whether this would support a green roof of 60-100kg per sq m.
Malc2098
Sequoia
Sorted, it seems!
From the net --- C24 graded Premium structural timber is a stronger, more demanding grade and has fewer/smaller knots than C16. C24 is best used where higher loads or wider spans are required. C24 will carry a higher point load than C16 grade.
From the net --- C24 graded Premium structural timber is a stronger, more demanding grade and has fewer/smaller knots than C16. C24 is best used where higher loads or wider spans are required. C24 will carry a higher point load than C16 grade.

- Joined
- Jul 21, 2014
- Messages
- 10,414
- Reaction score
- 165
I reckon if you use the tables for floor joists, they will be more than enough for your green roof.tabs":2c7v5bvz said:Thanks Malcolm, will take a look. I've found a site that gives joist sizes for flat roofs which is near enough what I will be doing.It says 50x150mm at 600mm centres will do a span of upto 2.97m so will do my 2.4 span easily. Just need to find out now whether this would support a green roof of 60-100kg per sq m.
I would never use a green roof personally but everyone to their own

Bob
9fingers":3a328kib said:I reckon if you use the tables for floor joists, they will be more than enough for your green roof.tabs":3a328kib said:Thanks Malcolm, will take a look. I've found a site that gives joist sizes for flat roofs which is near enough what I will be doing.It says 50x150mm at 600mm centres will do a span of upto 2.97m so will do my 2.4 span easily. Just need to find out now whether this would support a green roof of 60-100kg per sq m.
I would never use a green roof personally but everyone to their own
Bob
Thanks Bob, hadn't thought of it that way! OF course floor joists are carrying a lot of weight!!
Malc2098":2pmxy0rn said:Sorted, it seems!
From the net --- C24 graded Premium structural timber is a stronger, more demanding grade and has fewer/smaller knots than C16. C24 is best used where higher loads or wider spans are required. C24 will carry a higher point load than C16 grade.
Cheers will see if I can get some tanalised C24.

will1983
New Shoots
tabs":397sb4gh said:Malc2098":397sb4gh said:Sorted, it seems!
From the net --- C24 graded Premium structural timber is a stronger, more demanding grade and has fewer/smaller knots than C16. C24 is best used where higher loads or wider spans are required. C24 will carry a higher point load than C16 grade.
Cheers will see if I can get some tanalised C24.
Tabs do a cost comparison against using C16 at smaller centres. You may find it is cheaper to use more C16 joists than fewer C24 ones. Also remember that the joist centres will need to work with the sheeting dimensions so the joints are fully supported (remember to research the 1220x2440 / 1200x2400 difference from the supplier).
Will
Now onto making decision on cladding.Going for horizontal featheredge.
First up what sort of timber?
Cedar, Larch or Douglas Fir
I'm thinking about going for 200mm width to speed up installation and because i kind of like the look of a wider board.
Green or Air Dried?
I'm going to do some reading on the pros and cons of all these choices but am interested in the input of you guys who have experience in this. Cheers.
Rough calculation I need to cover about 26 sq m
First up what sort of timber?
Cedar, Larch or Douglas Fir
I'm thinking about going for 200mm width to speed up installation and because i kind of like the look of a wider board.
Green or Air Dried?
I'm going to do some reading on the pros and cons of all these choices but am interested in the input of you guys who have experience in this. Cheers.
Rough calculation I need to cover about 26 sq m
Oh , also looking for recommendations for suppliers . The one I've been looking at to get rough idea of cost says they use pallet couriers so is going to be no good as I assume that means I would need a truck to unload
- Joined
- Jul 21, 2014
- Messages
- 10,414
- Reaction score
- 165
tabs":34noqz3l said:Oh , also looking for recommendations for suppliers . The one I've been looking at to get rough idea of cost says they use pallet couriers so is going to be no good as I assume that means I would need a truck to unload
Not necessarily. You sometimes see wagons going around with their own forklift carried on the back so those can unload themselves.
Bob

tabs":1r00knwi said:Oh , also looking for recommendations for suppliers . The one I've been looking at to get rough idea of cost says they use pallet couriers so is going to be no good as I assume that means I would need a truck to unload
I unloaded 3 tonnes of oak flooring from the back of one lorry. Nothing to it
Personally I hate the smell of Douglas Fir and it makes me gag.
Malc2098
Sequoia
I got mine from the second nearest sawmills. (The first couldn't make the order).
I saw the log it was going to be cut from and they delivered.
It was Douglas Fir and it didn't make me gag.
It was green, and I painted it all fours sides with diluted Bedec barn paint and the three exposed sides with two coats of barn paint.
I saw the log it was going to be cut from and they delivered.
It was Douglas Fir and it didn't make me gag.
It was green, and I painted it all fours sides with diluted Bedec barn paint and the three exposed sides with two coats of barn paint.
Still slow progress but have settled on a supplier for my cladding. ITs a local timber yard just up the road and so I won't be charged delivery. I've placed the order, they ship in Russian Larch and will cut 200mm featheredge boards themselves. I've yet to decide on dimensions of corner and window trims but though maybe 4x1? Its coming to about 30 sq m and will be just over £300.
I've got the frame up now and will post pictures this week.
I've a couple of queries.
1)I'm in the process now of cutting rafters for my single pitched roof and have decided on exposed rafter feet with a japanese shape.I'd also like to have exposed rafters inside the shed so am considering putting sheets of 50mm celotex on top of the OSB roofing sheets, ficxing these with screws and big washers and then using EPDM over this. I thought this would also have the advantages of being quicker to put the roof insulation on and reducing cost as I would not have to use OSB over the inside ceiling. Can anyone see any drawbacks with me using this method.
2) What size screws should I use to fix the OSB roofing sheets? Also can I screw(and with what size) or should I nail the rafters on to the plate?
Thanks
I've got the frame up now and will post pictures this week.
I've a couple of queries.
1)I'm in the process now of cutting rafters for my single pitched roof and have decided on exposed rafter feet with a japanese shape.I'd also like to have exposed rafters inside the shed so am considering putting sheets of 50mm celotex on top of the OSB roofing sheets, ficxing these with screws and big washers and then using EPDM over this. I thought this would also have the advantages of being quicker to put the roof insulation on and reducing cost as I would not have to use OSB over the inside ceiling. Can anyone see any drawbacks with me using this method.
2) What size screws should I use to fix the OSB roofing sheets? Also can I screw(and with what size) or should I nail the rafters on to the plate?
Thanks
Coolhands
New Shoots
I've lately decided not to use EPDM which I was going to use (I was all keen on it) as over time the lines between boards can show through apparently. If you're going to use it over sheets (and screws with washers) I think they will end up being visible which may look ugly. I'm now thinking I might use GRP system like 'Cure-it'.
Also you will need a vapour control layer between insulation and boards if you use ply etc I believe (from reading, not experience) if you do this arrangement of roof.
Also you will need a vapour control layer between insulation and boards if you use ply etc I believe (from reading, not experience) if you do this arrangement of roof.
Coolhands":2k83jzb6 said:I... I'm now thinking I might use GRP system like 'Cure-it'.
.....
You might also like to look at East Coast Fibreglass Supplies for alternative prices. I've used them in the past and they are excellent. Currently have four boxes of GRP stuff from them waiting for the orangerie roof.
Thanks for the response guys. I need to do more research on the EPDM. I did think of of GRP but decided it needed a bit more skill and knowledge than the EPDM but I will take another look at it?
With regard to gaps between boards showing up I was going to fill them with some flexible filler which will still allow expansion of the boards, but if I went with insulation on top of the boards it wouldn't be an issue. As you mentioned though the screws/washers may show up but I'm hoping if I user a thicker EPDM it will not be too bad and also with my roof being at an angle of less than 10 degrees it won't be in view.
With regard to gaps between boards showing up I was going to fill them with some flexible filler which will still allow expansion of the boards, but if I went with insulation on top of the boards it wouldn't be an issue. As you mentioned though the screws/washers may show up but I'm hoping if I user a thicker EPDM it will not be too bad and also with my roof being at an angle of less than 10 degrees it won't be in view.
I've done a fair amount of work on my workshop but just not had time or had the technology(computer and internet problems ) to post when I needed to.
So here is an update of how I have progressed

As can be seen my slab retains a small lake after rain! Obviously not quite level, at its deepest in the far corner its about 8mm out.
Thinking about using self leveling on it.
I've also finished the internal blocks and the straps are in.
So here is an update of how I have progressed
As can be seen my slab retains a small lake after rain! Obviously not quite level, at its deepest in the far corner its about 8mm out.
Thinking about using self leveling on it.
I've also finished the internal blocks and the straps are in.

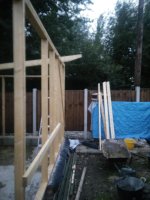
Basically completed my framing. Frame sat on bed of mortar on top of a DPC as per plans.
Did the ends as one piece but split the front and back into two as it was only me and my daughter lifting them onto the wall!!
I put an extra 4x2 on front and back as the rafters(6x2) are not going to sit over studs
Mike G":3cbb8kgw said:Good stuff Tez. It soon takes shape once you're framing.
What are those bricks in the foreground, just in front of your new plinth?
Part of an old brick garden wall. I took it down to that level and thought Id leave it there and infill between the slab and wall with stone chippings, protecting the DPM on at least 3 sides and providing some good drainage
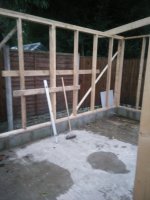
You can see the join where the 2 frames I split the back side into meet.Also started to screw straps onto frame
Also rafter number 1 cut. This is the first time I've done this so it took some experimenting. I decided rather than just a straight forward birds mouth I'd have the rafter touching both sides of the header.
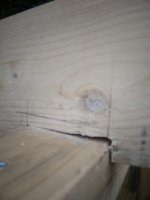
I found this tricky though and some of the joints left a lot to be desired(bad joint above)
Alhtough I did improve: Better joint
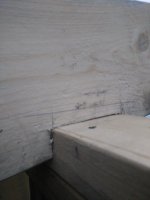
You can see the overhang I've left on the rafter. I've also cut it at a slight angle to try to give the finished roof a Japanese look, rafter is going to be exposed but have not quite decided on details at this point
- Joined
- Jul 21, 2014
- Messages
- 10,414
- Reaction score
- 165
Brilliant progress all inside 30 mins too :lol: :lol:
Bob
Bob
 In the picture below you can see the first stages in the construction of my warm roof. I didn't get any pictures of the osb decking(18mm) but you van see the vapour membrane on. I later had to remove this as it ripped in strong winds. I replaced it with a strong vapour proof layer using some DPM
I used 6x2 graded at 400mm centres for the rafters, so I would have the option in future of putting on a green roof.
9fingers":xrlaux83 said:Brilliant progress all inside 30 mins too :lol: :lol:
Bob
I'm like Speedy Gonzales once I get going!
I battened around the outside of the roof with some 50x50mm before putting on the 50mm insulation
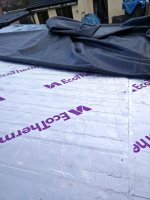
I put 50mm of PIR insulation on top of the vapour barrier. Normally you would then board over this with 9mm osb but it can be omittd and as this isn't for habitation I thought cost wise it would be overkill.
Attaching the PIR insulation was a bit of a problem as will explain in my next post.
You can see the firestone epdm ready to be layed, getting that up on the roof by myself was a big job.
I put 50mm of PIR insulation on top of the vapour barrier. Normally you would then board over this with 9mm osb but it can be omittd and as this isn't for habitation I thought cost wise it would be overkill.
Attaching the PIR insulation was a bit of a problem as will explain in my next post.
You can see the firestone epdm ready to be layed, getting that up on the roof by myself was a big job.
When installing a warm roof , the insulation(and board on top if any) need to be secured to the joists or board underneath. It seems most of the installers in my area just use either slab nails or helifix nails to fix the insulation. However when using these on a warm roof the heads will be on top of the insulation/board and as there is some compression and bounce back of the material when walked on eventually you can get the nail head breaking through the EPDM membrane. The best way to fix is to use plastic tube washers. The screw gets screwed thruoght the tube washer and its head ends up between 15-25mm under the surface of the insulation, thus stopping the danger of it breaking through the roof covering.
However I could not get hold of these locally and it was going to cost my £60 to order them online when I only needed 30. So I instead got some large washers, cut out a square 20mm deep piece of insulation and screwed into the raftrs as in picture below.

However I could not get hold of these locally and it was going to cost my £60 to order them online when I only needed 30. So I instead got some large washers, cut out a square 20mm deep piece of insulation and screwed into the raftrs as in picture below.

Heres the window for my workshop. Got it for £50 off a mate whos a window fitter, brand new but sent back as wrong sort of window.

I deliberately had'nt framed out the window as I didn't know the size I would be able to get hold of, but have done it now:
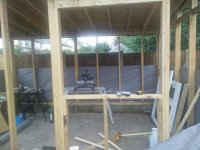
I deliberately had'nt framed out the window as I didn't know the size I would be able to get hold of, but have done it now: