• Hi all and welcome to TheWoodHaven2 brought into the 21st Century, kicking and screaming! We all have Alasdair to thank for the vast bulk of the heavy lifting to get us here, no more so than me because he's taken away a huge burden of responsibility from my shoulders and brought us to this new shiny home, with all your previous content (hopefully) still intact! Please peruse and feed back. There is still plenty to do, like changing the colour scheme, adding the banner graphic, tweaking the odd setting here and there so I have added a new thread in the 'Technical Issues, Bugs and Feature Requests' forum for you to add any issues you find, any missing settings or just anything you'd like to see added/removed from the feature set that Xenforo offers. We will get to everything over the coming weeks so please be patient, but add anything at all to the thread I mention above and we promise to get to them over the next few days/weeks/months. In the meantime, please enjoy!

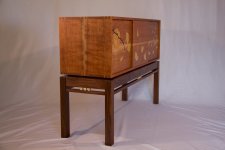
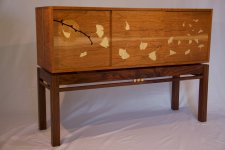
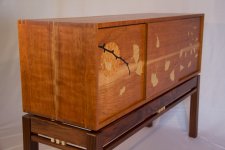
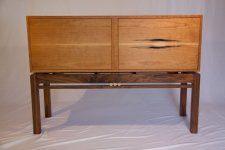
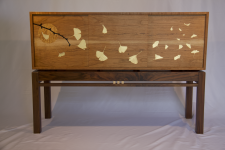
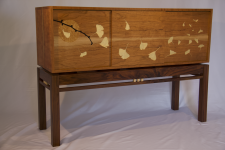
The Gingko Cabinet

Woodbloke

Sequoia
Joined
Jul 22, 2014
Messages
7,356
Reaction score
1,323
Location
Salisbury, UK
I very rarely use Faffbook these days, but I do look in from time to time to keep abreast of people that I've had engaging 'conversations' with in the past and Peter Franks from San Diego is one. Some little time ago, he sent me note on 'Messenger' requesting, if possible, a small parcel of Bog Oak (he was 'bereft of Bog Oak in the US :lol: )' which I duly posted to him, paying for it to go the long way round by sea. As it transpires, it went by air and he received it within a few days, thanking me profusely when it arrived and promising to use it in his next project.

Peter is employed by the Scripps Institute of Oceanography in San Diego and originally (so I believe) hails from Canada; even more impressively, he's visited the UK and sung in Salisbury Cathedral! He's also a very accomplished woodmangler and the other day posted his latest project on FB, which took six months to make. I asked him if he wouldn't mind if I uploaded the images to WH2 and I also invited him to become a member of our happy band (mostly :D ) to which he agreed on both counts.
298262537_5854709057895763_2602487324254582681_n.jpg

297336441_5855106951189307_6587251695157003706_n.jpg

298374448_5854708847895784_3396789446517831704_n.jpg

298286640_5854708941229108_3830187549279575681_n.jpg

298317781_5854709084562427_8402853007601928386_n.jpg

298065337_5854709074562428_7688400482839023428_n.jpg

We discussed the twin panelled back and Peter spent as much time making this section as any other part. Made in Claro Walnut and American Cherry; the gingko leaves are 24carat gold leaf :shock: Bog Oak twig courtesy of 'yours truly' :D No idea on the finish but with any luck, Peter will be along shortly to give us more details on the cabinet - Rob
 
Quality work. I like the floating cupboard concept. The whole base has a Japanese or oriental feel to me.
 
AJB Temple":oqsbtmhq said:
Quality work. I like the floating cupboard concept. The whole base has a Japanese or oriental feel to me.
Indeed Adrian; he's very keen on Japan as am I and you - Rob
 
I dunno how he can crank 'em out so quick! ;)

Seriously, it will be interesting to see how he achieves work at such a level.
 
To me it's the Ginko leaves that please the most as I have one of these trees with these beautiful leaves in the garden. I also love the cabinet - it's very different.
John
 
Hi Folks - I am the creator of this Gingko Cabinet. Thank you for having me here! And thank you to Rob for inviting me in - and for displaying some pictures of my cabinet. Really, the cabinet was built around that Bog Oak twig - it would not exist, except for that. (I jest - I was going to use black epoxy, but then remembered that I had the Bog Oak at hand. It worked much better than black epoxy...)

As Rob mentioned, I have a paying job as an oceanography professor - it keeps me in tools, and ensures that I can only complete about two pieces a year. If you have any ocean-related questions, please feel free to ask. I'll do my best to answer woodworking-related questions, too!

Thank you to all who posted complimentary words about my piece. I sincerely appreciate it.

And yes - in addition to singing at Salisbury Cathedral (and quite a few others), I lived in Oxford for 3 years as a youth, and fairly recent ancestors were from Birmingham (they couldn't help it). So I have a sense of what life is like on your lovely island. I do miss it (though it's cooler in San Diego than England right now!).

I'm looking forward to noodling around the site, and seeing your work!
 
Also, I noticed that Rob neglected to post the two "beauty shots" of the Gingko Cabinet. So here they are:

Gingko_Cabinet_1.png

Gingko_Cabinet_2.png
 
welcome Peter. You are clearly a craftsman of considerable ability. Would be nice to know some of your techniques. Such as the inlays for example and the floating construction support. Kind regards, Adrian
 
Thank you, Everyone!

Adrian, the inlays were done using the Shaper Origin. I first gathered some gingko leaves from local trees in the fall. I dangled them from a thread, and took pictures in various orientations. I then manipulated the photos in Photoshop to get a black and white image, and extracted the black leaf. Then in Illustrator, I arranged the leaves, moon, and twig, to get a pleasing pattern (it took about a year to get what I wanted - with lots of practice pieces in between. I have given away many little coasters and cutting boards...). I then used the Shaper to cut the pattern 0.07" deep (yes, we still use the *%^$ing Imperial system here), using successively smaller downcut spiral bits (1/4", 1/8", 1/16" and 1/32"). I then coated the inside of the pocket with two coats of gesso, and sanded it smooth. Then I applied size (which, when brushed on gave the veining effect you can see in the leaves), and the gold leaf. I then poured clear epoxy over each leaf, and sanded it smooth. The moon area was done in three steps: first the moon inlay, then the twig, and finally the leaves.

The supports for the upper box run front-to-back, joining the side-to-side aprons of the stand. There are four of them. They have little arcs cut into the upper front and back so that they're hard to see - the actual supporting part is set back from the edge of the box. They're all done in claro walnut.

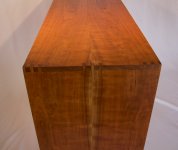
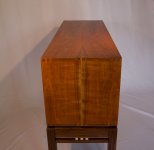
The box is bookmatched cherry, and the grain runs continuously all the way around the box. You can see the dovetails are grouped into three clusters of three - I like the interest and balance they give.

Hope this helps!
 
A question about the finish Peter; what did you use on the cabinet? It loos like it could be some type of oil/wax based finish on the cherry? - Rob
 
Woodbloke":kdsj6lh9 said:
A question about the finish Peter; what did you use on the cabinet? It loos like it could be some type of oil/wax based finish on the cherry? - Rob

That's right, Rob. I used Maloof's poly/oil finish. I used to sand to 1000 grit and put 6-8 coats of finish on. But I decided I didn't like the shiny, burnished look that the wood acquired. So instead, I sanded this piece to 320, and did only two coats of finish. It has a lovely texture to the hand, and a duller sheen, which I like. I'll probably stick with it.

My go-to finish for pieces that might get scratched or have wet things put on them is Min Wax Wipe-On Poly. It builds slowly, but gives a wonderfully resistant finish. But it looks a bit more plastic than the poly-oil finish. On one piece I did the cabinet top in Wipe-On Poly, and the rest of the cabinet in the poly-oil. Nobody has ever noticed that they're different finishes!
 
Thanks for the explanation Peter.

The inlay technique interests me as I have done quite a few (around 170) guitar neck inlays quite a few years ago, and it was always very time consuming as it was a hand tools job for me apart from a bit of light roughing out with a router.

Yours loom extremely crisp, but I am not familiar with the tool you refer to.

I would like to get back to that kind of skilled work.

KR, Adrian
 
AJB Temple":38yzbhaa said:
Thanks for the explanation Peter.

The inlay technique interests me as I have done quite a few (around 170) guitar neck inlays quite a few years ago, and it was always very time consuming as it was a hand tools job for me apart from a bit of light roughing out with a router.

Yours loom extremely crisp, but I am not familiar with the tool you refer to.

I would like to get back to that kind of skilled work.

KR, Adrian

You'll love this tool, Adrian. It's basically a hand-held CNC machine:
https://www.shapertools.com/
You create files in your favorite graphics program (I use Illustrator), save them as SVG files, transfer them to the Shaper (it has both WiFi and USB), lay the pattern down on your piece, and go to work! It's a little more complicated than that, but not much. I cut these inlays in about an hour; the smallest bit was 1/32" downcut spiral. It took a lot longer to do the gold leaf inlay and epoxy. Of course, you can cut a perfect inlay, too - the Shaper will work with wood, abalone, soft metals, plastic, etc. I just liked the look of the gold leaf.

Have you posted your guitar necks on here? I'd love to see some.
 
amazing work peter! very neat and precise, a true heirloom quality piece, that's something to be proud of.
 
thetyreman":389zbt6r said:
amazing work peter! very neat and precise, a true heirloom quality piece, that's something to be proud of.

Thank you so much, Ben!
 
Peter F.":sbvregyu said:
Woodbloke":sbvregyu said:
A question about the finish Peter; what did you use on the cabinet? It looks like it could be some type of oil/wax based finish on the cherry? - Rob

That's right, Rob. I used Maloof's poly/oil finish. I used to sand to 1000 grit and put 6-8 coats of finish on. But I decided I didn't like the shiny, burnished look that the wood acquired. So instead, I sanded this piece to 320, and did only two coats of finish. It has a lovely texture to the hand, and a duller sheen, which I like. I'll probably stick with it.
I thought that might be the case; I've started to use poly/oil finish as well, but on the current oak project, it's been sanded to around 180g as it's open grained, and then three coats max of finish applied with a white cloth. When bone dry, it's de-nibbled with 600g and then a coat of wax polish applied over the top using a grey webrax pad - Rob
 
Back
Top